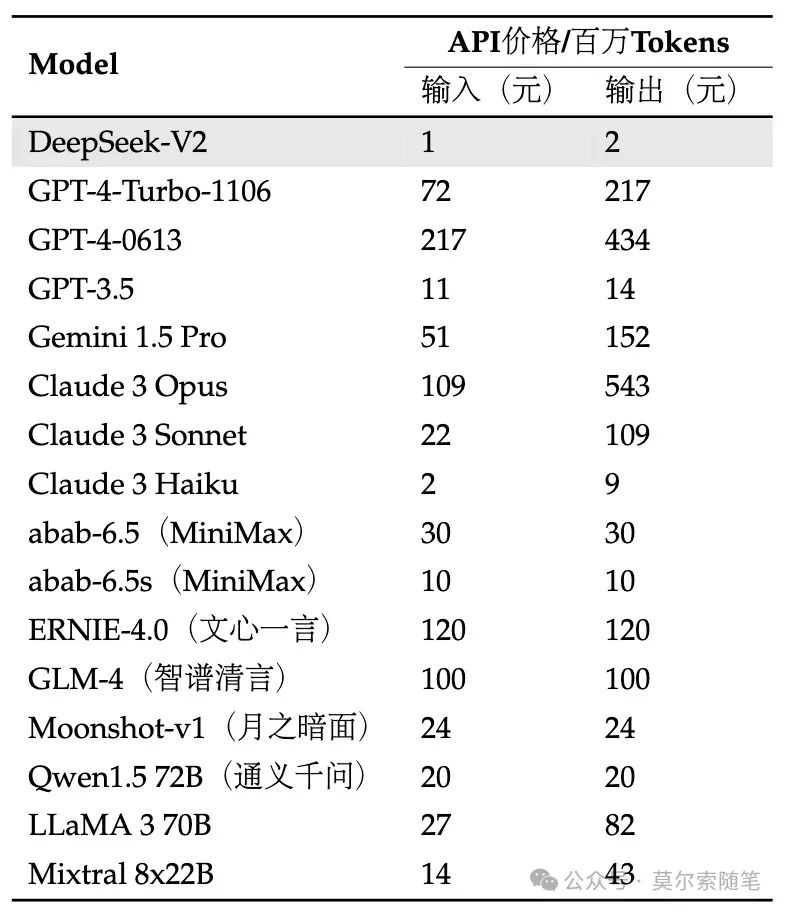
 DeepSeek-V2 在中文方面是最好用的,價(jià)格也是最便宜的(社區(qū)里微調(diào) LLaMA3-70B 中文版的朋友估計(jì)哭暈在廁所了 ??)
 DeepSeek-V2 在中文方面是最好用的,價(jià)格也是最便宜的(社區(qū)里微調(diào) LLaMA3-70B 中文版的朋友估計(jì)哭暈在廁所了 ??)

對(duì) Transformer 架構(gòu)中的自注意力機(jī)制進(jìn)行了全方位的創(chuàng)新
更詳細(xì)的技術(shù)解讀請(qǐng)看這篇 ?? 幻方發(fā)布全球最強(qiáng) MOE 大模型!DeepSeek-V2
一句話(huà)總結(jié):參數(shù)更多、能力更強(qiáng)、成本更低!當(dāng)然能不能干活,我得試了才知道,所以我決定使用 LangChain 的 LangGraph 組件構(gòu)建一個(gè)編碼類(lèi) Agent 測(cè)試下(編碼能力、工具調(diào)用能力、推理能力),順便提下,自從上次 LLaMA3-70B 發(fā)布,我還在測(cè)試其在各類(lèi)開(kāi)源 Agent 項(xiàng)目中的實(shí)際效果,接下來(lái)要替換為 DeepSeek-V2 了。

LangGraph 是一套構(gòu)建于 LangChain 框架之上的開(kāi)發(fā)組件,可以與 LangChain 現(xiàn)有的鏈(Chain)、LCEL(LangChain Express Language)等無(wú)縫協(xié)作,與其生態(tài)系統(tǒng)完全兼容。
LangGraph 受到 NetworkX 框架的啟發(fā),將應(yīng)用流程抽象為一個(gè)圖,其中節(jié)點(diǎn)表示一個(gè)函數(shù)調(diào)用或一次大模型調(diào)用,而邊(則代表了節(jié)點(diǎn)的執(zhí)行順序(即數(shù)據(jù)流),并且可以通過(guò)設(shè)置條件邊(conditional edge)來(lái)實(shí)現(xiàn)流程的分支控制,進(jìn)而基于此圖編譯生成相應(yīng)的應(yīng)用。在任務(wù)執(zhí)行期間,系統(tǒng)維護(hù)一個(gè)中央狀態(tài)對(duì)象(state),該對(duì)象會(huì)隨著節(jié)點(diǎn)跳轉(zhuǎn)而持續(xù)更新,其包含的屬性可根據(jù)需求自由定義,這種方式使得創(chuàng)建具有狀態(tài)管理和可控循環(huán)的 LLM 應(yīng)用變得容易,比如多 Agent 應(yīng)用。LangGraph 的作用包括:
下面是官方通過(guò)使用 LangGraph 構(gòu)建 RAG 應(yīng)用的示意圖,晰地闡釋了 LangGraph 中的 3 個(gè)核心概念:
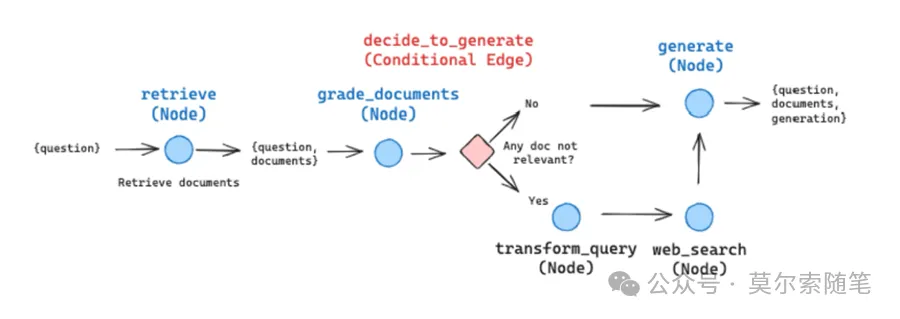 – StateGraph:狀態(tài)圖。通過(guò)提供狀態(tài)定義來(lái)初始化此類(lèi),該狀態(tài)定義代表了一個(gè)隨時(shí)間推移而更新的核心狀態(tài)對(duì)象。
下面的代碼展示了如何基于 DeepSeek-V2 和 LangGraph 實(shí)現(xiàn)一個(gè) AI 編碼代理,為 Python 代碼自動(dòng)編寫(xiě)單元測(cè)試。部分代碼參考自 Build an AI Coding Agent with LangGraph by LangChain[3]
首先配置環(huán)境,并安裝基礎(chǔ)依賴(lài)。
mkdir langgraph_test && cd langgraph_test

python3 -m venv env

source env/bin/activate

pip install langgraph langchain langchain_openai colorama
創(chuàng)建示例文件
# 定義搜索路徑,即app目錄的絕對(duì)路徑

search_path = os.path.join(os.getcwd(), "app")


# 定義crud.py文件的路徑,該文件位于search_path/src目錄下

code_file = os.path.join(search_path, "src/crud.py")


# 定義測(cè)試文件test_crud.py的路徑,該文件位于search_path/test目錄下

test_file = os.path.join(search_path, "test/test_crud.py")


# 檢查search_path路徑是否存在,如果不存在則創(chuàng)建

if not os.path.exists(search_path):

    os.mkdir(search_path)


# 創(chuàng)建search_path目錄

    os.mkdir(os.path.join(search_path, "src"))


# 在search_path下創(chuàng)建src目錄

    os.mkdir(os.path.join(search_path, "test"))


# 在search_path下創(chuàng)建test目錄


# 定義一個(gè)包含Item類(lèi)和CRUDApp類(lèi)的字符串,這些類(lèi)將被寫(xiě)入到code_file文件中

code = """

class Item:

    def __init__(self, id, name, description=None):

        self.id = id


# 初始化Item對(duì)象的id屬性

        self.name = name


# 初始化Item對(duì)象的name屬性

        self.description = description


# 初始化Item對(duì)象的description屬性,可省略


    def __repr__(self):


# 定義對(duì)象的字符串表示方法,便于打印和調(diào)試

        return f"Item(id={self.id}, name={self.name}, description={self.description})"


class CRUDApp:

    def __init__(self):

        self.items = []


# 初始化一個(gè)空列表,用于存儲(chǔ)Item對(duì)象


    def create_item(self, id, name, description=None):


# 創(chuàng)建一個(gè)Item對(duì)象,并將其添加到items列表中

        item = Item(id, name, description)

        self.items.append(item)

        return item


# 返回創(chuàng)建的Item對(duì)象


    def read_item(self, id):


# 根據(jù)id讀取Item對(duì)象

        for item in self.items:

            if item.id == id:

                return item


# 如果找到匹配的id,返回Item對(duì)象

        return None


# 如果沒(méi)有找到匹配的id,返回None


    def update_item(self, id, name=None, description=None):


# 根據(jù)id更新Item對(duì)象的name和/或description屬性

        for item in self.items:

            if item.id == id:

                if name:

                    item.name = name


# 如果提供了name,更新Item對(duì)象的name屬性

                if description:

                    item.description = description


# 如果提供了description,更新Item對(duì)象的description屬性

                return item


# 更新完成后返回Item對(duì)象

        return None


# 如果沒(méi)有找到匹配的id,返回None


    def delete_item(self, id):


# 根據(jù)id刪除Item對(duì)象

        for index, item in enumerate(self.items):

            if item.id == id:

                return self.items.pop(index)


# 如果找到匹配的id,從列表中移除Item對(duì)象并返回

        return None


# 如果沒(méi)有找到匹配的id,返回None


    def list_items(self):


# 返回所有存儲(chǔ)的Item對(duì)象的列表

        return self.items

"""


# 使用with語(yǔ)句打開(kāi)code_file文件進(jìn)行寫(xiě)入

with open(code_file, 'w') as f:

    f.write(code)


# 將code字符串寫(xiě)入到文件中
示例文件創(chuàng)建好后,接下來(lái)編寫(xiě) Agent 處理邏輯,即為這段代碼(code 字符串內(nèi)容)自動(dòng)生成單元測(cè)試。
開(kāi)始之前先設(shè)置好 DeepSeek-V2 大模型,由于 API 格式與 OpenAI 兼容 ,所以可以直接使用 OpenAI SDK (langchain_openai)來(lái)訪(fǎng)問(wèn) DeepSeek API。
llm = ChatOpenAI(base_url="https://api.deepseek.com/v1",

    api_key=os.getenv("DEEPSEEK_KEY"),

    model="deepseek-chat")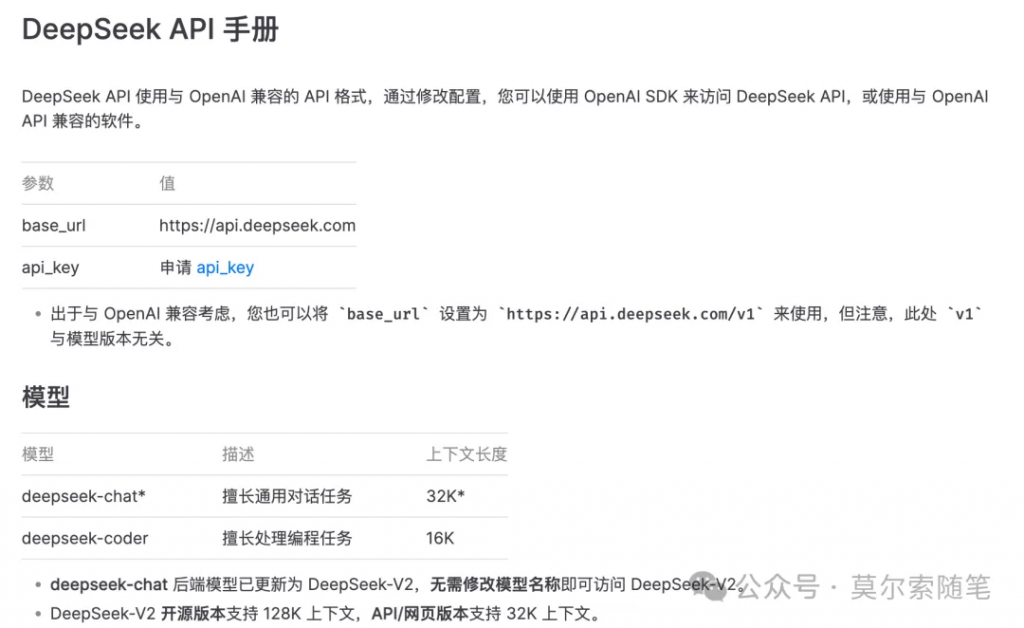
首先定義一個(gè) AgentState,負(fù)責(zé)在執(zhí)行過(guò)程中跟蹤代理的狀態(tài)。這主要是一個(gè) TypedDict 類(lèi),其中包含 Agent 狀態(tài)相關(guān)屬性。
class AgentState(TypedDict):


# 定義AgentState類(lèi)型,用于存儲(chǔ)代理的狀態(tài)

    class_source: str

    class_methods: List[str]

    tests_source: str# 創(chuàng)建StateGraph

workflow = StateGraph(AgentState)
class_source 存儲(chǔ)代碼中的 Python 類(lèi)名稱(chēng),class_methods 用于存儲(chǔ) Python 類(lèi)類(lèi)的方法,tests_source 用于存儲(chǔ)生成的單元測(cè)試代碼。
現(xiàn)在為 AgentState 添加節(jié)點(diǎn),這里需要定義 3 個(gè)節(jié)點(diǎn),一個(gè)用于查找類(lèi)方法的節(jié)點(diǎn),一個(gè)用于更新單元測(cè)試到狀態(tài)對(duì)象的節(jié)點(diǎn),一個(gè)用于將生成的單元測(cè)試寫(xiě)入測(cè)試文件的節(jié)點(diǎn)
代碼解析函數(shù)
開(kāi)始之前先聲明一個(gè)提取源代碼的工具函數(shù),這里假設(shè)代碼片段在“`內(nèi)
def extract_code_from_message(message):

    lines = message.split("n")


# 按行分割消息

    code = ""

    in_code = False# 標(biāo)記是否在代碼塊中

    for line in lines:

        if "```" in line:# 檢查是否是代碼塊的開(kāi)始或結(jié)束

            in_code = not in_code

        elif in_code:# 如果在代碼塊中,則累加代碼

            code += line + "n"

    return code# 返回提取的代碼
現(xiàn)在開(kāi)始定義節(jié)點(diǎn)
節(jié)點(diǎn) 1 用于查找類(lèi)方法的節(jié)點(diǎn)
)
# 沒(méi)有要寫(xiě)的測(cè)試”且不要包含類(lèi)。

示例:

def test_function():

    ...

請(qǐng)務(wù)必遵循指令并編寫(xiě)高質(zhì)量的測(cè)試,不要寫(xiě)測(cè)試類(lèi),只寫(xiě)方法。

"""


import_prompt_template = """

這是一條包含代碼文件路徑的信息:{code_file}。

這是一條包含測(cè)試文件路徑的信息:{test_file}。

請(qǐng)為文件中的類(lèi)編寫(xiě)正確的導(dǎo)入語(yǔ)句。

"""


# 發(fā)現(xiàn)類(lèi)及其方法

def discover_function(state: AgentState):

    assert os.path.exists(code_file)


# 確保代碼文件存在

    with open(code_file, "r") as f:


# 打開(kāi)代碼文件進(jìn)行讀取

        source = f.read()


# 讀取文件內(nèi)容

    state["class_source"] = source


# 將源代碼存儲(chǔ)在狀態(tài)中


# 獲取方法

    methods = []

    for line in source.split("n"):

        if "def " in line:


# 如果行中包含def,表示這是一個(gè)方法定義

            methods.append(line.split("def ")[1].split("(")[0])

    state["class_methods"] = methods


# 將方法名存儲(chǔ)在狀態(tài)中


# 生成導(dǎo)入語(yǔ)句并啟動(dòng)代碼

    import_prompt = import_prompt_template.format(

        code_file=code_file,


# 格式化導(dǎo)入提示模板

        test_file=test_file

    )

    message = llm.invoke([HumanMessage(content=import_prompt)]).content


# 調(diào)用模型生成消息

    code = extract_code_from_message(message)


# 提取消息中的代碼

    state["tests_source"] = code + "nn"


# 將測(cè)試源代碼存儲(chǔ)在狀態(tài)中


    return state


# 返回更新后的狀態(tài)


# 將節(jié)點(diǎn)添加到工作流中

workflow.add_node(

    "discover",


# 節(jié)點(diǎn)名稱(chēng)

    discover_function


# 節(jié)點(diǎn)對(duì)應(yīng)的函數(shù)

)
上面的代碼片段中從 AgentState 的 class_source 元素中提取代碼,并將它們傳遞給 LLM ,然后將 LLM 的響應(yīng)存儲(chǔ)在 AgentState 的 tests_source 元素中。
節(jié)點(diǎn) 2 更新單元測(cè)試到狀態(tài)對(duì)象的節(jié)點(diǎn)
workflow.add_node(
"write_tests",
write_tests_function
)
def write_tests_function(state: AgentState):


# 獲取下一個(gè)要編寫(xiě)測(cè)試的方法

    class_method = state["class_methods"].pop(0)

    print(f"為{class_method}編寫(xiě)測(cè)試。")


# 獲取源代碼

    class_source = state["class_source"]


# 創(chuàng)建提示

    write_test_prompt = write_test_template.format(

        class_source=class_source,

        class_method=class_method

    )

    print(colorama.Fore.CYAN + write_test_prompt + colorama.Style.RESET_ALL)


# 打印提示信息


# 獲取測(cè)試源代碼

    system_message = SystemMessage(system_message_template)


# 創(chuàng)建系統(tǒng)消息

    human_message = HumanMessage(write_test_prompt)


# 創(chuàng)建人類(lèi)消息

    test_source = llm.invoke([system_message, human_message]).content


# 調(diào)用模型生成測(cè)試代碼

    test_source = extract_code_from_message(test_source)


# 提取消息中的測(cè)試代碼

    print(colorama.Fore.GREEN + test_source + colorama.Style.RESET_ALL)


# 打印測(cè)試代碼

    state["tests_source"] += test_source + "nn"


# 將測(cè)試源代碼添加到狀態(tài)中


    return state


# 返回更新后的狀態(tài)


# 將編寫(xiě)測(cè)試節(jié)點(diǎn)添加到工作流中

workflow.add_node(

    "write_tests",

    write_tests_function

)
讓 LLM 為每個(gè)方法編寫(xiě)測(cè)試用例,并更新到 AgentState 的 tests_source 元素中。
節(jié)點(diǎn) 3 將生成的單元測(cè)試寫(xiě)入測(cè)試文件
# 編寫(xiě)文件

def write_file(state: AgentState):

    with open(test_file, "w") as f:


# 打開(kāi)測(cè)試文件進(jìn)行寫(xiě)入

        f.write(state["tests_source"])# 寫(xiě)入測(cè)試源代碼

    return state# 返回狀態(tài)# 將寫(xiě)文件節(jié)點(diǎn)添加到工作流中

workflow.add_node(

    "write_file",

    write_file
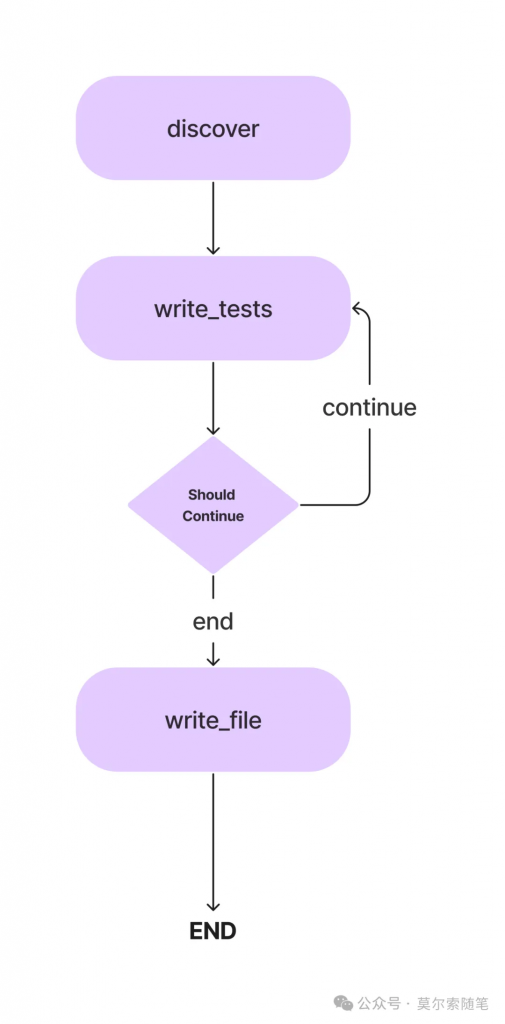
)現(xiàn)在已經(jīng)有 3 個(gè)節(jié)點(diǎn),接下來(lái)定義邊用于指定它們之間的執(zhí)行方向。Agent 工作流從查找類(lèi)方法的節(jié)點(diǎn)開(kāi)始執(zhí)行,然后轉(zhuǎn)到編寫(xiě)單元測(cè)試的節(jié)點(diǎn)。
 “`
“`
workflow.set_entry_point("discover")
workflow.add_edge("discover", "write_tests")
add_conditional_edge 函數(shù)添加了 write_tests 函數(shù)和 should_continue 函數(shù),該函數(shù)根據(jù) class_methods 條目決定采取哪一步,def should_continue(state: AgentState):
if len(state["class_methods"]) == 0:
return "end"else:
return "continue"workflow.add_conditional_edges(
"write_tests",
should_continue,{
"continue": "write_tests", "end": "write_file"})
workflow.add_edge("write_file", END)
當(dāng)從 LLM 生成所有方法的單元測(cè)試后,測(cè)試代碼被寫(xiě)入測(cè)試文件。


### __4. 執(zhí)行工作流__


最后剩下的就是編譯工作流并運(yùn)行它。
app = workflow.compile()
inputs = {}
config = RunnableConfig(recursion_limit=100)
try:
result = app.invoke(inputs, config)
print(result)except GraphRecursionError:
print("達(dá)到圖遞歸限制。")遞歸限制是給定工作流的 LLM 進(jìn)行循環(huán)推理的次數(shù),當(dāng)超過(guò)限制時(shí),工作流停止。
### __5. 生成的單元測(cè)試文件__
下面是最終生成的 test_crud.py 文件的內(nèi)容,大家自行評(píng)判。class TestDict(unittest.TestCase):
def test_crudapp_init():
app = CRUDApp() assert app.items == []
def test_item_repr():
item = Item(1, 'Test Item', 'This is a test item')
expected_repr = "Item(id=1, name=Test Item, description=This is a test item)"
assert repr(item) == expected_repr
def test_crudapp_init(): app = CRUDApp() assert app.items == []
def test_create_item(): app = CRUDApp() item = app.create_item(1, 'Test Item') assert item in app.list_items()
assert item.id == 1
assert item.name == 'Test Item'
assert item.description is None another_item = app.create_item(2, 'Another Test Item')
assert another_item in app.list_items()
assert another_item.id == 2
assert another_item.name == 'Another Test Item'
assert another_item.description is None assert len(app.list_items()) == 2
def test_read_item(): app = CRUDApp() test_item = app.create_item(1, 'Test Item') read_item = app.read_item(1)
assert read_item == test_item non_existent_item = app.read_item(99)
assert non_existent_item is None
def test_update_item(): app = CRUDApp() item = app.create_item(1, 'Test Item') updated_item = app.update_item(1, 'Updated Test Item') assert updated_item is not None
assert updated_item.id == 1
assert updated_item.name == 'Updated Test Item'
assert updated_item.description is None listed_items = app.list_items()
assert len(listed_items) == 1
assert listed_items[0].id == 1
assert listed_items[0].name == 'Updated Test Item'
assert listed_items[0].description is None non_existent_item = app.update_item(2, 'Non Existent Item')
assert non_existent_item is None updated_item_description = app.update_item(1, description='Updated Test Description') assert updated_item_description is not None
assert updated_item_description.id == 1
assert updated_item_description.name == 'Updated Test Item'
assert updated_item_description.description == 'Updated Test Description' listed_items = app.list_items()
assert len(listed_items) == 1
assert listed_items[0].id == 1
assert listed_items[0].name == 'Updated Test Item'
assert listed_items[0].description == 'Updated Test Description'
def test_delete_item(): app = CRUDApp() item1 = app.create_item(1, 'Item 1')
item2 = app.create_item(2, 'Item 2') assert item1 in app.list_items()
assert item2 in app.list_items() deleted_item = app.delete_item(1) assert deleted_item == item1
assert item1 not in app.list_items()
assert item2 in app.list_items() deleted_nonexistent_item = app.delete_item(3) assert deleted_nonexistent_item is None
def test_list_items(): app = CRUDApp() item1 = app.create_item(1, 'Item 1')
item2 = app.create_item(2, 'Item 2', 'This is item 2') listed_items = app.list_items()
assert item1 in listed_items
assert item2 in listed_items assert len(listed_items) == 2## 結(jié)論
生成的單元測(cè)試,屬于是一種基本可用的狀態(tài),多次(10 次)執(zhí)行輸出的結(jié)果也較為穩(wěn)定,通過(guò)和 GPT-4-Turbo、GLM-4 生成的進(jìn)行比較,DeepSeek-V2 在一些 Agent 應(yīng)用場(chǎng)景確實(shí)可以做到平替,畢竟百分之一的成本,性?xún)r(jià)比在這里擺著,還要啥自行車(chē),等我后續(xù)在其他更復(fù)雜的 Agent 項(xiàng)目進(jìn)行進(jìn)一步驗(yàn)證。
## 參考資料
[1]瘋狂的幻方:一家隱形 AI 巨頭的大模型之路: *https://36kr.com/p/2272896094586500*
[2]MoE 架構(gòu): *https://baoyu.io/translations/llm/what-is-mixture-of-experts*
[3]Build an AI Coding Agent with LangGraph by LangChain: *https://www.analyticsvidhya.com/blog/2024/03/build-an-ai-coding-agent-with-langgraph-by-langchain/*
文章轉(zhuǎn)自[微信公眾號(hào)@莫爾索隨筆](https://mp.weixin.qq.com/s/cVbwsPutLjAMj9z7nY0g3A)