
PixVerse V3 API Key 獲取:全面指南與實踐
這種機器識別出人眼不能識別的圖案的能力,讓我們再一次開始思考機器視覺和人類視覺的不同。DeepDream像一個有著無限想象力的嬰兒人工智能,把我們周圍的世界看作它的畫布。
實際上,Google DeepDream真正想要了解的,是神經網絡黑盒子的工作邏輯。神經網絡在識別圖像時,層數越多越細致。第一層可能在識別輪廓,中間層可能在識別紋理和筆觸。DeepDream通過增強這些識別過程,生成了我們現在看到的夢幻圖像。
DeepDream人工神經網絡主要包含10到30個人工神經元對疊層。每個圖像存儲在輸入層中,然后與下一個層級通信,直至最終到達輸出層。我們可以選取一個層級并命令網絡增強監測到的任何內容,因而網絡將在接下來的層級中對于我們命令的形象識別更為敏感。
在使用DeepDream之前,需要準備合適的開發環境。通常,我們需要Python和TensorFlow的支持。此外,還需要一些圖像處理庫,如PIL或OpenCV。
!pip install tensorflow
!pip install pillow
準備好開發環境后,我們就可以開始探索DeepDream的功能了。
首先,我們需要加載一個預訓練的模型。在此例中,我們使用InceptionV3模型,并選擇合適的層進行激活。
import tensorflow as tf
base_model = tf.keras.applications.InceptionV3(include_top=False, weights='imagenet')
names = ['mixed3', 'mixed5']
layers = [base_model.get_layer(name).output for name in names]
deepdream_model = tf.keras.Model(inputs=base_model.input, outputs=layers)接下來,我們需要對輸入圖像進行預處理。通常,我們會調整圖像大小并進行歸一化。
from PIL import Image
import numpy as np

image = Image.open('your_image.jpg').resize((225, 375))
image = np.array(image) / 255.0
image = tf.keras.preprocessing.image.img_to_array(image)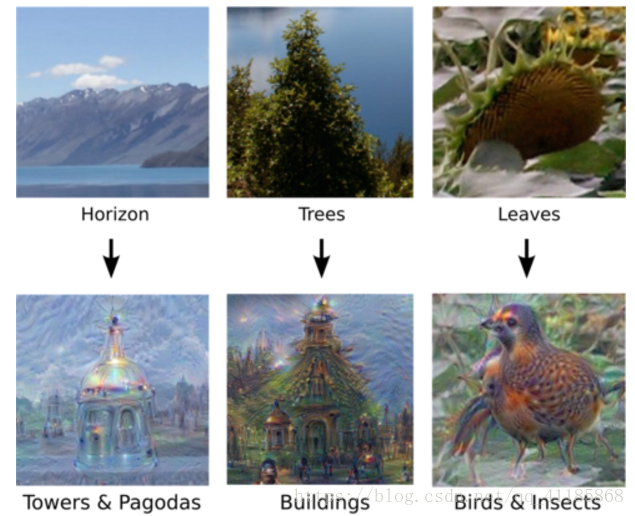
使用DeepDream模型生成夢幻圖像的核心在于通過梯度上升來增強圖像中的特定特征。
@tf.function
def deepdream(model, image, step_size):
    with tf.GradientTape() as tape:
        tape.watch(image)
        loss = calc_loss(image, model)
    gradients = tape.gradient(loss, image)
    gradients /= tf.math.reduce_std(gradients)
    image = image + gradients * step_size
    image = tf.clip_by_value(image, -1, 1)
return loss, image在執行完所有步驟后,我們可以查看生成的夢幻圖像。
def run_deep_dream(model, image, steps=100, step_size=0.01):
    for step in range(steps):
        loss, image = deepdream(model, image, step_size)
        if step % 100 == 0:
            plt.imshow(deprocess(image))
            plt.show()
return deprocess(image)問:DeepDream的主要應用場景是什么?
問:如何提高DeepDream生成圖像的質量?
問:使用DeepDream需要哪些基礎知識?
通過本文的介紹,您應該能夠理解如何使用DeepDream生成獨特的夢幻圖像。希望本文能幫助您更好地探索這一強大的工具。