區塊鏈API推薦,快速開發去中心化應用
安裝 Python 后,您需要一個編寫 Python 代碼的地方。基本上,您需要一個 IDE。
集成開發環境 (IDE) 提供了編寫、測試和調試代碼的工具。一些流行的 Python 開發 IDE 是:
歸根結底,IDE的選擇取決于個人偏好。以上所有選項都配備了運行 Python 代碼的能力,并且可以很好地用于我們的網絡爬蟲目的。因此,請選擇適合您偏好的 IDE。
從本質上講,Python 庫是預打包函數和方法的集合,它們允許你在不需要從頭開始編寫所有內容的情況下執行許多操作。庫是軟件開發不可或缺的一部分。最常用的安裝Python庫的方式是使用pip,Python的包管理系統。
使用pip安裝庫非常簡單:
requests 庫,您可以鍵入 pip install requests。很簡單,對吧?現在您已經掌握了必要的基礎知識,讓我們來了解使Python成為網絡爬蟲如此強大和流行的語言的Python庫。
要在 Python 中開始網頁抓取,您需要兩個關鍵工具:HTTP客戶端(例如HTTPX)用于請求網頁,以及HTML解析器(如BeautifulSoup)來提取并理解數據。
在這一部分,我們將逐步介紹爬蟲過程,并解釋每一步涉及的技術。通過這個過程,你將學會如何使用BeautifulSoup與HTTPX從Hacker News首頁的所有文章中提取標題、排名和URL。
第一步是向目標頁面發送請求并檢索其 HTML 內容。使用 HTTPX 只需幾行代碼即可完成此操作:
?? 安裝 HTTPX
pip install httpx運行下面的代碼。
import httpx


response = httpx.get('https://news.ycombinator.com')


html = response.text


print(html[:200])  # print first 200 characters of html
這段代碼片段通過發送GET請求獲取Hacker News首頁的HTML內容,并將前200個字符打印出來,以驗證是否成功獲取了頁面的HTML。這是通過使用httpx.get發送請求并將HTML內容存儲在一個名為html的變量中來實現的。然而,原始的HTML對人們閱讀并不友好。為了以結構化的形式提取有用的數據,需要使用BeautifulSoup來解析這個HTML。
BeautifulSoup 是一個 Python 庫,可幫助您從 HTML 和 XML 文件中提取數據。它對用戶友好,非常適合中小型項目,因為它設置快速并且可以有效地解析內容。如前所述,BeautifulSoup 通常與 HTTP 請求庫配對。就像 HTTPX 一樣。現在,讓我們將所有內容結合起來,以結構化格式從 Hacker News 首頁上的所有文章中抓取數據。
BeautifulSoup + HTTPX 代碼從 Hacker News 首頁的所有文章中提取標題內容、排名和 URL:
import httpx

from bs4 import BeautifulSoup


# Function to get HTML content from a URL

def get_html_content(url: str, timeout: int = 10) -> str:

    response = httpx.get(url, timeout=timeout)

    return str(response.text)


# Function to parse a single article

def parse_article(article) -> dict:

    url = article.find(class_='titleline').find('a').get('href')

    title = article.find(class_='titleline').get_text()

    rank = article.find(class_='rank').get_text().replace('.', '')

    return {'url': url, 'title': title, 'rank': rank}


# Function to parse all articles in the HTML content

def parse_html_content(html: str) -> list:

    soup = BeautifulSoup(html, features='html.parser')

    articles = soup.find_all(class_='athing')

    return [parse_article(article) for article in articles]


# Main function to get and parse HTML content

def main() -> None:

    html_content = get_html_content('https://news.ycombinator.com')

    data = parse_html_content(html_content)

    print(data)


if __name__ == '__main__':

    main()


# Expected Output:

'''

[

   {

      "url":"https://ian.sh/tsa",

      "title":"Bypassing airport security via SQL injection (ian.sh)",

      "rank":"1"

   },

   {

      "url":"https://www.elastic.co/blog/elasticsearch-is-open-source-again",

      "title":"Elasticsearch is open source, again (elastic.co)",

      "rank":"2"

   },

     ...

   {

      "url":"https://languagelog.ldc.upenn.edu/nll/?p=73",

      "title":"Two Dots Too Many (2008) (upenn.edu)",

      "rank":"29"

   },

   {

      "url":"https://collidingscopes.github.io/ascii/",

      "title":"Show HN: turn videos into ASCII art (open source, js+canvas) (collidingscopes.github.io)",

      "rank":"30"

   }

]

'''
上面的代碼包含多個協同工作的函數,用于抓取和解析Hacker News的首頁。首先,它使用httpx獲取HTML內容,然后針對特定的CSS選擇器,使用BeautifulSoup提取每篇文章的標題、排名和URL。最后,所有這些邏輯被整合到一個主函數中,該函數將文章的詳細信息收集到一個列表中,然后打印出來。
從 Hacker News 首頁的 30 篇文章中抓取數據后,接下來是時候擴展你的抓取器,以從所有文章中提取數據了。這涉及處理 “分頁”,這是 Web 抓取中的一個常見挑戰。為了解決這個問題,您需要瀏覽該網站以了解其分頁的工作原理,然后相應地調整您的代碼。
下面是 Hacker News 的屏幕截圖,突出顯示了實現分頁所需的關鍵元素。你還會找到更新后的代碼,從所有頁面抓取文章。
import httpx

from bs4 import BeautifulSoup

import time


# Function to get HTML content from a URL

def get_html_content(url: str, timeout: int = 10) -> str:

    response = httpx.get(url, timeout=timeout)

    return str(response.text)


# Function to parse a single article

def parse_article(article) -> dict:

    url = article.find(class_='titleline').find('a').get('href')

    title = article.find(class_='titleline').get_text()

    rank = article.find(class_='rank').get_text(strip=True).replace('.', '')

    return {'url': url, 'title': title, 'rank': rank}


# Function to parse all articles in the HTML content

def parse_html_content(html: str) -> list:

    soup = BeautifulSoup(html, 'html.parser')

    articles = soup.find_all(class_='athing')

    return [parse_article(article) for article in articles]


# Main function to get and parse HTML content from all pages

def main() -> None:

    base_url = 'https://news.ycombinator.com'

    page_number = 1

    all_data = []


    while True:

        url = f'{base_url}/?p={page_number}'

        html_content = get_html_content(url)

        data = parse_html_content(html_content)

        all_data.extend(data)


        soup = BeautifulSoup(html_content, 'html.parser')

        more_link = soup.select_one('.morelink')

        if not more_link:

            break


        page_number += 1

        time.sleep(2)  # Adding a 2-second delay between requests


    print(all_data)


if __name__ == '__main__':

    main()
此代碼擴展了用于抓取第一頁的初始代碼段,并對函數進行了一些調整。現在,它通過循環遍歷多個頁面來處理這些頁面,更新URL中的頁碼,并使用與之前相同的解析函數。
雖然 BeautifulSoup 和 HTTPX 非常適合抓取靜態網站,但它們無法處理通過 JavaScript 加載內容的動態網站。
為此,我們使用 Playwright,這是一個瀏覽器自動化庫,可捕獲完全呈現的頁面,包括動態內容。Playwright 之所以有效,是因為它控制著一個真實的 Web 瀏覽器,但它比 BeautifulSoup 更耗費資源且速度更慢。因此,請在確實必要的情況下才使用Playwright,對于更直接的任務,請堅持使用我們之前的解決方案。
?? 安裝
# Install the Playwright package

pip install playwright


# Install the necessary browser binaries (Chromium, Firefox, and WebKit)

playwright install
目標是在 MintMobile 的第一頁上抓取每個產品的名稱、價格和 URL。以下是使用 Playwright 執行此操作的方法:
import asyncio

from playwright.async_api import async_playwright


async def main():

    async with async_playwright() as p:

        browser = await p.firefox.launch(headless=False)

        page = await browser.new_page()

        await page.goto("https://phones.mintmobile.com/")


        # Create a list to hold the scraped data

        data_list = []


        # Wait for the products to load

        await page.wait_for_selector('ul.products > li')


        products = await page.query_selector_all('ul.products > li')


        for product in products:

            url_element = await product.query_selector('a')

            name_element = await product.query_selector('h2')

            price_element = await product.query_selector('span.price > span.amount')


            if url_element and name_element and price_element:

                data = {

                    "url": await url_element.get_attribute('href'),

                    "name": await name_element.inner_text(),

                    "price": await price_element.inner_text()

                }

                data_list.append(data)


    await browser.close()


    print(data_list)


asyncio.run(main())
此代碼使用 Playwright 啟動 Firefox 瀏覽器,導航到 MintMobile 手機頁面,然后等待產品加載。產品可見后,它會選擇頁面上的所有產品元素并循環訪問它們以提取每個產品的 URL、名稱和價格。這些細節隨后被存儲在一個名為data_list的列表中。
最后,收集數據后,關閉瀏覽器,并打印抓取的產品詳細信息列表。
這很好用,但僅僅打印數據并不太實用。接下來,讓我們看看如何將此數據保存到 CSV 文件。
在Python中將抓取的數據保存到CSV文件相當簡單。只需導入Python內置的csv模塊,并使用下面的代碼:
import csv


    # Save the data to a CSV file

    with open('products.csv', mode='w', newline='') as file:

        writer = csv.DictWriter(file, fieldnames=["url", "name", "price"])

        writer.writeheader()

        writer.writerows(data_list)
這段代碼將抓取的數據保存到名為products.csv的CSV文件中。它創建該文件,并使用csv.DictWriter來寫入數據,其中“url”、“name”和“price”作為列標題。writeheader()函數添加這些標題,而writerows(data_list)則將每個產品的詳細信息寫入文件。
以下是完整代碼的最終版本:
import asyncio

import csv

from playwright.async_api import async_playwright


async def main():

    async with async_playwright() as p:

        browser = await p.firefox.launch(headless=False)

        page = await browser.new_page()

        await page.goto("https://phones.mintmobile.com/")


        # Create a list to hold the scraped data

        data_list = []


        # Wait for the products to load

        await page.wait_for_selector('ul.products > li')


        products = await page.query_selector_all('ul.products > li')


        for product in products:

            url_element = await product.query_selector('a')

            name_element = await product.query_selector('h2')

            price_element = await product.query_selector('span.price > span.amount')


            if url_element and name_element and price_element:

                data = {

                    "url": await url_element.get_attribute('href'),

                    "name": await name_element.inner_text(),

                    "price": await price_element.inner_text()

                }

                data_list.append(data)


    await browser.close()


    # Save the data to a CSV file

    with open('products.csv', mode='w', newline='') as file:

        writer = csv.DictWriter(file, fieldnames=["url", "name", "price"])

        writer.writeheader()

        writer.writerows(data_list)


asyncio.run(main())接下來,我們將學習如何使用Apify將我們的爬蟲部署到云端,以便我們可以配置它們按計劃運行,并使用該平臺的其他許多功能。
Apify 使用稱為 Actors 的無服務器云程序,這些程序在 Apify 平臺上運行并執行計算任務。
為了演示這一點,我們將使用 Apify SDK、BeautifulSoup 和 HTTPX 創建一個開發模板,并調整生成的樣板代碼以運行我們的 BeautifulSoup Hacker News 抓取工具。那么,讓我們開始吧。
通過 homebrew
在 macOS(或 Linux)上,您可以通過 Homebrew 包管理器安裝 Apify CLI。
brew install apify/tap/apify-cli通過 NPM
通過運行以下命令來安裝或升級 Apify CLI:
npm -g install apify-cli在計算機上安裝 Apify CLI 后,只需在終端中運行以下命令即可:
apify create bs4-actor然后,繼續選擇Python → BeautifulSoup和HTTPX→安裝模板

這條命令將創建一個名為bs4-actor的新文件夾,安裝所有必要的依賴項,并生成一段樣板代碼。我們可以使用這段樣板代碼,結合BeautifulSoup、Requests和Python的Apify SDK來快速啟動我們的開發。
最后,進入新創建的文件夾,并使用您喜歡的代碼編輯器打開它。在這個例子中,我使用的是VS Code。
cd bs4-actor

code .模板已經創建了一個功能齊全的爬蟲。如果您想在修改代碼之前嘗試一下,可以使用命令apify run來運行它。抓取的結果將被存儲在storage/datasets目錄下。
太好了!現在我們已經熟悉了模板,接下來讓我們進入src/main.py并修改其中的代碼,以便抓取HackerNews的內容。
只需進行一些調整,最終代碼就會變成這樣:
from bs4 import BeautifulSoup

from httpx import AsyncClient


from apify import Actor


async def main() -> None:

    async with Actor:

        # Read the Actor input

        actor_input = await Actor.get_input() or {}

        start_urls = actor_input.get('start_urls')


        if not start_urls:

            Actor.log.info('No start URLs specified in actor input, exiting...')

            await Actor.exit()


        # Enqueue the starting URLs in the default request queue

        rq = await Actor.open_request_queue()

        for start_url in start_urls:

            url = start_url.get('url')

            Actor.log.info(f'Enqueuing {url} ...')

            await rq.add_request({'url': url, 'userData': {'depth': 0}})


        # Process the requests in the queue one by one

        while request := await rq.fetch_next_request():

            url = request['url']

            Actor.log.info(f'Scraping {url} ...')


            try:

                # Fetch the URL using httpx
                async with AsyncClient() as client:
                    response = await client.get(url, follow_redirects=True)
                soup = BeautifulSoup(response.content, 'html.parser')
                articles = soup.find_all(class_='athing')

                for article in articles:
                    data = {
                        'URL': article.find(class_='titleline').find('a').get('href'),
                        'title': article.find(class_='titleline').getText(),
                        'rank': article.find(class_='rank').getText().replace('.', ''),
                    }
                    # Push the extracted data into the default dataset
                    await Actor.push_data(data)
            except:
                Actor.log.exception(f'Cannot extract data from {url}.')
            finally:
                # Mark the request as handled so it's not processed again
await rq.mark_request_as_handled(request)最后,在您的終端中輸入命令apify run,您將會看到存儲中填充了從HackerNews抓取的數據。
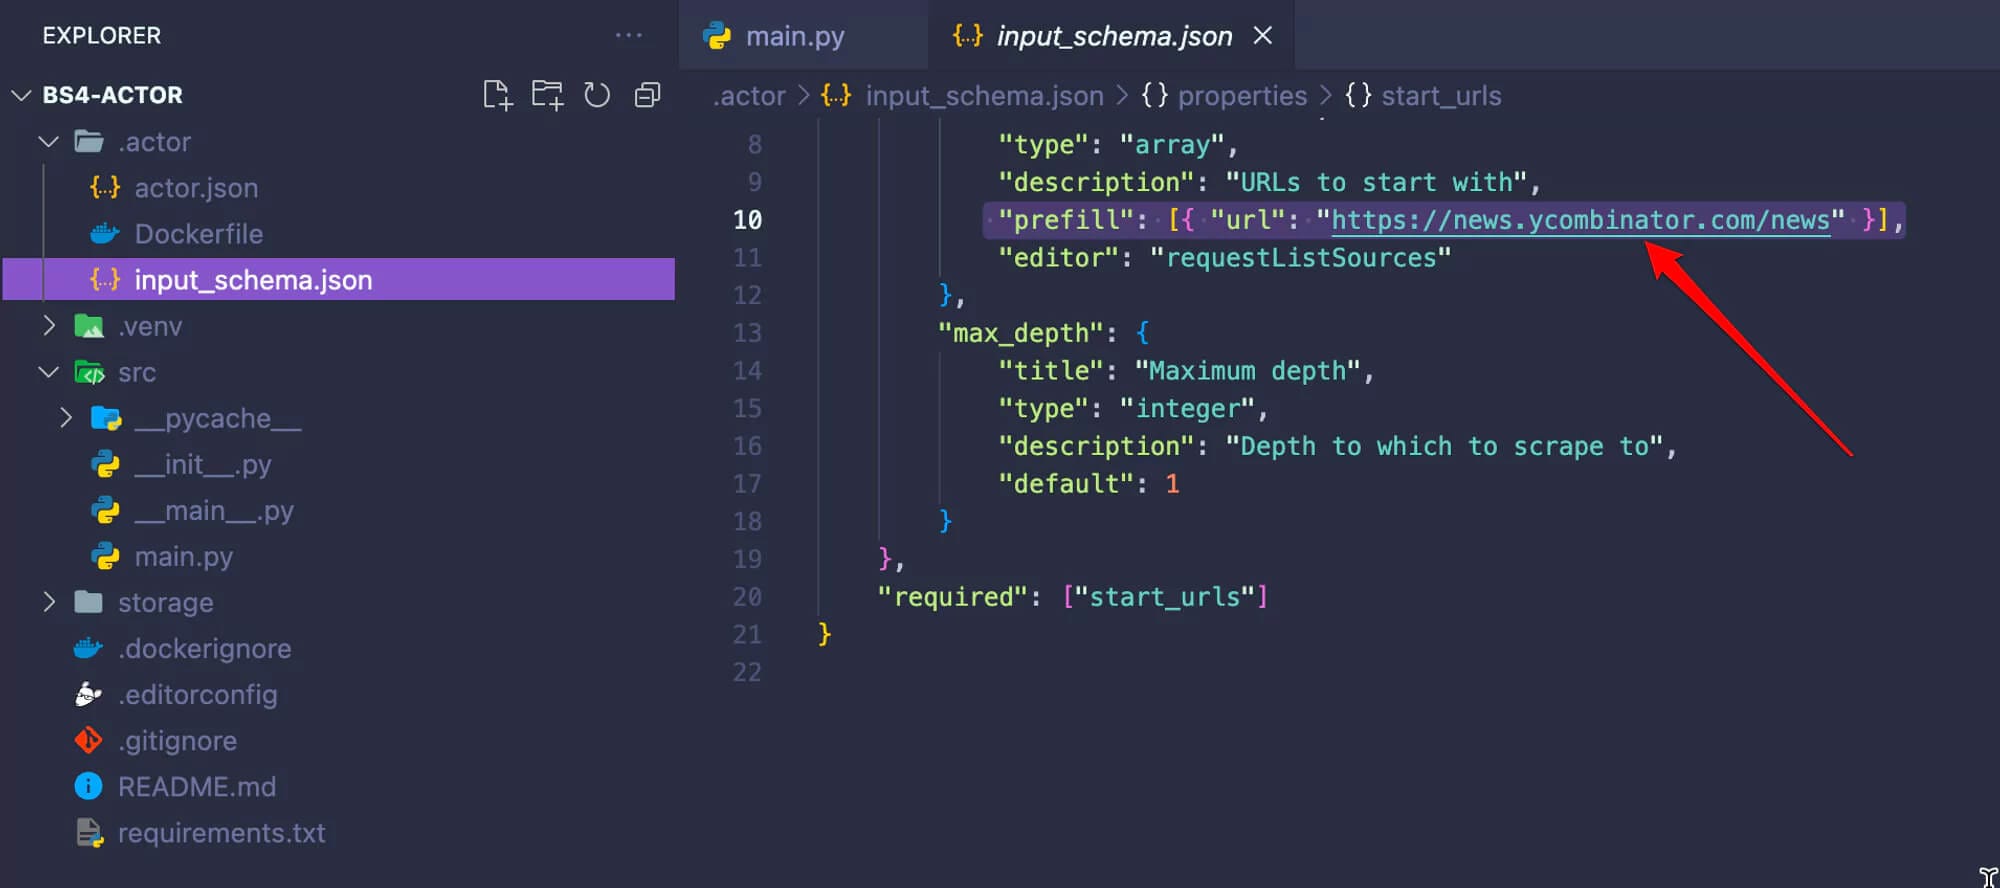
在我們進行下一步之前,請轉到.actor/input_schema.json文件,并將預填充的URL更改為https://news.ycombinator.com/news。當我們在Apify平臺上運行爬蟲時,這一點非常重要。

既然我們已經確認Actor按預期工作,現在就可以將其部署到Apify平臺了。要跟隨以下步驟,您需要注冊一個免費的Apify賬戶。
一旦您擁有了一個Apify賬戶,請在終端中運行命令apify login。系統將提示您提供Apify API Token。您可以在Apify控制臺中的“設置”→“集成”下找到該Token。

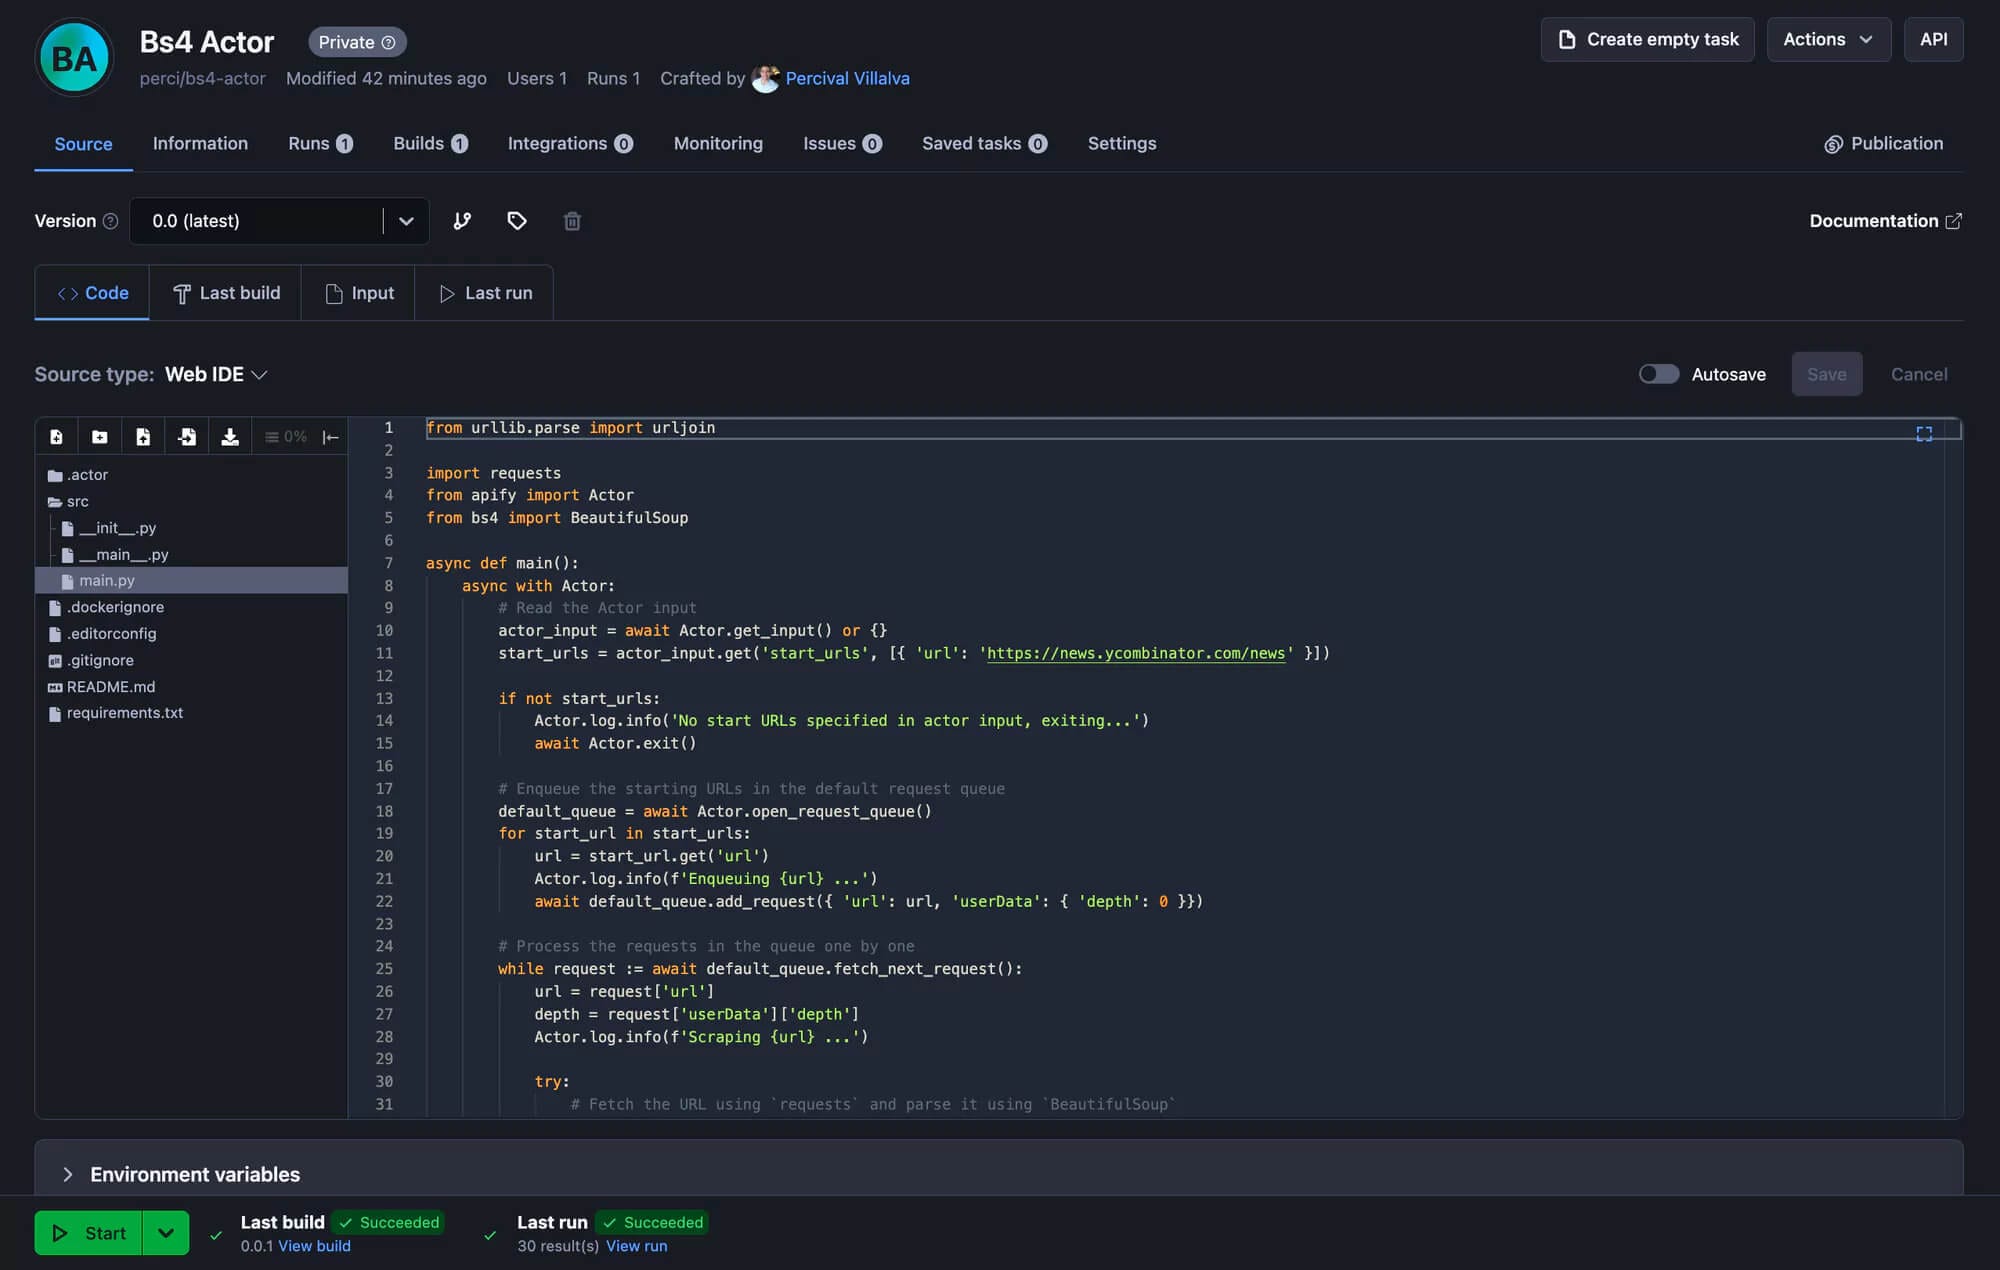
最后一步是運行apify push命令。這將啟動Actor的構建過程,幾秒鐘后,您應該能夠在Apify控制臺下的“Actors”→“我的Actors”中看到您新創建的Actor。apify push

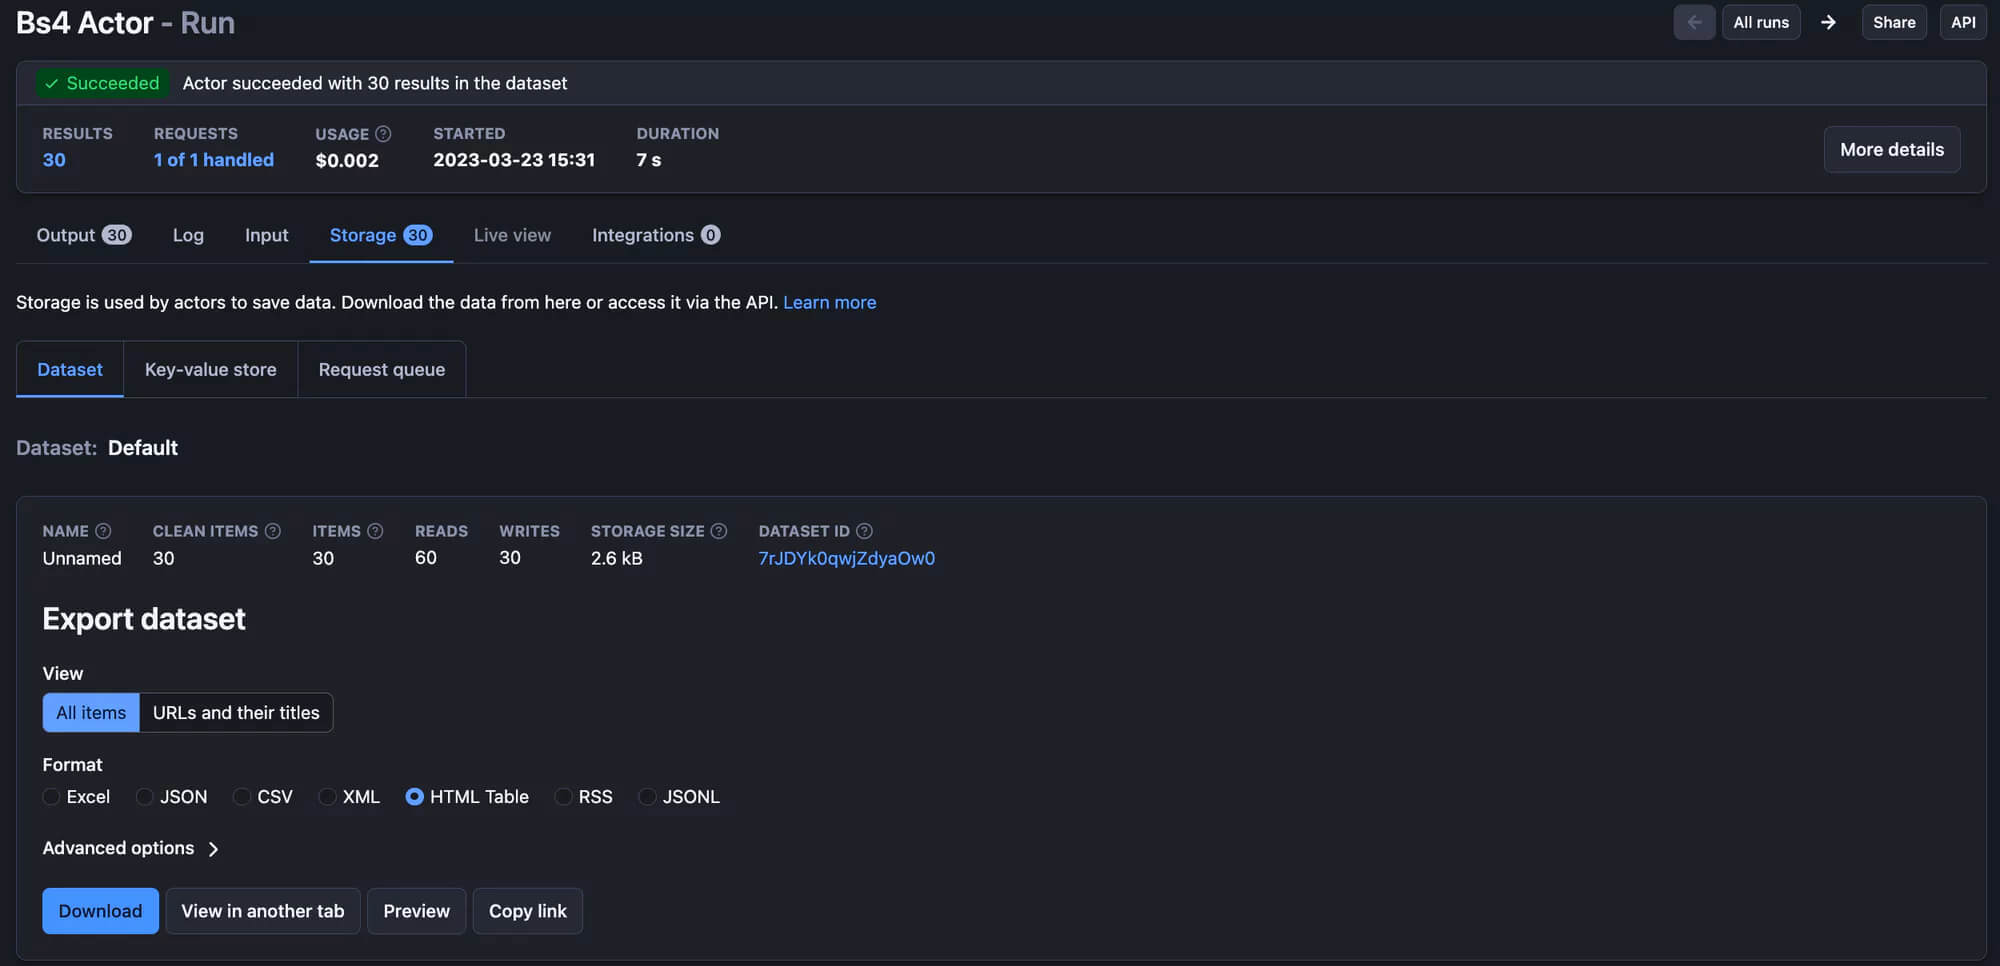
太棒了!您的抓取工具已準備好在 Apify 平臺上運行!只需點擊“開始”按鈕,運行結束后,您就可以在“存儲”選項卡中預覽并以多種格式下載您的數據。

總體而言,Python憑借其簡潔性和強大的庫,是進行網絡爬蟲的絕佳選擇。像BeautifulSoup這樣的工具可以輕松抓取靜態網站,而Playwright則非常適合處理動態內容。使用Python進行網絡爬蟲不會出錯。
原文鏈接:https://blog.apify.com/web-scraping-python/