
使用這些基本 REST API 最佳實踐構建出色的 API
當我們著手開發REST API后端服務時,NodeJS無疑是一個重量級選擇。NodeJS作為一個Javascript運行時,使得Javascript代碼能夠在非瀏覽器環境中執行。為了構建網絡服務,我們通常依賴于像Express和NestJS這樣的框架。
NestJS 有一個特定的設計理念,這有助于開發一個良好的項目結構。核心框架部分如下:
您將會了解如何在wimm-node-app項目中實現功能。但在此之前,我們先來探討一下如何定義功能。采用特性封裝是一個明智的選擇,即將與特定功能相關的內容大多保存在一個單獨的特性目錄中。這里的功能指的是常見的路由基礎URL,例如/blog和/content分別代表兩個不同的功能。一般而言,功能具有以下結構:
注意:為了繼續閱讀,您應該克隆GitHub存儲庫wimm-node-app。
讓我們看看項目中的 mentor 示例
mentor

├── dto

│   ├── create-mentor.dto.ts

│   ├── mentor-info.dto.ts

│   └── update-mentor.dto.ts

├── schemas

│  └── mentor.schema.ts

├── mentor-admin.controller.ts

├── mentor.controller.ts

├── mentor.module.ts

├── mentor.service.ts

└── mentors.controller.ts
create-mentor.dto.ts
import {

  IsOptional,

  IsUrl,

  Max,

  MaxLength,

  Min,

  MinLength,

} from 'class-validator';


export class CreateMentorDto {

  @MinLength(3)

  @MaxLength(50)

  readonly name: string;


  @MinLength(3)

  @MaxLength(50)

  readonly occupation: string;


  @MinLength(3)

  @MaxLength(300)

  readonly title: string;


  @MinLength(3)

  @MaxLength(10000)

  readonly description: string;


  @IsUrl({ require_tld: false })

  @MaxLength(300)

  readonly thumbnail: string;


  @IsUrl({ require_tld: false })

  @MaxLength(300)

  readonly coverImgUrl: string;


  @IsOptional()

  @Min(0)

  @Max(1)

  readonly score: number;


  constructor(params: CreateMentorDto) {

    Object.assign(this, params);

  }

}
mentor.schema.ts
import { Prop, Schema, SchemaFactory } from '@nestjs/mongoose';

import mongoose, { HydratedDocument, Types } from 'mongoose';

import { User } from '../../user/schemas/user.schema';


export type MentorDocument = HydratedDocument<Mentor>;


@Schema({ collection: 'mentors', versionKey: false, timestamps: true })

export class Mentor {

  readonly _id: Types.ObjectId;


  @Prop({ required: true, maxlength: 50, trim: true })

  name: string;


  @Prop({ required: true, maxlength: 300, trim: true })

  title: string;


  @Prop({ required: true, maxlength: 300, trim: true })

  thumbnail: string;


  @Prop({ required: true, maxlength: 50, trim: true })

  occupation: string;


  @Prop({ required: true, maxlength: 10000, trim: true })

  description: string;


  @Prop({ required: true, maxlength: 300, trim: true })

  coverImgUrl: string;


  @Prop({ default: 0.01, max: 1, min: 0 })

  score: number;


  @Prop({

    type: mongoose.Schema.Types.ObjectId,

    ref: User.name,

    required: true,

  })

  createdBy: User;


  @Prop({

    type: mongoose.Schema.Types.ObjectId,

    ref: User.name,

    required: true,

  })

  updatedBy: User;


  @Prop({ default: true })

  status: boolean;

}


export const MentorSchema = SchemaFactory.createForClass(Mentor);


MentorSchema.index(

  { name: 'text', occupation: 'text', title: 'text' },

  { weights: { name: 5, occupation: 1, title: 2 }, background: false },

);


MentorSchema.index({ _id: 1, status: 1 });
mentor.controller.ts
import { Controller, Get, NotFoundException, Param } from '@nestjs/common';

import { Types } from 'mongoose';

import { MongoIdTransformer } from '../common/mongoid.transformer';

import { MentorService } from './mentor.service';

import { MentorInfoDto } from './dto/mentor-info.dto';


@Controller('mentor')

export class MentorController {

  constructor(private readonly mentorService: MentorService) {}


  @Get('id/:id')

  async findOne(

    @Param('id', MongoIdTransformer) id: Types.ObjectId,

  ): Promise<MentorInfoDto> {

    const mentor = await this.mentorService.findById(id);

    if (!mentor) throw new NotFoundException('Mentor Not Found');

    return new MentorInfoDto(mentor);

  }

}
mentor.service.ts
import { Injectable, NotFoundException } from '@nestjs/common';

import { InjectModel } from '@nestjs/mongoose';

import { Model, Types } from 'mongoose';

import { Mentor } from './schemas/mentor.schema';

import { User } from '../user/schemas/user.schema';

import { CreateMentorDto } from './dto/create-mentor.dto';

import { UpdateMentorDto } from './dto/update-mentor.dto';

import { PaginationDto } from '../common/pagination.dto';


@Injectable()

export class MentorService {

  constructor(

    @InjectModel(Mentor.name) private readonly mentorModel: Model<Mentor>,

  ) {}


  INFO_PARAMETERS = '-description -status';


  async create(admin: User, createMentorDto: CreateMentorDto): Promise<Mentor> {

    const created = await this.mentorModel.create({

      ...createMentorDto,

      createdBy: admin,

      updatedBy: admin,

    });

    return created.toObject();

  }


  async findById(id: Types.ObjectId): Promise<Mentor | null> {

    return this.mentorModel.findOne({ _id: id, status: true }).lean().exec();

  }


  async search(query: string, limit: number): Promise<Mentor[]> {

    return this.mentorModel

      .find({

        $text: { $search: query, $caseSensitive: false },

        status: true,

      })

      .select(this.INFO_PARAMETERS)

      .limit(limit)

      .lean()

      .exec();

  }


  ...

}
現在,讓我們看看項目結構的概述。
讓我們更深入地研究 src 目錄
database.config.ts
import { registerAs } from '@nestjs/config';


export const DatabaseConfigName = 'database';


export interface DatabaseConfig {

  name: string;

  host: string;

  port: number;

  user: string;

  password: string;

  minPoolSize: number;

  maxPoolSize: number;

}


export default registerAs(DatabaseConfigName, () => ({

  name: process.env.DB_NAME || '',

  host: process.env.DB_HOST || '',

  port: process.env.DB_PORT || '',

  user: process.env.DB_USER || '',

  password: process.env.DB_USER_PWD || '',

  minPoolSize: parseInt(process.env.DB_MIN_POOL_SIZE || '5'),

  maxPoolSize: parseInt(process.env.DB_MAX_POOL_SIZE || '10'),

}));
2. setup — 它定義數據庫連接和自定義 Winston 記錄器
/setup/database.factory.ts
import { Injectable, Logger } from '@nestjs/common';

import {

  MongooseOptionsFactory,

  MongooseModuleOptions,

} from '@nestjs/mongoose';

import { ConfigService } from '@nestjs/config';

import { DatabaseConfig, DatabaseConfigName } from '../config/database.config';

import mongoose from 'mongoose';

import { ServerConfig, ServerConfigName } from '../config/server.config';


@Injectable()

export class DatabaseFactory implements MongooseOptionsFactory {

  constructor(private readonly configService: ConfigService) {}


  createMongooseOptions(): MongooseModuleOptions {

    const dbConfig =

      this.configService.getOrThrow<DatabaseConfig>(DatabaseConfigName);


    const { user, host, port, name, minPoolSize, maxPoolSize } = dbConfig;


    const password = encodeURIComponent(dbConfig.password);


    const uri = mongodb://${user}:${password}@${host}:${port}/${name};

    const serverConfig =
      this.configService.getOrThrow<ServerConfig>(ServerConfigName);
    if (serverConfig.nodeEnv == 'development') mongoose.set({ debug: true });

    Logger.debug('Database URI:' + uri);

    return {
      uri: uri,
      autoIndex: true,
      minPoolSize: minPoolSize,
      maxPoolSize: maxPoolSize,
      connectTimeoutMS: 60000, // Give up initial connection after 10 seconds
      socketTimeoutMS: 45000, // Close sockets after 45 seconds of inactivity,
    };
  }
}
3. app.module.ts — 它加載我們應用程序的所有其他模塊和配置。
@Module({

  imports: [

    ConfigModule.forRoot({

      load: [

        serverConfig,

        databaseConfig,

        cacheConfig,

        authkeyConfig,

        tokenConfig,

        diskConfig,

      ],

      cache: true,

      envFilePath: getEnvFilePath(),

    }),

    MongooseModule.forRootAsync({

      imports: [ConfigModule],

      useClass: DatabaseFactory,

    }),

    RedisCacheModule,

    CoreModule,

    AuthModule,

    MessageModule,

    FilesModule,

    ScrapperModule,

    MentorModule,

    TopicModule,

    SubscriptionModule,

    ContentModule,

    BookmarkModule,

    SearchModule,

  ],

  providers: [

    {

      provide: 'Logger',

      useClass: WinstonLogger,

    },

  ],

})

export class AppModule {}


function getEnvFilePath() {

  return process.env.NODE_ENV === 'test' ? '.env.test' : '.env';

}
4. main.ts — 這是服務器運行時執行的第一個腳本。它通過加載 AppModule 創建一個 Nest 應用程序。
import { NestFactory } from '@nestjs/core';

import { AppModule } from './app.module';

import { ConfigService } from '@nestjs/config';

import { ServerConfig, ServerConfigName } from './config/server.config';


async function server() {

  const app = await NestFactory.create(AppModule);


  const configService = app.get(ConfigService);

  const serverConfig = configService.getOrThrow<ServerConfig>(ServerConfigName);


  await app.listen(serverConfig.port);

}


server();現在,我們可以繼續探索有關架構的更多信息。首先要的是了解核心模塊。core 包含我們架構的構建塊。
為了使我們的服務保持一致,我們需要為請求和響應定義一個結構。REST API 將發送 2 種類型的響應:
// 1. Message Response

{

    "statusCode": 10000,

    "message": "something",

}


// 2. Data Response

{

    "statusCode": 10000,

    "message": "something",

    "data": {DTO}

}
我們將創建類來表示這個結構 — src/core/http/response.ts
export enum StatusCode {

  SUCCESS = 10000,

  FAILURE = 10001,

  RETRY = 10002,

  INVALID_ACCESS_TOKEN = 10003,

}


export class MessageResponse {

  readonly statusCode: StatusCode;

  readonly message: string;


  constructor(statusCode: StatusCode, message: string) {

    this.statusCode = statusCode;

    this.message = message;

  }

}


export class DataResponse<T> extends MessageResponse {

  readonly data: T;


  constructor(statusCode: StatusCode, message: string, data: T) {

    super(statusCode, message);

    this.data = data;

  }

}
現在,我們還有 3 種類型的請求 — Public、Private 和 Protected。我們在 src/core/http/request.ts 中定義它們
import { Request } from 'express';

import { User } from '../../user/schemas/user.schema';

import { ApiKey } from '../../auth/schemas/apikey.schema';

import { Keystore } from '../../auth/schemas/keystore.schema';


export interface PublicRequest extends Request {

  apiKey: ApiKey;

}


export interface RoleRequest extends PublicRequest {

  currentRoleCodes: string[];

}


export interface ProtectedRequest extends RoleRequest {

  user: User;

  accessToken: string;

  keystore: Keystore;

}
此外,當控制器返回 DTO 時,我們需要做 2 件事:
// response-validation.interceptor.ts

import {

  Injectable,

  NestInterceptor,

  ExecutionContext,

  CallHandler,

  InternalServerErrorException,

} from '@nestjs/common';

import { Observable } from 'rxjs';

import { map } from 'rxjs/operators';

import { ValidationError, validateSync } from 'class-validator';


@Injectable()

export class ResponseValidation implements NestInterceptor {

  intercept(_: ExecutionContext, next: CallHandler): Observable<any> {

    return next.handle().pipe(

      map((data) => {

        if (data instanceof Object) {

          const errors = validateSync(data);

          if (errors.length > 0) {

            const messages = this.extractErrorMessages(errors);

            throw new InternalServerErrorException([

              'Response validation failed',

              ...messages,

            ]);

          }

        }

        return data;

      }),

    );

  }


  private extractErrorMessages(

    errors: ValidationError[],

    messages: string[] = [],

  ): string[] {

    for (const error of errors) {

      if (error) {

        if (error.children && error.children.length > 0)

          this.extractErrorMessages(error.children, messages);

        const constraints = error.constraints;

        if (constraints) messages.push(Object.values(constraints).join(', '));

      }

    }

    return messages;

  }

}
2. 響應轉換 — 將 DTO 轉換為響應對象。
src/core/interceptors/response.transformer.ts
import {

  CallHandler,

  ExecutionContext,

  Injectable,

  NestInterceptor,

} from '@nestjs/common';

import { Observable, map } from 'rxjs';

import { DataResponse, MessageResponse, StatusCode } from '../http/response';


@Injectable()

export class ResponseTransformer implements NestInterceptor {

  intercept(_: ExecutionContext, next: CallHandler): Observable<any> {

    return next.handle().pipe(

      map((data) => {

        if (data instanceof MessageResponse) return data;

        if (data instanceof DataResponse) return data;

        if (typeof data == 'string')

          return new MessageResponse(StatusCode.SUCCESS, data);

        return new DataResponse(StatusCode.SUCCESS, 'success', data);

      }),

    );

  }

}
最后,我們還必須在 src/core/interceptors/exception.handler.ts 中定義異常處理過濾器
// exception.filter.ts

import {

  ExceptionFilter,

  Catch,

  ArgumentsHost,

  HttpException,

  HttpStatus,

  InternalServerErrorException,

  UnauthorizedException,

} from '@nestjs/common';

import { TokenExpiredError } from '@nestjs/jwt';

import { Request, Response } from 'express';

import { StatusCode } from '../http/response';

import { isArray } from 'class-validator';

import { ConfigService } from '@nestjs/config';

import { ServerConfig, ServerConfigName } from '../../config/server.config';

import { WinstonLogger } from '../../setup/winston.logger';


@Catch()

export class ExpectionHandler implements ExceptionFilter {

  constructor(

    private readonly configService: ConfigService,

    private readonly logger: WinstonLogger,

  ) {}


  catch(exception: any, host: ArgumentsHost) {

    const ctx = host.switchToHttp();

    const response = ctx.getResponse<Response>();

    const request = ctx.getRequest<Request>();


    let status = HttpStatus.INTERNAL_SERVER_ERROR;

    let statusCode = StatusCode.FAILURE;

    let message: string = 'Something went wrong';

    let errors: any[] | undefined = undefined;


    if (exception instanceof HttpException) {

      status = exception.getStatus();

      const body = exception.getResponse();

      if (typeof body === 'string') {

        message = body;

      } else if ('message' in body) {

        if (typeof body.message === 'string') {

          message = body.message;

        } else if (isArray(body.message) && body.message.length > 0) {

          message = body.message[0];

          errors = body.message;

        }

      }

      if (exception instanceof InternalServerErrorException) {

        this.logger.error(exception.message, exception.stack);

      }


      if (exception instanceof UnauthorizedException) {

        if (message.toLowerCase().includes('invalid access token')) {

          statusCode = StatusCode.INVALID_ACCESS_TOKEN;

          response.appendHeader('instruction', 'logout');

        }

      }

    } else if (exception instanceof TokenExpiredError) {

      status = HttpStatus.UNAUTHORIZED;

      statusCode = StatusCode.INVALID_ACCESS_TOKEN;

      response.appendHeader('instruction', 'refresh_token');

      message = 'Token Expired';

    } else {

      const serverConfig =

        this.configService.getOrThrow<ServerConfig>(ServerConfigName);

      if (serverConfig.nodeEnv === 'development') message = exception.message;

      this.logger.error(exception.message, exception.stack);

    }


    response.status(status).json({

      statusCode: statusCode,

      message: message,

      errors: errors,

      url: request.url,

    });

  }

}
我們將創建一個 CoreModule 來應用它們。然后將 CoreModule 添加到 AppModule 中。
import { Module, ValidationPipe } from '@nestjs/common';

import { APP_FILTER, APP_INTERCEPTOR, APP_PIPE } from '@nestjs/core';

import { ResponseTransformer } from './interceptors/response.transformer';

import { ExpectionHandler } from './interceptors/exception.handler';

import { ResponseValidation } from './interceptors/response.validations';

import { ConfigModule } from '@nestjs/config';

import { WinstonLogger } from '../setup/winston.logger';

import { CoreController } from './core.controller';


@Module({

  imports: [ConfigModule],

  providers: [

    { provide: APP_INTERCEPTOR, useClass: ResponseTransformer },

    { provide: APP_INTERCEPTOR, useClass: ResponseValidation },

    { provide: APP_FILTER, useClass: ExpectionHandler },

    {

      provide: APP_PIPE,

      useValue: new ValidationPipe({

        transform: true,

        whitelist: true,

        forbidNonWhitelisted: true,

      }),

    },

    WinstonLogger,

  ],

  controllers: [CoreController],

})

export class CoreModule {}
下一個重要功能是 auth,它提供 ApiKeyGuard、AuthGuard(身份驗證)和 RolesGuard(授權)。
src/auth/guards/apikey.guard.ts — 驗證了 x-api-key 標頭及其權限。
import {

  CanActivate,

  ExecutionContext,

  ForbiddenException,

  Injectable,

} from '@nestjs/common';

import { HeaderName } from '../../core/http/header';

import { Reflector } from '@nestjs/core';

import { Permissions } from '../decorators/permissions.decorator';

import { PublicRequest } from '../../core/http/request';

import { Permission } from '../../auth/schemas/apikey.schema';

import { AuthService } from '../auth.service';


@Injectable()

export class ApiKeyGuard implements CanActivate {

  constructor(

    private readonly authService: AuthService,

    private readonly reflector: Reflector,

  ) {}


  async canActivate(context: ExecutionContext): Promise<boolean> {

    const permissions = this.reflector.get(Permissions, context.getClass()) ?? [

      Permission.GENERAL,

    ];

    if (!permissions) throw new ForbiddenException();


    const request = context.switchToHttp().getRequest<PublicRequest>();


    const key = request.headers[HeaderName.API_KEY]?.toString();

    if (!key) throw new ForbiddenException();


    const apiKey = await this.authService.findApiKey(key);

    if (!apiKey) throw new ForbiddenException();


    request.apiKey = apiKey;


    for (const askedPermission of permissions) {

      for (const allowedPemission of apiKey.permissions) {

        if (allowedPemission === askedPermission) return true;

      }

    }


    throw new ForbiddenException();

  }

}
src/auth/guards/auth.guard.ts — 驗證 JWT Authentication 標頭。它還將 user 和 keystore 添加到請求對象中,供其他處理程序接收。
import {

  CanActivate,

  ExecutionContext,

  Injectable,

  UnauthorizedException,

} from '@nestjs/common';

import { Reflector } from '@nestjs/core';

import { Request } from 'express';

import { IS_PUBLIC_KEY } from '../decorators/public.decorator';

import { ProtectedRequest } from '../../core/http/request';

import { Types } from 'mongoose';

import { AuthService } from '../auth.service';

import { UserService } from '../../user/user.service';


@Injectable()

export class AuthGuard implements CanActivate {

  constructor(

    private readonly authService: AuthService,

    private readonly reflector: Reflector,

    private readonly userService: UserService,

  ) {}


  async canActivate(context: ExecutionContext): Promise<boolean> {

    const isPublic = this.reflector.getAllAndOverride<boolean>(IS_PUBLIC_KEY, [

      context.getHandler(),

      context.getClass(),

    ]);

    if (isPublic) return true;


    const request = context.switchToHttp().getRequest<ProtectedRequest>();

    const token = this.extractTokenFromHeader(request);

    if (!token) throw new UnauthorizedException();


    const payload = await this.authService.verifyToken(token);

    const valid = this.authService.validatePayload(payload);

    if (!valid) throw new UnauthorizedException('Invalid Access Token');


    const user = await this.userService.findUserById(

      new Types.ObjectId(payload.sub),

    );

    if (!user) throw new UnauthorizedException('User not registered');


    const keystore = await this.authService.findKeystore(user, payload.prm);

    if (!keystore) throw new UnauthorizedException('Invalid Access Token');


    request.user = user;

    request.keystore = keystore;


    return true;

  }


  private extractTokenFromHeader(request: Request): string | undefined {

    const [type, token] = request.headers.authorization?.split(' ') ?? [];

    return type === 'Bearer' ? token : undefined;

  }

}
src/auth/guards/roles.guard.ts — 它驗證了給定控制器或控制器處理程序的用戶角色。
要在 Controller 中指定 Roles,我們在 src/auth/decorators/role.decorator.ts 中定義裝飾器。
import { Reflector } from '@nestjs/core';

import { RoleCode } from '../schemas/role.schema';


export const Roles = Reflector.createDecorator<RoleCode[]>();
我們將這個裝飾器應用到 Controller 上。示例:src/mentor/mentor-admin.controller.ts
@Roles([RoleCode.ADMIN])

@Controller('mentor/admin')

export class MentorAdminController {

  ...

}
最后 — src/auth/guards/roles.guard.ts
import {
CanActivate,
ExecutionContext,
ForbiddenException,
Injectable,
} from '@nestjs/common';
import { Reflector } from '@nestjs/core';
import { Roles } from '../decorators/roles.decorator';
import { ProtectedRequest } from '../../core/http/request';
@Injectable()
export class RolesGuard implements CanActivate {
constructor(private readonly reflector: Reflector) {}
async canActivate(context: ExecutionContext): Promise<boolean> {
let roles = this.reflector.get(Roles, context.getHandler());
if (!roles) roles = this.reflector.get(Roles, context.getClass());
if (roles) {
const request = context.switchToHttp().getRequest<ProtectedRequest>();
const user = request.user;
if (!user) throw new ForbiddenException('Permission Denied');
const hasRole = () =>
user.roles.some((role) => !!roles.find((item) => item === role.code));
if (!hasRole()) throw new ForbiddenException('Permission Denied');
}
return true;
}
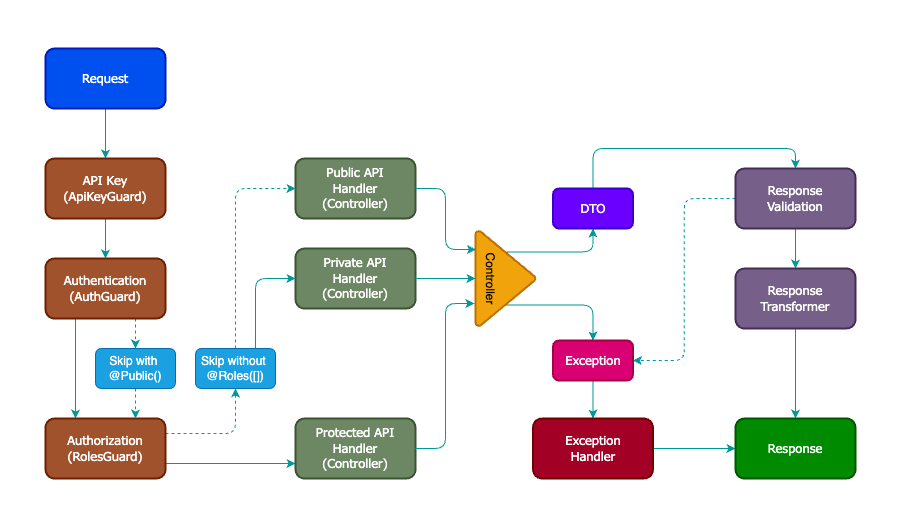
}我們現在可以通過圖表看到完整的情況 — 整個架構的請求旅程,從而產生響應。
架構中還添加了一些高效的工具。示例 — 驗證 id param 字符串并將其轉換為 MongoId 對象。讓我們看看如何使用 MongoIdTransformer 處理 mongo id 參數。
import { Controller, Get, NotFoundException, Param } from '@nestjs/common';

import { Types } from 'mongoose';

import { MongoIdTransformer } from '../common/mongoid.transformer';

import { MentorService } from './mentor.service';

import { MentorInfoDto } from './dto/mentor-info.dto';


@Controller('mentor')

export class MentorController {

  constructor(private readonly mentorService: MentorService) {}


  @Get('id/:id')

  async findOne(

    @Param('id', MongoIdTransformer) id: Types.ObjectId,

  ): Promise<MentorInfoDto> {

    const mentor = await this.mentorService.findById(id);

    if (!mentor) throw new NotFoundException('Mentor Not Found');

    return new MentorInfoDto(mentor);

  }

}
MongoIdTransformer 在 src/common/mongoid.transformer.ts 中實現
import {

  PipeTransform,

  Injectable,

  BadRequestException,

  ArgumentMetadata,

} from '@nestjs/common';

import { Types } from 'mongoose';


@Injectable()

export class MongoIdTransformer implements PipeTransform<any> {

  transform(value: any, metadata: ArgumentMetadata): any {

    if (typeof value !== 'string') return value;


    if (metadata.metatype?.name === 'ObjectId') {

      if (!Types.ObjectId.isValid(value)) {

        const key = metadata?.data ?? '';

        throw new BadRequestException(${key} must be a mongodb id);
      }
      return new Types.ObjectId(value);
    }

    return value;
  }
}
同樣,我們定義 IsMongoIdObject 驗證以在 DTO 中使用。
export class ContentInfoDto {

  @IsMongoIdObject()

  _id: Types.ObjectId;


  ...

}
IsMongoIdObject 在以下位置實現:
src/common/mongo.validation.ts
import {

  registerDecorator,

  ValidationArguments,

  ValidationOptions,

} from 'class-validator';

import { Types } from 'mongoose';


export function IsMongoIdObject(validationOptions?: ValidationOptions) {

  return function (object: object, propertyName: string) {

    registerDecorator({

      name: 'IsMongoIdObject',

      target: object.constructor,

      propertyName: propertyName,

      constraints: [],

      options: validationOptions,

      validator: {

        validate(value: any) {

          return Types.ObjectId.isValid(value);

        },


        defaultMessage(validationArguments?: ValidationArguments) {

          const property = validationArguments?.property ?? '';

          return ${property} should be a valid MongoId;
        },
      },
    });
  };
}
架構中隱藏著許多服務于關鍵功能的微妙細節,這些細節在您閱讀代碼時可以逐一探索。
Web服務器中,緩存是一個至關重要的工具。在這個項目中,我們采用了Redis作為內存緩存解決方案。
Redis的包裝器位于src/cache/redis-cache.ts文件中,它實現了Nest的緩存管理器功能。這一實現通過Nest的緩存API,為我們提供了一個自定義的CacheInterceptor。這里需要注意的是,我不會深入討論這段代碼的具體實現,因為它是內部機制,不建議進行修改。
接下來,我們創建了一個工廠、一個服務以及一個模塊,這些組件共同協作,為應用程序啟用了Redis緩存功能。
src/cache/cache.factory.ts
import { Injectable } from '@nestjs/common';

import { ConfigService } from '@nestjs/config';

import { CacheConfig, CacheConfigName } from '../config/cache.config';

import { redisStore } from './redis-cache';

import { CacheModuleOptions, CacheOptionsFactory } from '@nestjs/cache-manager';


@Injectable()

export class CacheConfigFactory implements CacheOptionsFactory {

  constructor(private readonly configService: ConfigService) {}


  async createCacheOptions(): Promise<CacheModuleOptions> {

    const cacheConfig =

      this.configService.getOrThrow<CacheConfig>(CacheConfigName);

    const redisURL = redis://:${cacheConfig.password}@${cacheConfig.host}:${cacheConfig.port};
    return {
      store: redisStore,
      url: redisURL,
      ttl: cacheConfig.ttl,
    };
  }
}
src/cache/cache.service.ts
import { CACHE_MANAGER } from '@nestjs/cache-manager';

import { Inject, Injectable } from '@nestjs/common';

import { Cache } from 'cache-manager';

import { RedisStore } from './redis-cache';


@Injectable()

export class CacheService {

  constructor(@Inject(CACHE_MANAGER) private readonly cache: Cache) {}


  async getValue(key: string): Promise<string | null | undefined> {

    return await this.cache.get(key);

  }


  async setValue(key: string, value: string): Promise<void> {

    await this.cache.set(key, value);

  }


  async delete(key: string): Promise<void> {

    await this.cache.del(key);

  }


  onModuleDestroy() {

    (this.cache.store as RedisStore).client.disconnect();

  }

}
src/cache/redis-cache.module.ts
import { Module } from '@nestjs/common';

import { CacheModule } from '@nestjs/cache-manager';

import { ConfigModule } from '@nestjs/config';

import { CacheConfigFactory } from './cache.factory';

import { CacheService } from './cache.service';


@Module({

  imports: [

    ConfigModule,

    CacheModule.registerAsync({

      imports: [ConfigModule],

      useClass: CacheConfigFactory,

    }),

  ],

  providers: [CacheService],

  exports: [CacheService, CacheModule],

})

export class RedisCacheModule {}
現在,我們可以在任何 Controller 中使用它來緩存 CacheInterceptor 的請求。
import { CacheInterceptor } from '@nestjs/cache-manager';

...


@Controller('content')

export class ContentController {

  constructor(private readonly contentService: ContentService) {}


  @UseInterceptors(CacheInterceptor)

  @Get('id/:id')

  async findOne(

    @Param('id', MongoIdTransformer) id: Types.ObjectId,

    @Request() request: ProtectedRequest,

  ): Promise<ContentInfoDto> {

    return await this.contentService.findOne(id, request.user);

  }


 ...


}
測試是任何優秀項目的一等公民。該項目廣泛地實現了單元測試和集成測試。代碼覆蓋率超過 75%。
在另一篇文章中,我將詳細介紹有效的單元測試和集成測試。同時,您可以通過{feature}.spect.ts文件名來瀏覽單元測試,例如src/auth/auth.guard.spec.ts。而集成測試則位于test目錄內,例如app-auth.e2e-spec.ts。
進行集成測試時,我們會連接到測試數據庫。測試所需的配置信息會從.env.test文件中獲取。
現在,您可以深入探索這個repo,我相信您會發現它是一個非常有益的練習。
感謝您閱讀本文。如果您覺得這篇文章有幫助,請務必分享這篇文章。它會讓其他人得到這篇文章并傳播知識。此外,您的點贊會激勵我寫出更多類似的文章。
在janisharali.com上,您可以找到關于我的更多信息。
讓我們在Twitter、LinkedIn和Github上互相關注,成為朋友。