如何快速實現REST API集成以優化業務流程
請注意:您可能會發現,此文件夾中還包含了一個名為test的目錄。本教程中不會涉及對這部分內容的測試。
此存儲庫中的關鍵文件和目錄如下:
src 目錄包含應用程序的源代碼。它包含以下三個模塊:
src 目錄的根部,是應用程序的入口點。它負責啟動 Web 服務器。/articles 路由的端點以及相關的業務邏輯。prisma 文件夾包含以下內容:
schema.prisma 文件:定義了數據庫架構。migrations 目錄:包含了數據庫的遷移歷史記錄。seed.ts 文件:包含一個腳本,用于使用虛擬數據為您的開發數據庫填充初始數據。docker-compose.yml 文件:定義了您的 PostgreSQL 數據庫的 Docker 映像。.env 文件:包含了您的 PostgreSQL 數據庫的數據庫連接字符串。目前,您的數據庫架構中僅包含一個模型:Article。文章可以由注冊用戶撰寫。因此,您將在數據庫架構中添加一個User模型,以反映這種關系。
首先更新 Prisma 架構:
// prisma/schema.prisma


model Article {

  id          Int      @id @default(autoincrement())

  title       String   @unique

  description String?

  body        String

  published   Boolean  @default(false)

  createdAt   DateTime @default(now())

  updatedAt   DateTime @updatedAt

  author      User?    @relation(fields: [authorId], references: [id])

  authorId    Int?

}


model User {

  id        Int       @id @default(autoincrement())

  name      String?

  email     String    @unique

  password  String

  createdAt DateTime  @default(now())

  updatedAt DateTime  @updatedAt

  articles  Article[]

}
User模型包含了一些您可能期待的字段,例如id、email、password等,并且與Article模型建立了一對多的關系。這意味著一個用戶可以擁有多篇文章,但一篇文章只能有一個作者。為了簡化設計,author關系是可選的,所以您也可以創建沒有指定作者的文章。
現在,要將這些更改應用到數據庫,請執行遷移命令:
npx prisma migrate dev --name "add-user-model"如果遷移成功運行,您應該會看到以下輸出:
...

The following migration(s) have been created and applied from new schema changes:


migrations/

  └─ 20230318100533_add_user_model/

    └─ migration.sql


Your database is now in sync with your schema

...seed 腳本負責使用虛擬數據填充數據庫。您將更新seed腳本以在數據庫中創建一些用戶。
打開 prisma/seed.ts 文件并更新如下:
async function main() {

  // create two dummy users

  const user1 = await prisma.user.upsert({

    where: { email: 'sabin@adams.com' },

    update: {},

    create: {

      email: 'sabin@adams.com',

      name: 'Sabin Adams',

      password: 'password-sabin',

    },

  });


  const user2 = await prisma.user.upsert({

    where: { email: 'alex@ruheni.com' },

    update: {},

    create: {

      email: 'alex@ruheni.com',

      name: 'Alex Ruheni',

      password: 'password-alex',

    },

  });


  // create three dummy articles

  const post1 = await prisma.article.upsert({

    where: { title: 'Prisma Adds Support for MongoDB' },

    update: {

      authorId: user1.id,

    },

    create: {

      title: 'Prisma Adds Support for MongoDB',

      body: 'Support for MongoDB has been one of the most requested features since the initial release of...',

      description:

        "We are excited to share that today's Prisma ORM release adds stable support for MongoDB!",

      published: false,

      authorId: user1.id,

    },

  });


  const post2 = await prisma.article.upsert({

    where: { title: "What's new in Prisma? (Q1/22)" },

    update: {

      authorId: user2.id,

    },

    create: {

      title: "What's new in Prisma? (Q1/22)",

      body: 'Our engineers have been working hard, issuing new releases with many improvements...',

      description:

        'Learn about everything in the Prisma ecosystem and community from January to March 2022.',

      published: true,

      authorId: user2.id,

    },

  });


  const post3 = await prisma.article.upsert({

    where: { title: 'Prisma Client Just Became a Lot More Flexible' },

    update: {},

    create: {

      title: 'Prisma Client Just Became a Lot More Flexible',

      body: 'Prisma Client extensions provide a powerful new way to add functionality to Prisma in a type-safe manner...',

      description:

        'This article will explore various ways you can use Prisma Client extensions to add custom functionality to Prisma Client..',

      published: true,

    },

  });


  console.log({ user1, user2, post1, post2, post3 });

}
種子腳本現在創建了兩個用戶和三篇文章。第一篇文章的作者是第一個用戶,第二篇文章的作者是第二個用戶,而第三篇文章則沒有指定作者。
注意:目前,密碼是以純文本形式存儲的。在實際應用中,您絕不應該這樣做。在下一章中,您將了解到如何對密碼進行加鹽和哈希處理的更多信息。
要執行種子腳本,請運行以下命令:
npx prisma db seed如果種子腳本成功運行,您應該會看到以下輸出:
...?? The seed command has been executed.在遷移之后,您可能已經注意到出現了一個新的 TypeScript 錯誤。ArticleEntity 類實現了由 Prisma 生成的 Article 類型。Article 類型現在有了一個新的 authorId 字段,但是 ArticleEntity 類中還沒有定義這個字段。TypeScript 識別到了類型之間的這種不匹配,并拋出了一個錯誤。您將通過在 ArticleEntity 類中添加 authorId 字段來解決這個錯誤。
在 ArticleEntity 中添加一個新的 authorId 字段:
// src/articles/entities/article.entity.ts


import { Article } from '@prisma/client';

import { ApiProperty } from '@nestjs/swagger';


export class ArticleEntity implements Article {

  @ApiProperty()

  id: number;


  @ApiProperty()

  title: string;


  @ApiProperty({ required: false, nullable: true })

  description: string | null;


  @ApiProperty()

  body: string;


  @ApiProperty()

  published: boolean;


  @ApiProperty()

  createdAt: Date;


  @ApiProperty()

  updatedAt: Date;


  @ApiProperty({ required: false, nullable: true })

  authorId: number | null;

}
在像JavaScript這樣的弱類型語言中,開發者需要自行識別和修復類型相關的問題。而擁有像TypeScript這樣的強類型語言的一大優勢在于,它能夠迅速幫助開發者發現并解決類型不匹配的問題。
在本部分中,我們將為REST API添加 /users 資源,這將賦予您對數據庫中用戶執行創建(Create)、讀取(Read)、更新(Update)和刪除(Delete)操作(即CRUD操作)的能力。
要為 users 生成新的REST資源,請運行以下命令:
npx nest generate resource您將會看到一些命令行提示(CLI prompts)。請根據提示相應回答問題:
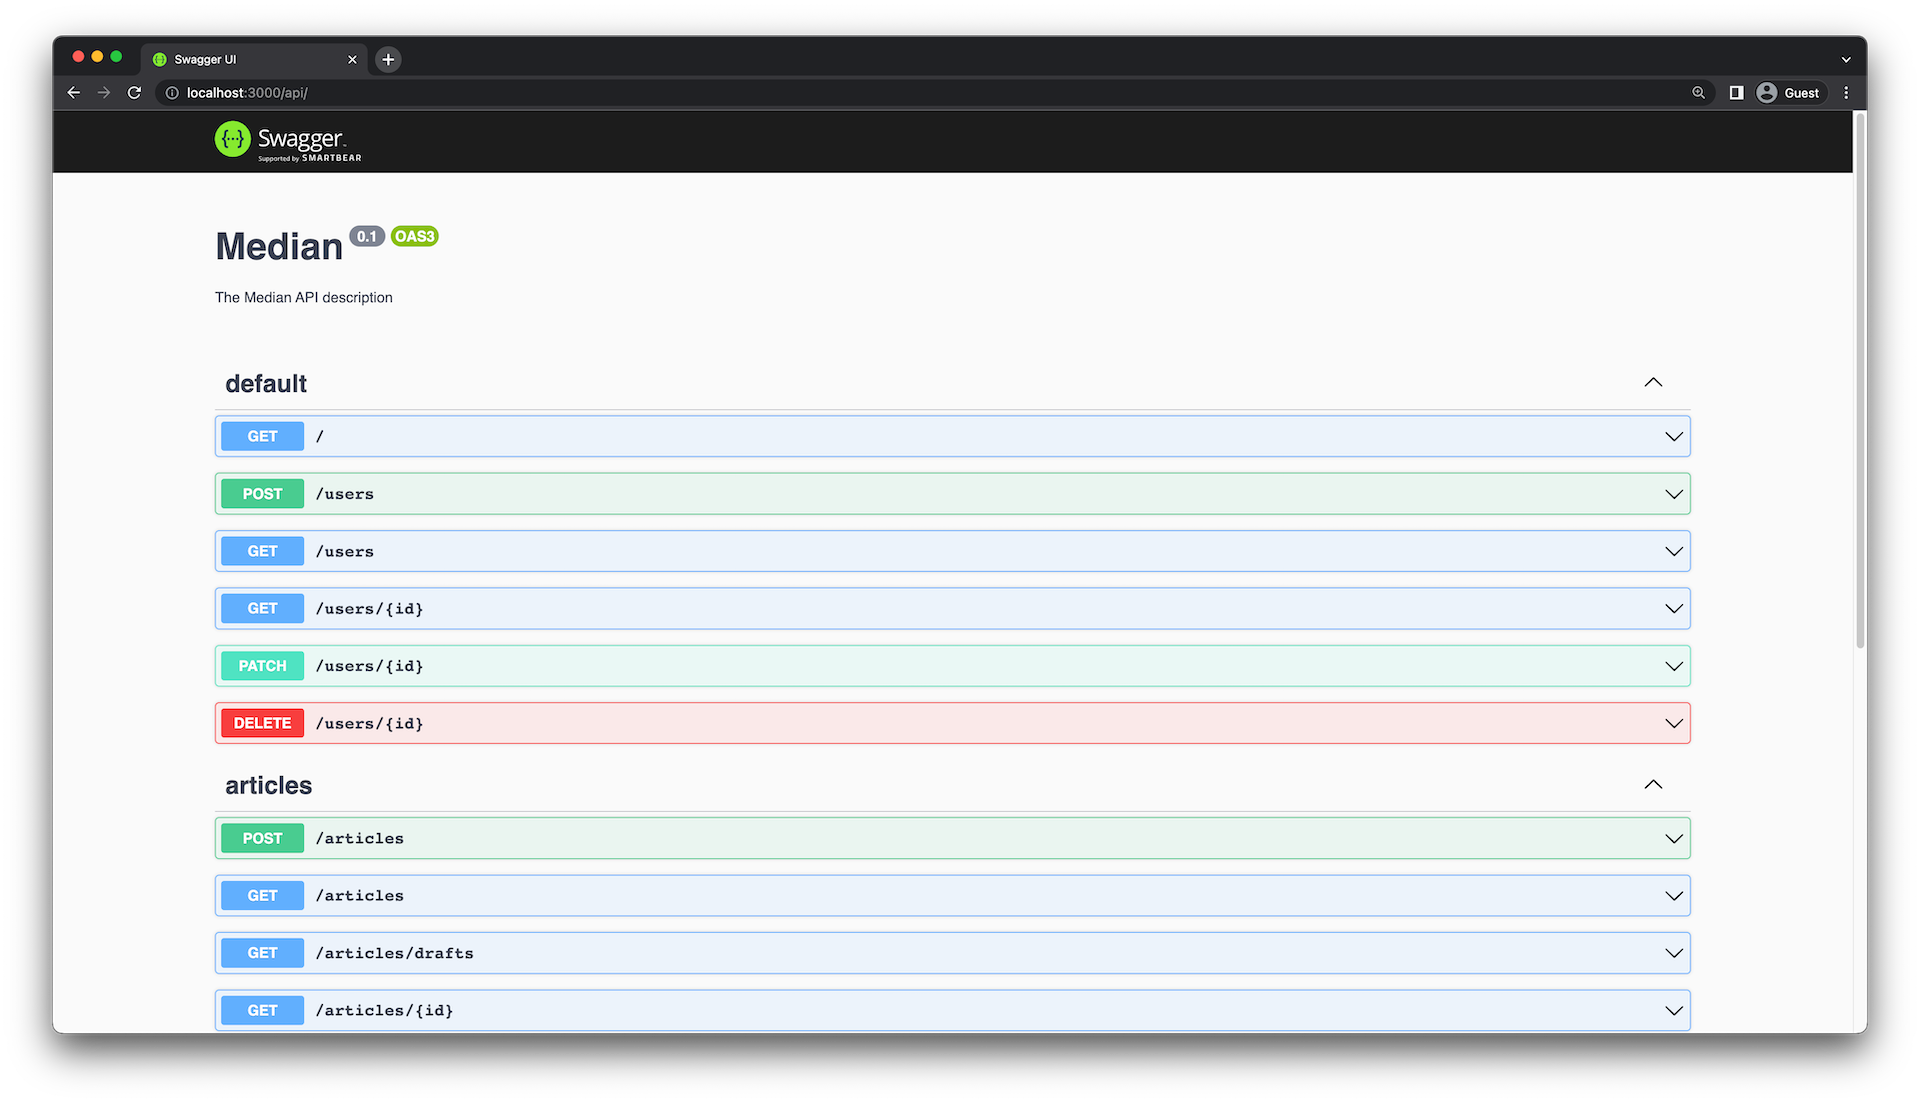
現在,您應該在src/users目錄中找到一個新的用戶模塊,其中包含您REST端點所需的所有樣板代碼。
在src/users/users.controller.ts文件中,您會看到不同路由(也稱為路由處理程序)的定義。處理每個請求的業務邏輯被封裝在src/users/users.service.ts文件中。
如果您打開Swagger生成的API頁面,您應該會看到類似這樣的內容:
要在 Users 模塊內部訪問 PrismaClient,您必須將 PrismaModule 作為導入項。請在 UsersModule 中添加以下導入內容:
// src/users/users.module.ts

import { Module } from '@nestjs/common';

import { UsersService } from './users.service';

import { UsersController } from './users.controller';

import { PrismaModule } from 'src/prisma/prisma.module';


@Module({

  controllers: [UsersController],

  providers: [UsersService],

  imports: [PrismaModule],

})

export class UsersModule {}
現在,您可以在 UsersService 中注入 PrismaService,并使用它來訪問數據庫。為此,請在 users.service.ts 文件中添加一個構造函數,如下所示:
// src/users/users.service.ts


import { Injectable } from '@nestjs/common';

import { CreateUserDto } from './dto/create-user.dto';

import { UpdateUserDto } from './dto/update-user.dto';

import { PrismaService } from 'src/prisma/prisma.service';


@Injectable()

export class UsersService {

  constructor(private prisma: PrismaService) {}


// CRUD operations

}與 ArticleEntity 類似,您將定義一個 UserEntity 類,用于在API層表示User實體。請在 user.entity.ts 文件中定義 UserEntity 類,如下所示:
// src/users/entities/user.entity.ts

import { ApiProperty } from '@nestjs/swagger';

import { User } from '@prisma/client';


export class UserEntity implements User {

  @ApiProperty()

  id: number;


  @ApiProperty()

  createdAt: Date;


  @ApiProperty()

  updatedAt: Date;


  @ApiProperty()

  name: string;


  @ApiProperty()

  email: string;


  password: string;

}
@ApiProperty 裝飾器用于使屬性在Swagger中可見。請注意,您沒有為password字段添加@ApiProperty裝飾器。這是因為該字段是敏感的,您不希望它在API中暴露。
注意:省略
@ApiProperty裝飾器只會從Swagger文檔中隱藏password屬性。該屬性仍然會在響應體中可見。您將在后面的部分處理這個問題。
DTO(數據傳輸對象)是一個定義數據如何通過網絡發送的對象。您需要實現CreateUserDto和UpdateUserDto類,以分別定義在創建和更新用戶時發送到API的數據。請在create-user.dto.ts文件中定義CreateUserDto 類,如下所示:
// src/users/dto/create-user.dto.ts


import { ApiProperty } from '@nestjs/swagger';

import { IsNotEmpty, IsString, MinLength } from 'class-validator';


export class CreateUserDto {

  @IsString()

  @IsNotEmpty()

  @ApiProperty()

  name: string;


  @IsString()

  @IsNotEmpty()

  @ApiProperty()

  email: string;


  @IsString()

  @IsNotEmpty()

  @MinLength(6)

  @ApiProperty()

  password: string;

}@IsString、@MinLength?和?@IsNotEmpty?是用于驗證發送到API的數據的驗證裝飾器
UpdateUserDto 的定義會自動從 CreateUserDto 的定義中推斷出來,因此無需顯式定義。
UsersService 負責使用 Prisma Client 從數據庫中修改和獲取數據,并將其提供給 UsersController。您將在該類中實現 create()、findAll()、findOne()、update() 和 remove() 方法。
// src/users/users.service.ts


import { Injectable } from '@nestjs/common';

import { CreateUserDto } from './dto/create-user.dto';

import { UpdateUserDto } from './dto/update-user.dto';

import { PrismaService } from 'src/prisma/prisma.service';


@Injectable()

export class UsersService {

  constructor(private prisma: PrismaService) {}


  create(createUserDto: CreateUserDto) {

    return this.prisma.user.create({ data: createUserDto });

  }


  findAll() {

    return this.prisma.user.findMany();

  }


  findOne(id: number) {

   return this.prisma.user.findUnique({ where: { id } });

  }


  update(id: number, updateUserDto: UpdateUserDto) {

    return this.prisma.user.update({ where: { id }, data: updateUserDto });

  }


  remove(id: number) {

    return this.prisma.user.delete({ where: { id } });

  }

}UsersController 負責處理對 users 端點的請求和響應。它將利用 UsersService 來訪問數據庫,使用 UserEntity 來定義響應體,以及使用 CreateUserDto 和 UpdateUserDto 來定義請求體。
控制器由不同的路由處理程序組成。您將在該類中實現五個路由處理程序,它們分別對應于五個端點:
create() – POST /usersfindAll() – GET /usersfindOne() – GET /users/:idupdate() – PATCH /users/:idremove() – DELETE /users/:id在 users.controller.ts 文件中更新這些路由處理程序的實現,如下所示:
// src/users/users.controller.ts


import {

  Controller,

  Get,

  Post,

  Body,

  Patch,

  Param,

  Delete,

  ParseIntPipe,

} from '@nestjs/common';

import { UsersService } from './users.service';

import { CreateUserDto } from './dto/create-user.dto';

import { UpdateUserDto } from './dto/update-user.dto';

import { ApiCreatedResponse, ApiOkResponse, ApiTags } from '@nestjs/swagger';

import { UserEntity } from './entities/user.entity';


@Controller('users')

@ApiTags('users')

export class UsersController {

  constructor(private readonly usersService: UsersService) {}


  @Post()

  @ApiCreatedResponse({ type: UserEntity })

  create(@Body() createUserDto: CreateUserDto) {

    return this.usersService.create(createUserDto);

  }


  @Get()

  @ApiOkResponse({ type: UserEntity, isArray: true })

  findAll() {

    return this.usersService.findAll();

  }


  @Get(':id')

  @ApiOkResponse({ type: UserEntity })

  findOne(@Param('id', ParseIntPipe) id: number) {

    return this.usersService.findOne(id);

  }


  @Patch(':id')

  @ApiCreatedResponse({ type: UserEntity })

  update(

    @Param('id', ParseIntPipe) id: number,

    @Body() updateUserDto: UpdateUserDto,

  ) {

    return this.usersService.update(id, updateUserDto);

  }


  @Delete(':id')

  @ApiOkResponse({ type: UserEntity })

  remove(@Param('id', ParseIntPipe) id: number) {

    return this.usersService.remove(id);

  }

}
更新后的控制器使用 @ApiTags 裝飾器將端點分組到 users 標簽下。它還使用 @ApiCreatedResponse 和 @ApiOkResponse 裝飾器來定義每個端點的響應體。
更新后的Swagger API頁面應該如下所示:
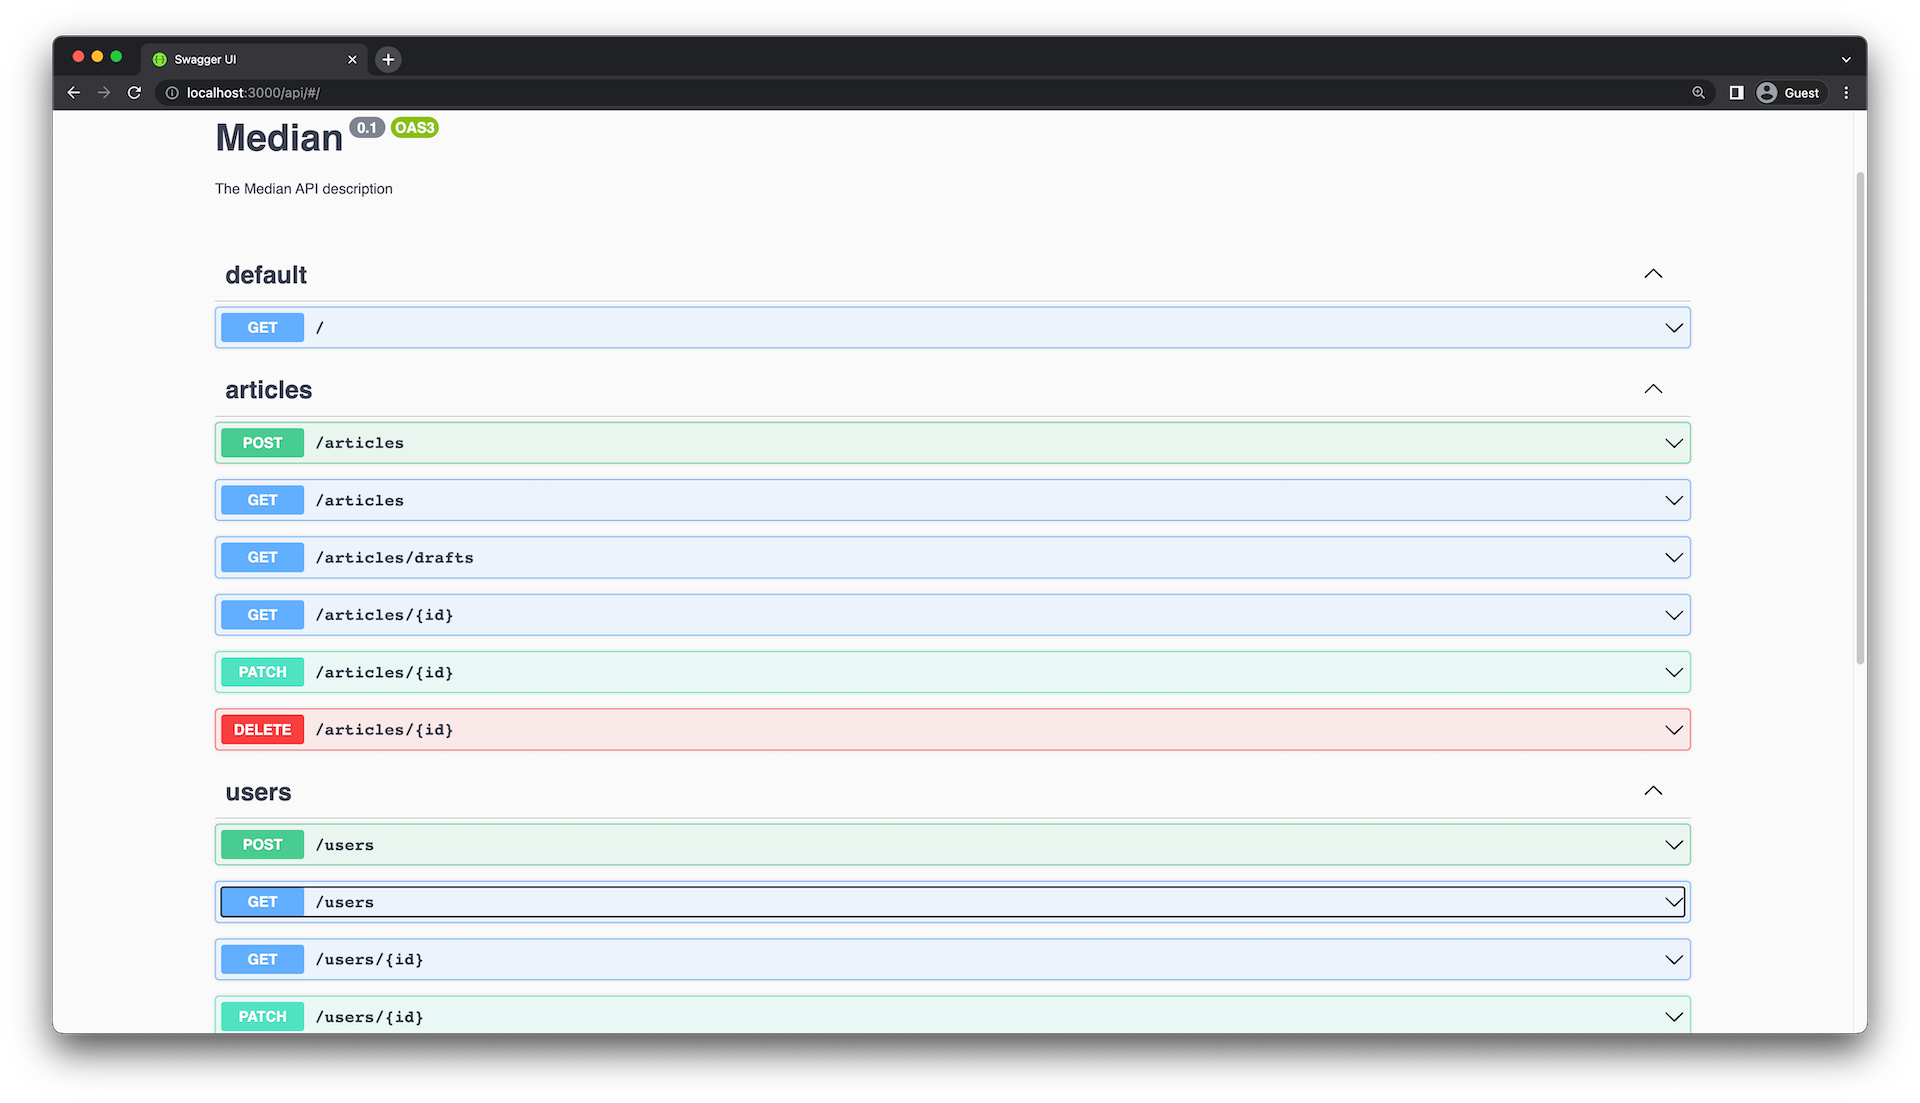
請隨意測試不同的終端節點,以驗證它們是否按預期運行。
雖然 user API 按預期工作,但它存在一個重大的安全漏洞。不同端點的響應體中返回了password字段。

您有兩種方法可以解決此問題:
第一種方法容易出錯,并且會導致不必要的代碼重復。因此,您將使用第二種方法。
NestJS中的攔截器允許您掛鉤到請求-響應周期,并在路由處理程序執行之前和之后執行額外的邏輯。在這種情況下,您將使用它來從響應體中刪除 password 字段。
NestJS有一個內置的ClassSerializerInterceptor,可以用于轉換對象。您將使用這個攔截器從響應對象中刪除 password 字段。
首先,通過更新 main.ts 文件來全局啟用ClassSerializerInterceptor:
// src/main.ts


import { NestFactory, Reflector } from '@nestjs/core';

import { AppModule } from './app.module';

import { SwaggerModule, DocumentBuilder } from '@nestjs/swagger';

import { ClassSerializerInterceptor, ValidationPipe } from '@nestjs/common';


async function bootstrap() {

  const app = await NestFactory.create(AppModule);


  app.useGlobalPipes(new ValidationPipe({ whitelist: true }));

  app.useGlobalInterceptors(new ClassSerializerInterceptor(app.get(Reflector)));


  const config = new DocumentBuilder()

    .setTitle('Median')

    .setDescription('The Median API description')

    .setVersion('0.1')

    .build();

  const document = SwaggerModule.createDocument(app, config);

  SwaggerModule.setup('api', app, document);


  await app.listen(3000);

}

bootstrap();注意:您也可以將攔截器綁定到方法或控制器上,而不是全局綁定。
ClassSerializerInterceptor 使用 class-transformer 包來定義如何轉換對象。在 UserEntity 類中使用 @Exclude() 裝飾器來排除密碼字段:
// src/users/entities/user.entity.ts


import { ApiProperty } from '@nestjs/swagger';

import { User } from '@prisma/client';

import { Exclude } from 'class-transformer';


export class UserEntity implements User {

  @ApiProperty()

  id: number;


  @ApiProperty()

  createdAt: Date;


  @ApiProperty()

  updatedAt: Date;


  @ApiProperty()

  name: string;


  @ApiProperty()

  email: string;


  @Exclude()

  password: string;

}
如果您再次嘗試使用GET /users/:id端點,您會發現密碼字段仍然被公開??。這是因為目前控制器中的路由處理程序返回的是由Prisma Client生成的User類型。ClassSerializerInterceptor 僅適用于使用 @Exclude() 裝飾器裝飾的類。在這種情況下,它是 UserEntity 類。因此,您需要更新路由處理程序以返回 UserEntity 類型。
首先,您需要創建一個構造函數來實例化 UserEntity 對象。
// src/users/entities/user.entity.ts


import { ApiProperty } from '@nestjs/swagger';

import { User } from '@prisma/client';

import { Exclude } from 'class-transformer';


export class UserEntity implements User {

  constructor(partial: Partial<UserEntity>) {

    Object.assign(this, partial);

  }


  @ApiProperty()

  id: number;


  @ApiProperty()

  createdAt: Date;


  @ApiProperty()

  updatedAt: Date;


  @ApiProperty()

  name: string;


  @ApiProperty()

  email: string;


  @Exclude()

  password: string;

}
構造函數接收一個對象,并使用 Object.assign()方法將部分對象的屬性復制到 UserEntity 實例中。partial 的類型是 Partial<UserEntity> ,這意味著部分對象可以包含UserEntity類中定義的任何屬性子集。
接下來,更新 UsersController 的路由處理程序,使其返回 UserEntity 對象,而不是 Prisma.User 對象:
// src/users/users.controller.ts


@Controller('users')

@ApiTags('users')

export class UsersController {

  constructor(private readonly usersService: UsersService) {}


  @Post()

  @ApiCreatedResponse({ type: UserEntity })

  async create(@Body() createUserDto: CreateUserDto) {

    return new UserEntity(await this.usersService.create(createUserDto));

  }


  @Get()

  @ApiOkResponse({ type: UserEntity, isArray: true })

  async findAll() {

    const users = await this.usersService.findAll();

    return users.map((user) => new UserEntity(user));

  }


  @Get(':id')

  @ApiOkResponse({ type: UserEntity })

  async findOne(@Param('id', ParseIntPipe) id: number) {

    return new UserEntity(await this.usersService.findOne(id));

  }


  @Patch(':id')

  @ApiCreatedResponse({ type: UserEntity })

  async update(

    @Param('id', ParseIntPipe) id: number,

    @Body() updateUserDto: UpdateUserDto,

  ) {

    return new UserEntity(await this.usersService.update(id, updateUserDto));

  }


  @Delete(':id')

  @ApiOkResponse({ type: UserEntity })

  async remove(@Param('id', ParseIntPipe) id: number) {

    return new UserEntity(await this.usersService.remove(id));

  }

}
現在,應該從 response 對象中省略 password。
在第一章中,您實現了用于檢索單篇文章的GET /articles/:id端點。目前,該端點僅返回文章的authorId,而不返回作者信息。為了獲取作者信息,您需要向GET /users/:id端點發出額外的請求。如果您需要同時獲取文章及其作者信息,這樣做并不理想,因為您需要發出兩個API請求。您可以通過在返回Article對象的同時返回作者信息來改進這一點。
數據訪問邏輯是在ArticlesService中實現的。更新findOne()方法,以在返回Article對象的同時返回作者信息:
// src/articles/articles.service.ts


  findOne(id: number) {

    return this.prisma.article.findUnique({

      where: { id },

      include: {

        author: true,

      },

    });

  }
如果您測試 GET /articles/:id 端點,您會發現如果文章有作者,那么作者信息會被包含在響應對象中。但是,有一個問題,password 字段將再次被暴露??。
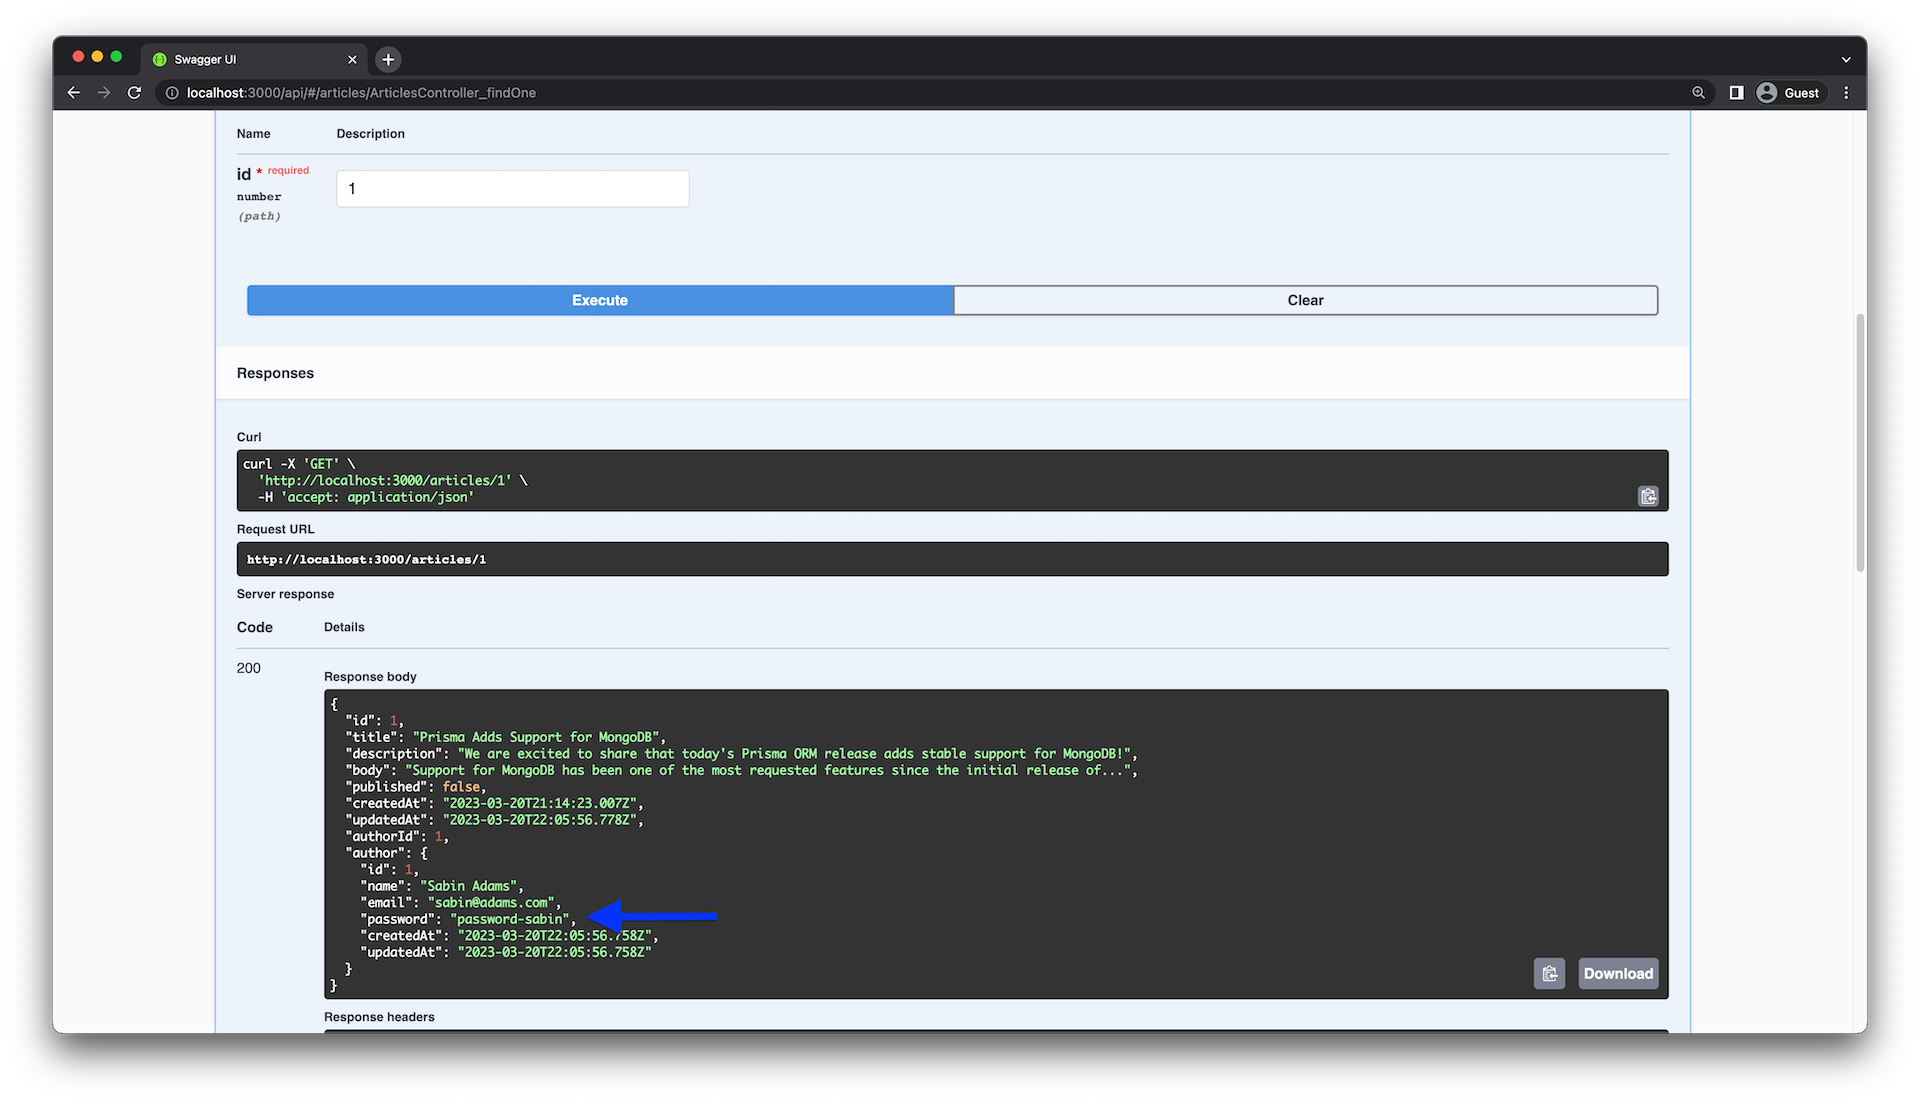
這個問題的原因與上次非常相似。目前,ArticlesController 返回的是由Prisma生成的類型實例,而 ClassSerializerInterceptor 是與 UserEntity 類一起工作的。為了解決這個問題,您將更新 ArticleEntity 類的實現,并確保它使用 UserEntity 的實例來初始化 author 屬性。
// src/articles/entities/article.entity.ts


import { Article } from '@prisma/client';

import { ApiProperty } from '@nestjs/swagger';

import { UserEntity } from 'src/users/entities/user.entity';


export class ArticleEntity implements Article {

  @ApiProperty()

  id: number;


  @ApiProperty()

  title: string;


  @ApiProperty({ required: false, nullable: true })

  description: string | null;


  @ApiProperty()

  body: string;


  @ApiProperty()

  published: boolean;


  @ApiProperty()

  createdAt: Date;


  @ApiProperty()

  updatedAt: Date;


  @ApiProperty({ required: false, nullable: true })

  authorId: number | null;


  @ApiProperty({ required: false, type: UserEntity })

  author?: UserEntity;


  constructor({ author, ...data }: Partial<ArticleEntity>) {

    Object.assign(this, data);


    if (author) {

      this.author = new UserEntity(author);

    }

  }

}您再次使用Object.assign()方法將數據對象的屬性復制到ArticleEntity實例中。如果author屬性存在,它將被初始化為UserEntity的實例。
現在,更新ArticlesController以返回ArticleEntity對象的實例:
// src/articles/articles.controller.ts
import {
  Controller,
  Get,
  Post,
  Body,
  Patch,
  Param,
  Delete,
  ParseIntPipe,
} from '@nestjs/common';
import { ArticlesService } from './articles.service';
import { CreateArticleDto } from './dto/create-article.dto';
import { UpdateArticleDto } from './dto/update-article.dto';
import { ApiCreatedResponse, ApiOkResponse, ApiTags } from '@nestjs/swagger';
import { ArticleEntity } from './entities/article.entity';

@Controller('articles')
@ApiTags('articles')
export class ArticlesController {
  constructor(private readonly articlesService: ArticlesService) {}

  @Post()
  @ApiCreatedResponse({ type: ArticleEntity })
  async create(@Body() createArticleDto: CreateArticleDto) {
    return new ArticleEntity(
      await this.articlesService.create(createArticleDto),
    );
  }

  @Get()
  @ApiOkResponse({ type: ArticleEntity, isArray: true })
  async findAll() {
    const articles = await this.articlesService.findAll();
    return articles.map((article) => new ArticleEntity(article));
  }

  @Get('drafts')
  @ApiOkResponse({ type: ArticleEntity, isArray: true })
  async findDrafts() {
    const drafts = await this.articlesService.findDrafts();
    return drafts.map((draft) => new ArticleEntity(draft));
  }

  @Get(':id')
  @ApiOkResponse({ type: ArticleEntity })
  async findOne(@Param('id', ParseIntPipe) id: number) {
    return new ArticleEntity(await this.articlesService.findOne(id));
  }

  @Patch(':id')
  @ApiCreatedResponse({ type: ArticleEntity })
  async update(
    @Param('id', ParseIntPipe) id: number,
    @Body() updateArticleDto: UpdateArticleDto,
  ) {
    return new ArticleEntity(
      await this.articlesService.update(id, updateArticleDto),
    );
  }

  @Delete(':id')
  @ApiOkResponse({ type: ArticleEntity })
  async remove(@Param('id', ParseIntPipe) id: number) {
    return new ArticleEntity(await this.articlesService.remove(id));
  }
}
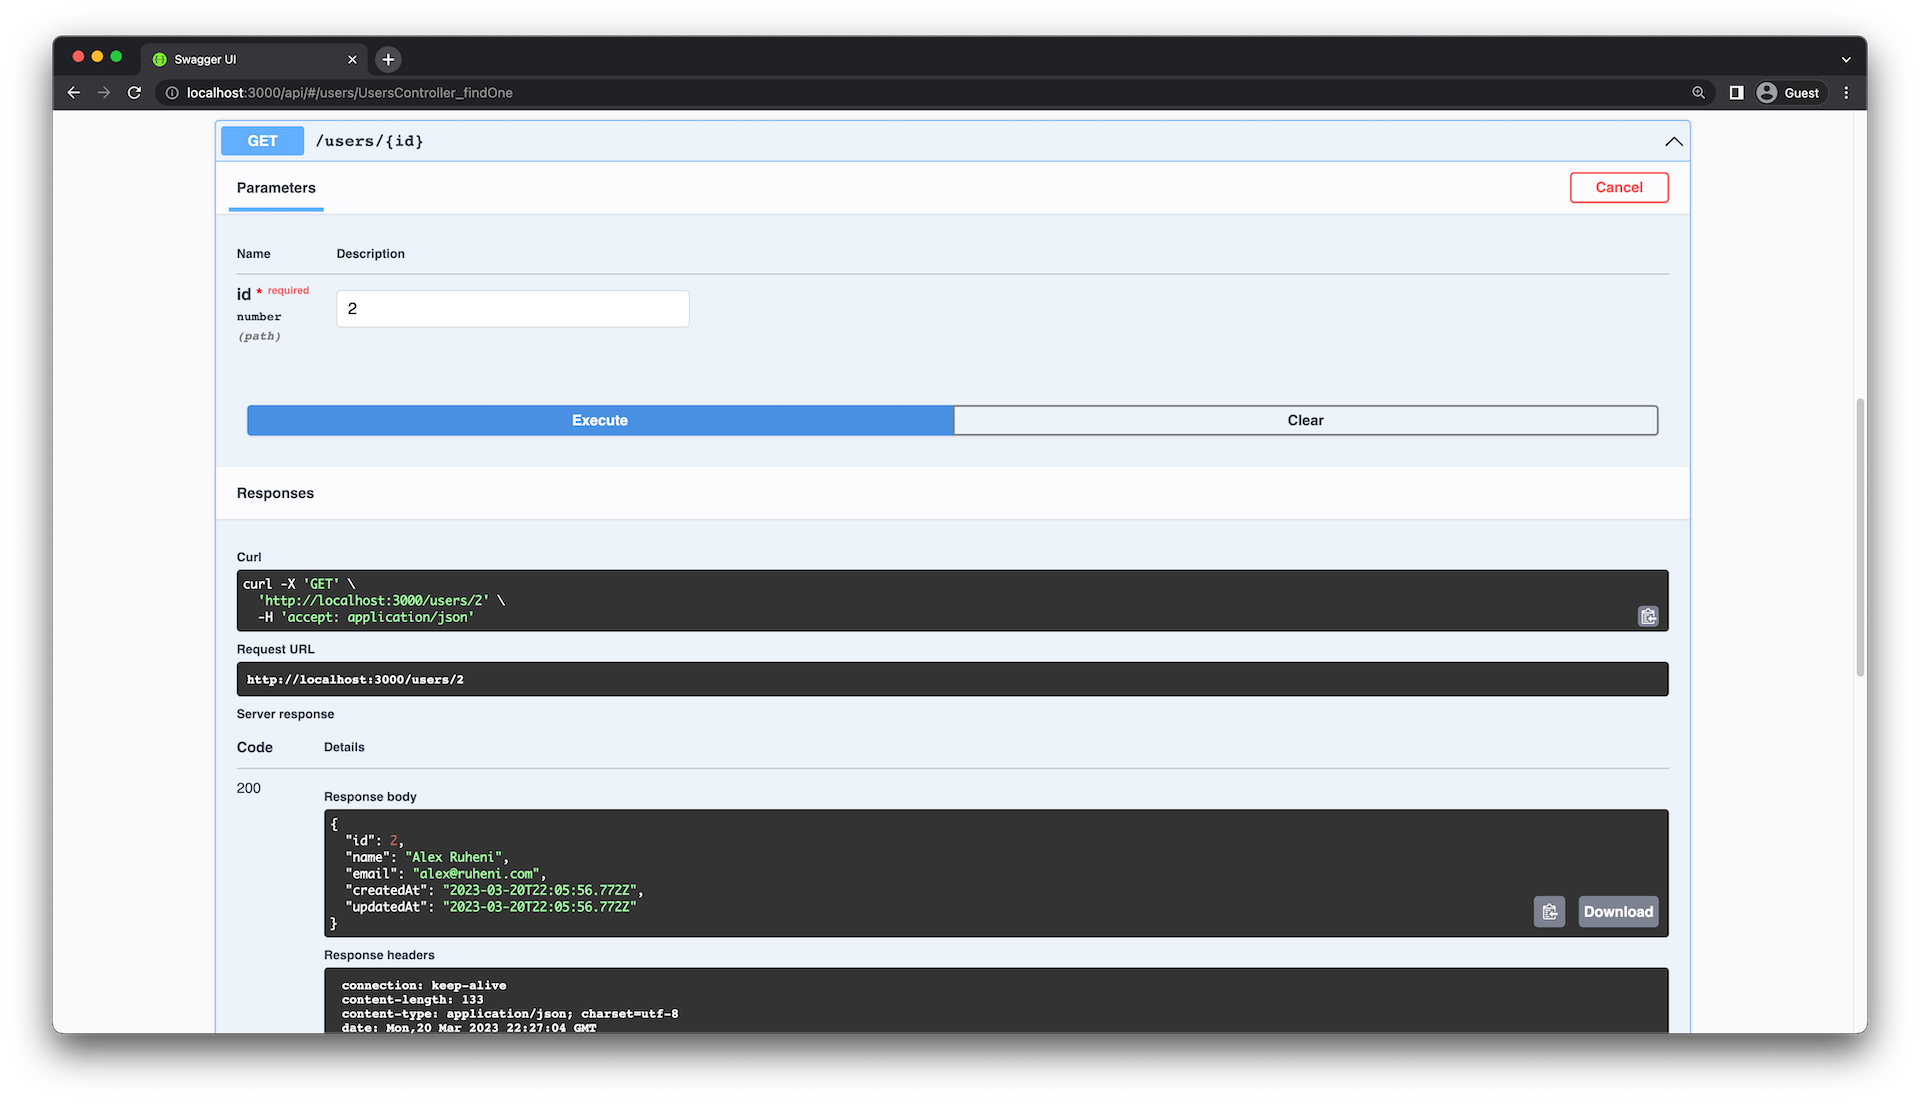
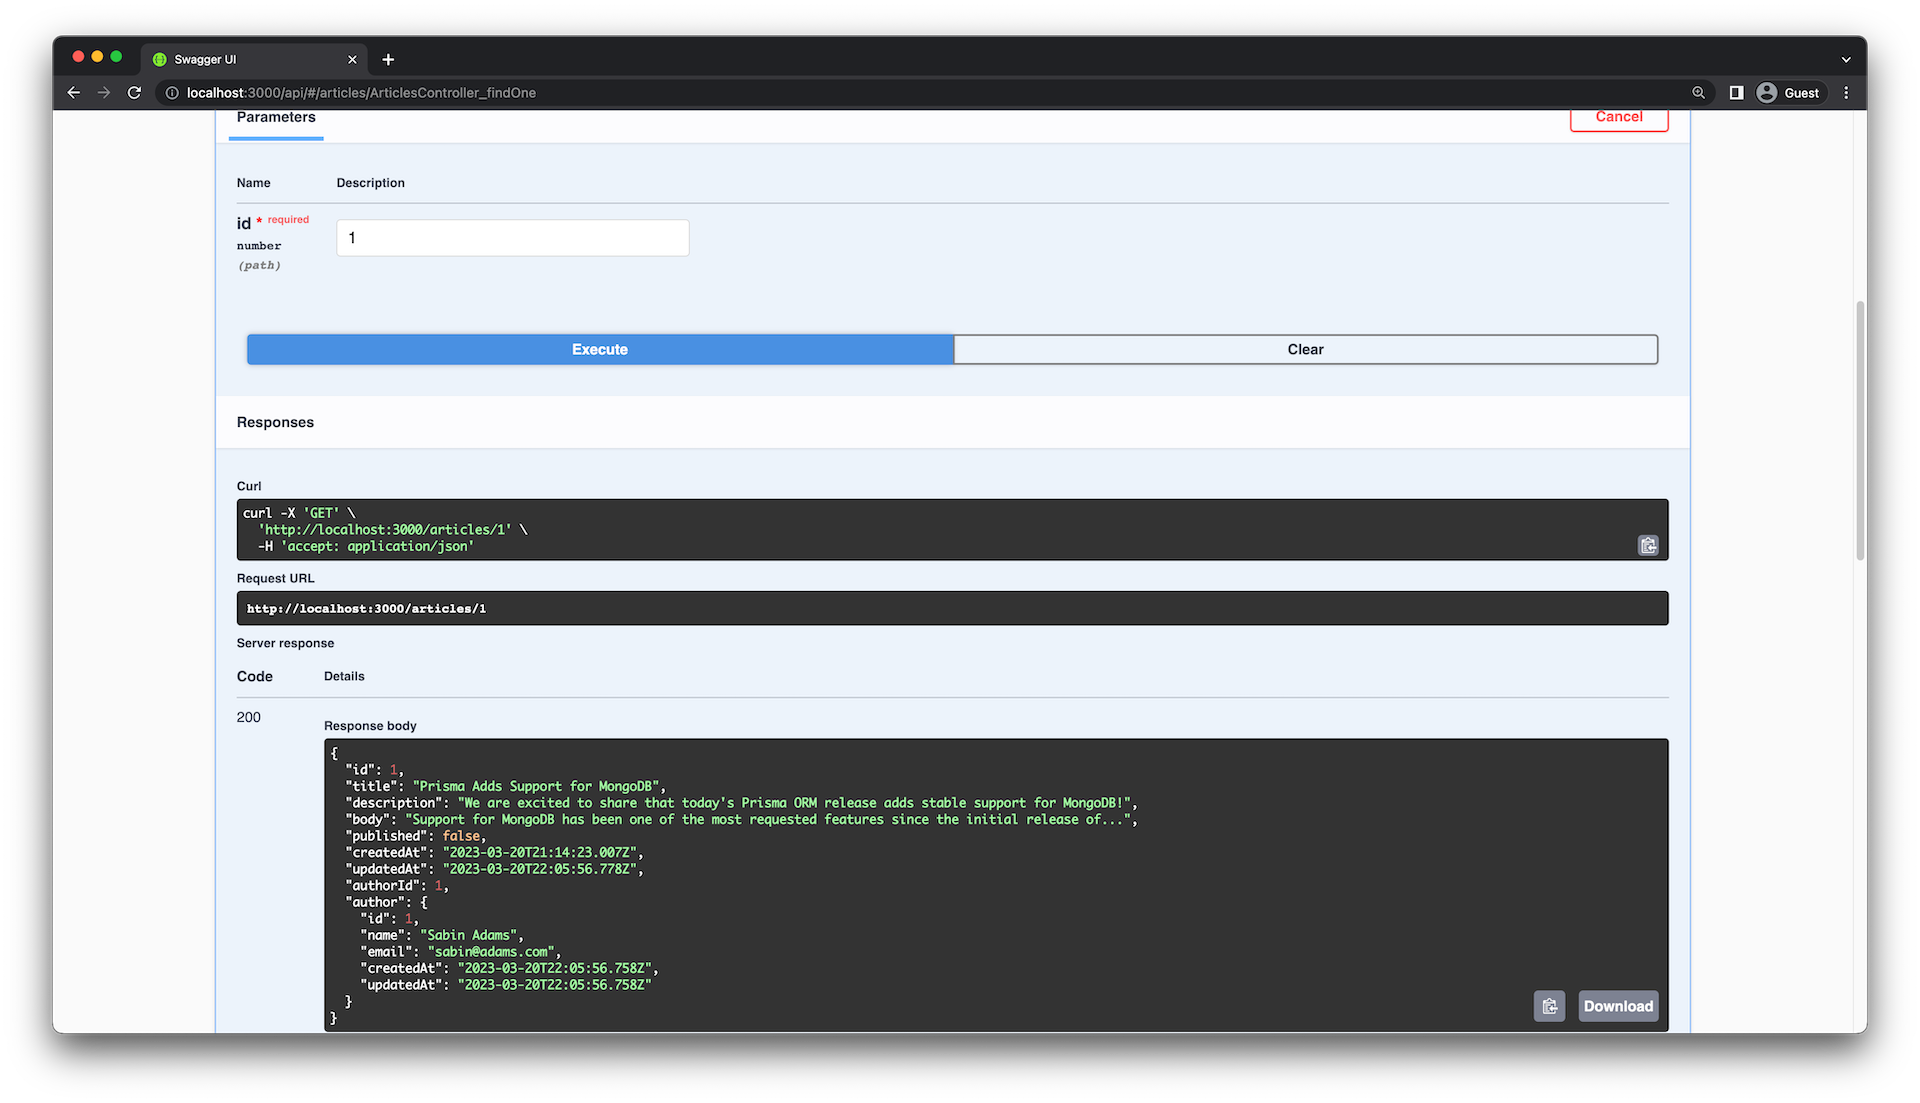
現在,GET /articles/:id返回沒有author字段的password對象:
在本章中,您學習了如何在NestJS應用程序中使用Prisma對關系型數據進行建模。您還了解了 ClassSerializerInterceptor 以及如何使用實體類來控制返回給客戶端的數據。
您可以在GitHub倉庫的 end-relational-data 分支中找到本教程的完整代碼。如果您發現任何問題,請隨時在倉庫中提出問題或提交拉取請求(PR)。
原文鏈接:https://www.prisma.io/blog/nestjs-prisma-relational-data-7D056s1kOabc