微信截圖_17461434713434.png)
深入解析 DeepSeek API 密鑰:獲取、使用與最佳實踐
注意:您可能會注意到該文件夾??還帶有一個目錄。本教程不涉及測試。
此存儲庫中值得注意的文件和目錄是:
src目錄包含應(yīng)用程序的源代碼。共有三個模塊:
app模塊位于目錄的根目錄中src,是應(yīng)用程序的入口點。它負(fù)責(zé)啟動網(wǎng)絡(luò)服務(wù)器。prisma模塊包含 Prisma 客戶端,即數(shù)據(jù)庫接口。articles模塊定義了路由的端點/articles和伴隨的業(yè)務(wù)邏輯。users模塊定義了路由的端點/users和伴隨的業(yè)務(wù)邏輯。prisma文件夾有以下內(nèi)容:
schema.prisma文件定義數(shù)據(jù)庫模式。migrations目錄包含數(shù)據(jù)庫遷移歷史記錄。seed.ts文件包含一個腳本,用于使用虛擬數(shù)據(jù)為您的開發(fā)數(shù)據(jù)庫播種。docker-compose.yml文件定義 PostgreSQL 數(shù)據(jù)庫的 Docker 映像。.env文件包含了PostgreSQL數(shù)據(jù)庫的連接字符串。在本部分中,您將為 REST API 實現(xiàn)大部分身份驗證邏輯。到本節(jié)結(jié)束時,以下端點將受到身份驗證保護(hù)??:
GET /usersGET /users/:idPATCH /users/:idDELETE /users/:idWeb 上使用的身份驗證主要有兩種類型:基于會話的身份驗證和基于令牌的身份驗證。在本教程中,您將利用JSON Web令牌(JWT)來實現(xiàn)基于令牌的身份驗證機制。
首先,在您的應(yīng)用程序中創(chuàng)建一個新模塊。運行以下命令生成新模塊:
npx nest generate resource
您將看到一些 CLI 提示。回答相應(yīng)的問題:
您現(xiàn)在應(yīng)該auth在目錄中找到一個新模塊src/auth。
passport是 Node.js 應(yīng)用程序的流行身份驗證庫。它具有高度可配置性并支持多種身份驗證策略。NestJS是基于Express Web框架構(gòu)建的,因此它旨在與Express一起使用。NestJS 與passport進(jìn)行了第一方集成@nestjs/passport,使其可以輕松地在您的 NestJS 應(yīng)用程序中使用。
首先安裝以下軟件包:
npm install --save @nestjs/passport passport @nestjs/jwt passport-jwtnpm install --save-dev @types/passport-jwt現(xiàn)在您已經(jīng)安裝了所需的軟件包,您可以passport在應(yīng)用程序中進(jìn)行配置。打開src/auth.module.ts文件并添加以下代碼:
//src/auth/auth.module.ts

import { Module } from '@nestjs/common';

import { AuthService } from './auth.service';

import { AuthController } from './auth.controller';

import { PassportModule } from '@nestjs/passport';

import { JwtModule } from '@nestjs/jwt';

import { PrismaModule } from 'src/prisma/prisma.module';


export const jwtSecret = 'zjP9h6ZI5LoSKCRj';


@Module({

  imports: [

    PrismaModule,

    PassportModule,

    JwtModule.register({

      secret: jwtSecret,

      signOptions: { expiresIn: '5m' }, // e.g. 30s, 7d, 24h

    }),

  ],

  controllers: [AuthController],

  providers: [AuthService],

})

export class AuthModule {}@nestjs/passport模塊提供了一個PassportModule,您可以將其導(dǎo)入到您的應(yīng)用程序中。這個PassportModule是passport庫的封裝器,為NestJS提供了特定的實用工具。您可以在官方文檔中閱讀更多關(guān)于PassportModule的詳細(xì)信息。
您還配置了JwtModule,用于生成和驗證JWT。JwtModule是jsonwebtoken庫的封裝,它提供了一個secret密鑰用于簽署JWT,以及一個expiresIn對象來定義JWT的過期時間,當(dāng)前設(shè)置為5分鐘。
注意:如果前一個令牌已過期,請記住生成新令牌。
您可以使用jwtSecret代碼片段中顯示的代碼片段或使用 OpenSSL 生成您自己的代碼片段。
注意:在真實的應(yīng)用程序中,您不應(yīng)該將機密直接存儲在代碼庫中。 NestJS提供了
@nestjs/config從環(huán)境變量加載秘密的包。
該POST /login端點將用于對用戶進(jìn)行身份驗證。它將接收用戶名和密碼作為輸入,如果憑據(jù)驗證通過,則返回JWT。首先,您需要創(chuàng)建一個LoginDto類,用于定義請求體的結(jié)構(gòu)。
在目錄中創(chuàng)建一個名為login.dto.ts的新文件:
mkdir src/auth/dto

touch src/auth/dto/login.dto.ts現(xiàn)在用email和LoginDto字段定義類:
//src/auth/dto/login.dto.ts

import { ApiProperty } from '@nestjs/swagger';

import { IsEmail, IsNotEmpty, IsString, MinLength } from 'class-validator';


export class LoginDto {

  @IsEmail()

  @IsNotEmpty()

  @ApiProperty()

  email: string;


  @IsString()

  @IsNotEmpty()

  @MinLength(6)

  @ApiProperty()

  password: string;

}您還需要定義一個新的AuthEntity來描述JWT有效負(fù)載的結(jié)構(gòu)。請在auth.entity.ts文件中進(jìn)行定義。
mkdir src/auth/entity

touch src/auth/entity/auth.entity.ts
現(xiàn)在在此文件中定義:
//src/auth/entity/auth.entity.ts

import { ApiProperty } from '@nestjs/swagger';


export class AuthEntity {

  @ApiProperty()

  accessToken: string;

}AuthEntity只有一個名為accessToken的字符串字段,該字段包含JWT。
現(xiàn)在在里面創(chuàng)建一個新login方法:
//src/auth/auth.service.ts

import {

  Injectable,

  NotFoundException,

  UnauthorizedException,

} from '@nestjs/common';

import { PrismaService } from './../prisma/prisma.service';

import { JwtService } from '@nestjs/jwt';

import { AuthEntity } from './entity/auth.entity';


@Injectable()

export class AuthService {

  constructor(private prisma: PrismaService, private jwtService: JwtService) {}


  async login(email: string, password: string): Promise<AuthEntity> {

    // Step 1: Fetch a user with the given email

    const user = await this.prisma.user.findUnique({ where: { email: email } });


    // If no user is found, throw an error

    if (!user) {

      throw new NotFoundException(No user found for email: ${email});
    }

    // Step 2: Check if the password is correct
    const isPasswordValid = user.password === password;

    // If password does not match, throw an error
    if (!isPasswordValid) {
      throw new UnauthorizedException('Invalid password');
    }

    // Step 3: Generate a JWT containing the user's ID and return it
    return {
      accessToken: this.jwtService.sign({ userId: user.id }),
    };
  }
}該login方法首先獲取具有給定電子郵件的用戶。如果沒有找到用戶,系統(tǒng)會拋出一個NotFoundException。如果找到了用戶,系統(tǒng)會進(jìn)一步檢查密碼是否正確。如果密碼不正確,則會拋出一個UnauthorizedException。如果密碼正確,它會生成一個包含用戶 ID 的 JWT 并將其返回。
現(xiàn)在,在AuthController中創(chuàng)建一個處理POST /auth/login請求的方法:
//src/auth/auth.controller.ts

+import { Body, Controller, Post } from '@nestjs/common';import { AuthService } from './auth.service';+import { ApiOkResponse, ApiTags } from '@nestjs/swagger';+import { AuthEntity } from './entity/auth.entity';+import { LoginDto } from './dto/login.dto';

@Controller('auth')+@ApiTags('auth')export class AuthController {  constructor(private readonly authService: AuthService) {}

+ @Post('login')+ @ApiOkResponse({ type: AuthEntity })+ login(@Body() { email, password }: LoginDto) {+ return this.authService.login(email, password);+ }}現(xiàn)在,您的API中應(yīng)該有一個新的端點POST /auth/login。
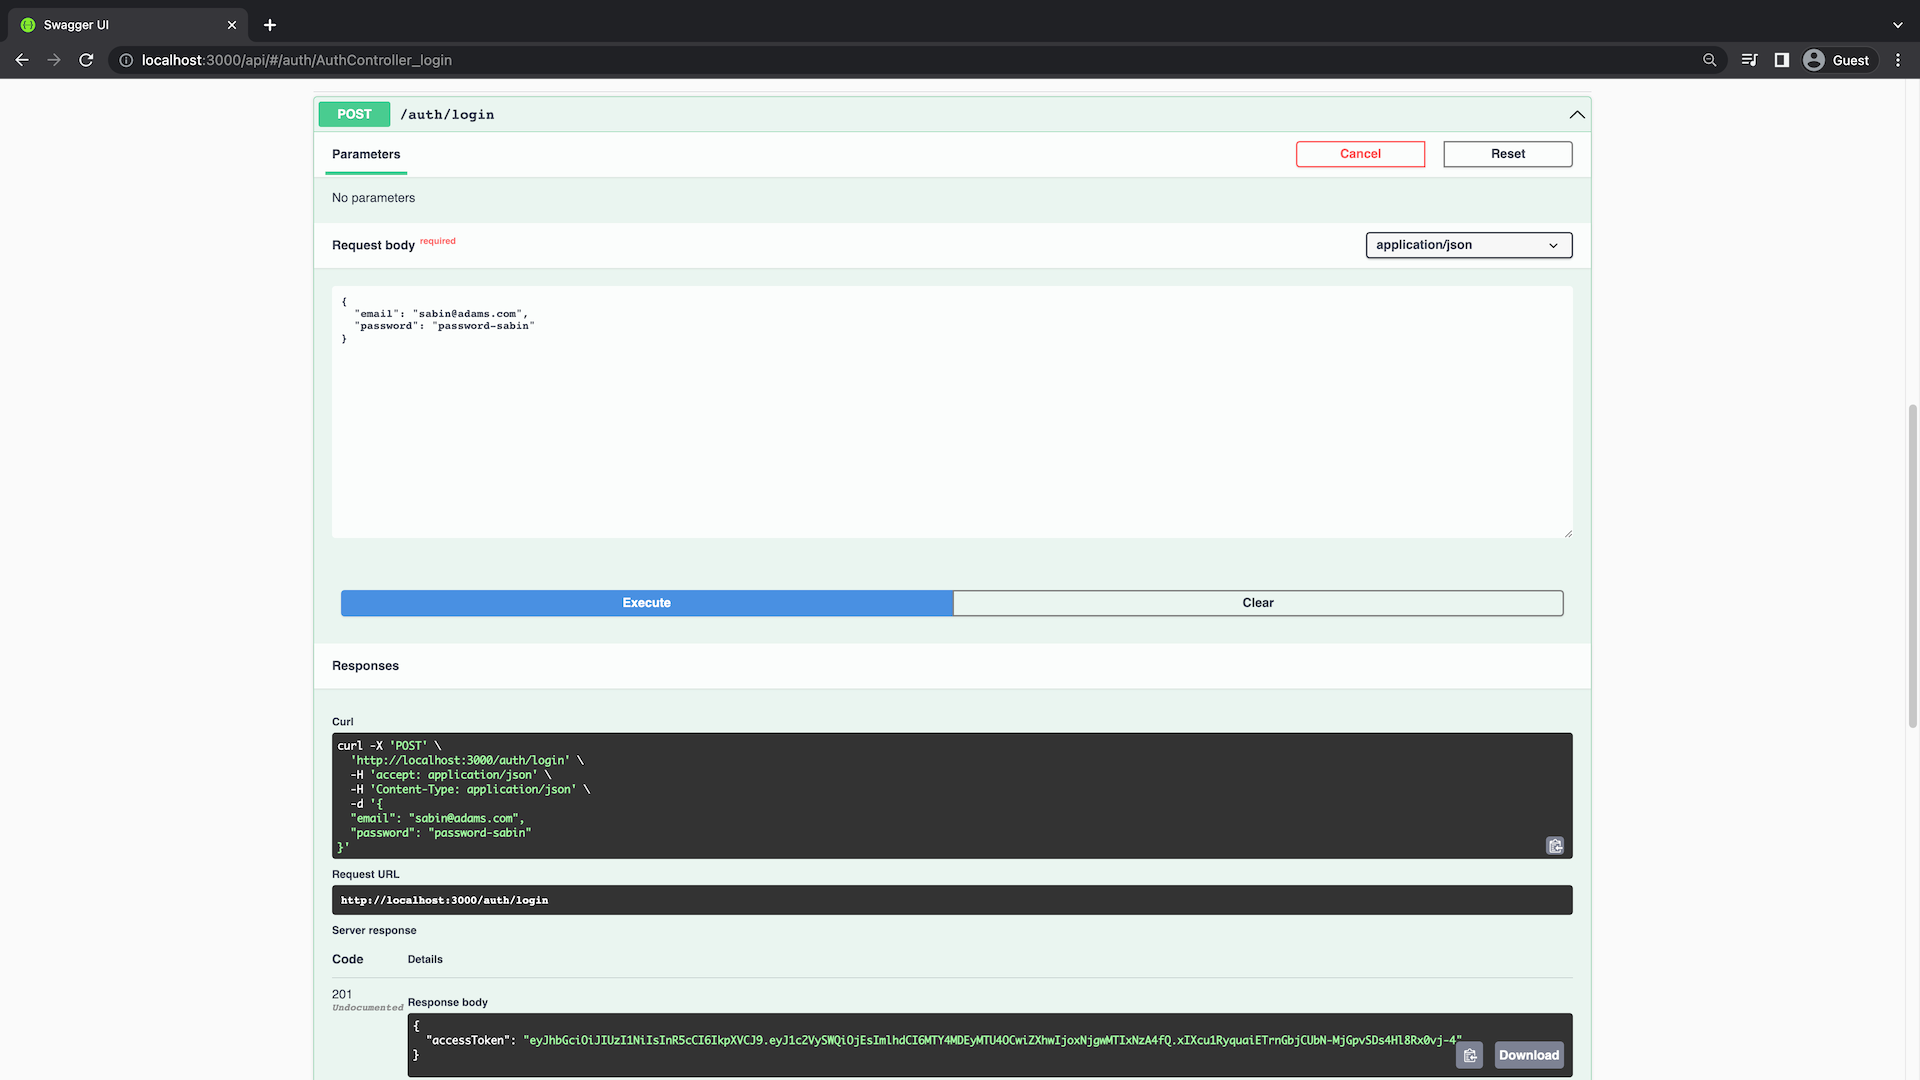
轉(zhuǎn)到該http://localhost:3000/api頁面并嘗試POST /auth/login端點。提供您在種子腳本中創(chuàng)建的用戶的憑據(jù)。
您可以使用以下請求正文:
{ "email": "sabin@adams.com", "password": "password-sabin"}執(zhí)行請求后,您應(yīng)該在響應(yīng)中獲得 JWT。
在下一部分中,您將使用此令牌對用戶進(jìn)行身份驗證。
在 Passport 中,策略負(fù)責(zé)對請求進(jìn)行身份驗證,這是通過實現(xiàn)身份驗證機制來完成的。在本部分中,您將實現(xiàn)用于對用戶進(jìn)行身份驗證的 JWT 身份驗證策略。
您不會直接使用passport這個包,而是與@nestjs/passport這個包裝器包進(jìn)行交互,后者會在幕后調(diào)用passport包。要使用配置策略@nestjs/passport,您需要創(chuàng)建一個擴展該類的類PassportStrategy。在這個課程中你需要做兩件主要的事情:
super()構(gòu)造函數(shù)中的方法。validate()回調(diào)方法,它將與您的數(shù)據(jù)庫進(jìn)行交互,根據(jù)JWT負(fù)載中的信息來獲取用戶。如果成功找到用戶,該validate()方法應(yīng)當(dāng)返回該用戶對象。首先在jwt.strategy.ts目錄中創(chuàng)建一個名為src/auth/strategy的新文件:
touch src/auth/jwt.strategy.ts現(xiàn)在實現(xiàn)JwtStrategy類:
//src/auth/jwt.strategy.ts

import { Injectable, UnauthorizedException } from '@nestjs/common';

import { PassportStrategy } from '@nestjs/passport';

import { ExtractJwt, Strategy } from 'passport-jwt';

import { jwtSecret } from './auth.module';

import { UsersService } from 'src/users/users.service';


@Injectable()

export class JwtStrategy extends PassportStrategy(Strategy, 'jwt') {

  constructor(private usersService: UsersService) {

    super({

      jwtFromRequest: ExtractJwt.fromAuthHeaderAsBearerToken(),

      secretOrKey: jwtSecret,

    });

  }


  async validate(payload: { userId: number }) {

    const user = await this.usersService.findOne(payload.userId);


    if (!user) {

      throw new UnauthorizedException();

    }


    return user;

  }

}您已經(jīng)創(chuàng)建了一個名為JwtStrategy的類,該類擴展了PassportStrategy。該類PassportStrategy采用兩個參數(shù):策略實現(xiàn)和策略名稱。在這里,您正在使用庫中的預(yù)定義策略passport-jwt。
您在super()構(gòu)造函數(shù)中向該方法傳遞了一些選項。其中,jwtFromRequest選項需要一個函數(shù),該函數(shù)能夠從請求中提取JWT。在這種情況下,您將使用在API請求的Authorization頭部中提供Bearer令牌的標(biāo)準(zhǔn)方法。secretOrKey選項則告訴策略應(yīng)該使用什么密鑰來驗證JWT。還有更多其他的選項可供配置,您可以在passport-jwt的官方存儲庫中查閱詳細(xì)信息。
對于passport-jwt,Passport 首先驗證 JWT 的簽名并解碼 JSON。然后將解碼后的 JSON 傳遞給該validate()方法。根據(jù) JWT 簽名的工作方式,您可以保證收到之前由您的應(yīng)用程序簽名和頒發(fā)的有效令牌。該validate()方法預(yù)計返回一個用戶對象。如果未找到用戶,該validate()方法將引發(fā)錯誤。
注意:Passport可能會讓人感到有些復(fù)雜。但將其本身視為一個迷你框架是很有幫助的,因為它將身份驗證過程抽象為了幾個步驟,這些步驟可以通過策略和配置選項進(jìn)行自定義。
在JwtStrategy中添加新的AuthModule作為提供程序:
//src/auth/auth.module.ts

import { Module } from '@nestjs/common';

import { AuthService } from './auth.service';

import { AuthController } from './auth.controller';

import { PassportModule } from '@nestjs/passport';

import { JwtModule } from '@nestjs/jwt';

import { PrismaModule } from 'src/prisma/prisma.module';

import { UsersModule } from 'src/users/users.module';

import { JwtStrategy } from './jwt.strategy';


export const jwtSecret = 'zjP9h6ZI5LoSKCRj';


@Module({

  imports: [

    PrismaModule,

    PassportModule,

    JwtModule.register({

      secret: jwtSecret,

      signOptions: { expiresIn: '5m' }, // e.g. 7d, 24h

    }),

    UsersModule,

  ],

  controllers: [AuthController],

  providers: [AuthService, JwtStrategy],

})

export class AuthModule {}現(xiàn)在,JwtStrategy可以被其他模塊所使用了。此外,您還在UsersModule中添加了相應(yīng)的imports,因為UsersService類中正在使用JwtStrategy。
要使UsersService在JwtStrategy類中可訪問,您還需要將其添加到exports的UsersModule中:
// src/users/users.module.ts

import { Module } from '@nestjs/common';

import { UsersService } from './users.service';

import { UsersController } from './users.controller';

import { PrismaModule } from 'src/prisma/prisma.module';


@Module({

  controllers: [UsersController],

  providers: [UsersService],

  imports: [PrismaModule],

  exports: [UsersService],

})

export class UsersModule {}Guards是一種 NestJS 構(gòu)造,用于確定是否允許請求繼續(xù)進(jìn)行。在本部分中,您將實現(xiàn)一個自定義JwtAuthGuard,用于保護(hù)需要身份驗證的路由。
jwt-auth.guard.ts在目錄中創(chuàng)建一個名為的新文件src/auth:
touch src/auth/jwt-auth.guard.ts現(xiàn)在實現(xiàn)JwtAuthGuard類:
//src/auth/jwt-auth.guard.tsimport { Injectable } from '@nestjs/common';import { AuthGuard } from '@nestjs/passport';

@Injectable()export class JwtAuthGuard extends AuthGuard('jwt') {}該類AuthGuard需要策略的名稱。在本例中,您將使用JwtStrategy在上一節(jié)中實現(xiàn)的名為 的jwt。
您現(xiàn)在可以使用這個守衛(wèi)(Guard)作為裝飾器來保護(hù)您的端點。請將JwtAuthGuard添加到UsersController的路由中:
// src/users/users.controller.ts

import {

  Controller,

  Get,

  Post,

  Body,

  Patch,

  Param,

  Delete,

  ParseIntPipe,

  UseGuards,

} from '@nestjs/common';

import { UsersService } from './users.service';

import { CreateUserDto } from './dto/create-user.dto';

import { UpdateUserDto } from './dto/update-user.dto';

import { ApiCreatedResponse, ApiOkResponse, ApiTags } from '@nestjs/swagger';

import { UserEntity } from './entities/user.entity';

import { JwtAuthGuard } from 'src/auth/jwt-auth.guard';


@Controller('users')

@ApiTags('users')

export class UsersController {

  constructor(private readonly usersService: UsersService) {}


  @Post()

  @ApiCreatedResponse({ type: UserEntity })

  async create(@Body() createUserDto: CreateUserDto) {

    return new UserEntity(await this.usersService.create(createUserDto));

  }


  @Get()

  @UseGuards(JwtAuthGuard)

  @ApiOkResponse({ type: UserEntity, isArray: true })

  async findAll() {

    const users = await this.usersService.findAll();

    return users.map((user) => new UserEntity(user));

  }


  @Get(':id')

  @UseGuards(JwtAuthGuard)

  @ApiOkResponse({ type: UserEntity })

  async findOne(@Param('id', ParseIntPipe) id: number) {

    return new UserEntity(await this.usersService.findOne(id));

  }


  @Patch(':id')

  @UseGuards(JwtAuthGuard)

  @ApiCreatedResponse({ type: UserEntity })

  async update(

    @Param('id', ParseIntPipe) id: number,

    @Body() updateUserDto: UpdateUserDto,

  ) {

    return new UserEntity(await this.usersService.update(id, updateUserDto));

  }


  @Delete(':id')

  @UseGuards(JwtAuthGuard)

  @ApiOkResponse({ type: UserEntity })

  async remove(@Param('id', ParseIntPipe) id: number) {

    return new UserEntity(await this.usersService.remove(id));

  }

}
如果您嘗試在未經(jīng)身份驗證的情況下查詢?nèi)魏芜@些端點,它將不再起作用。
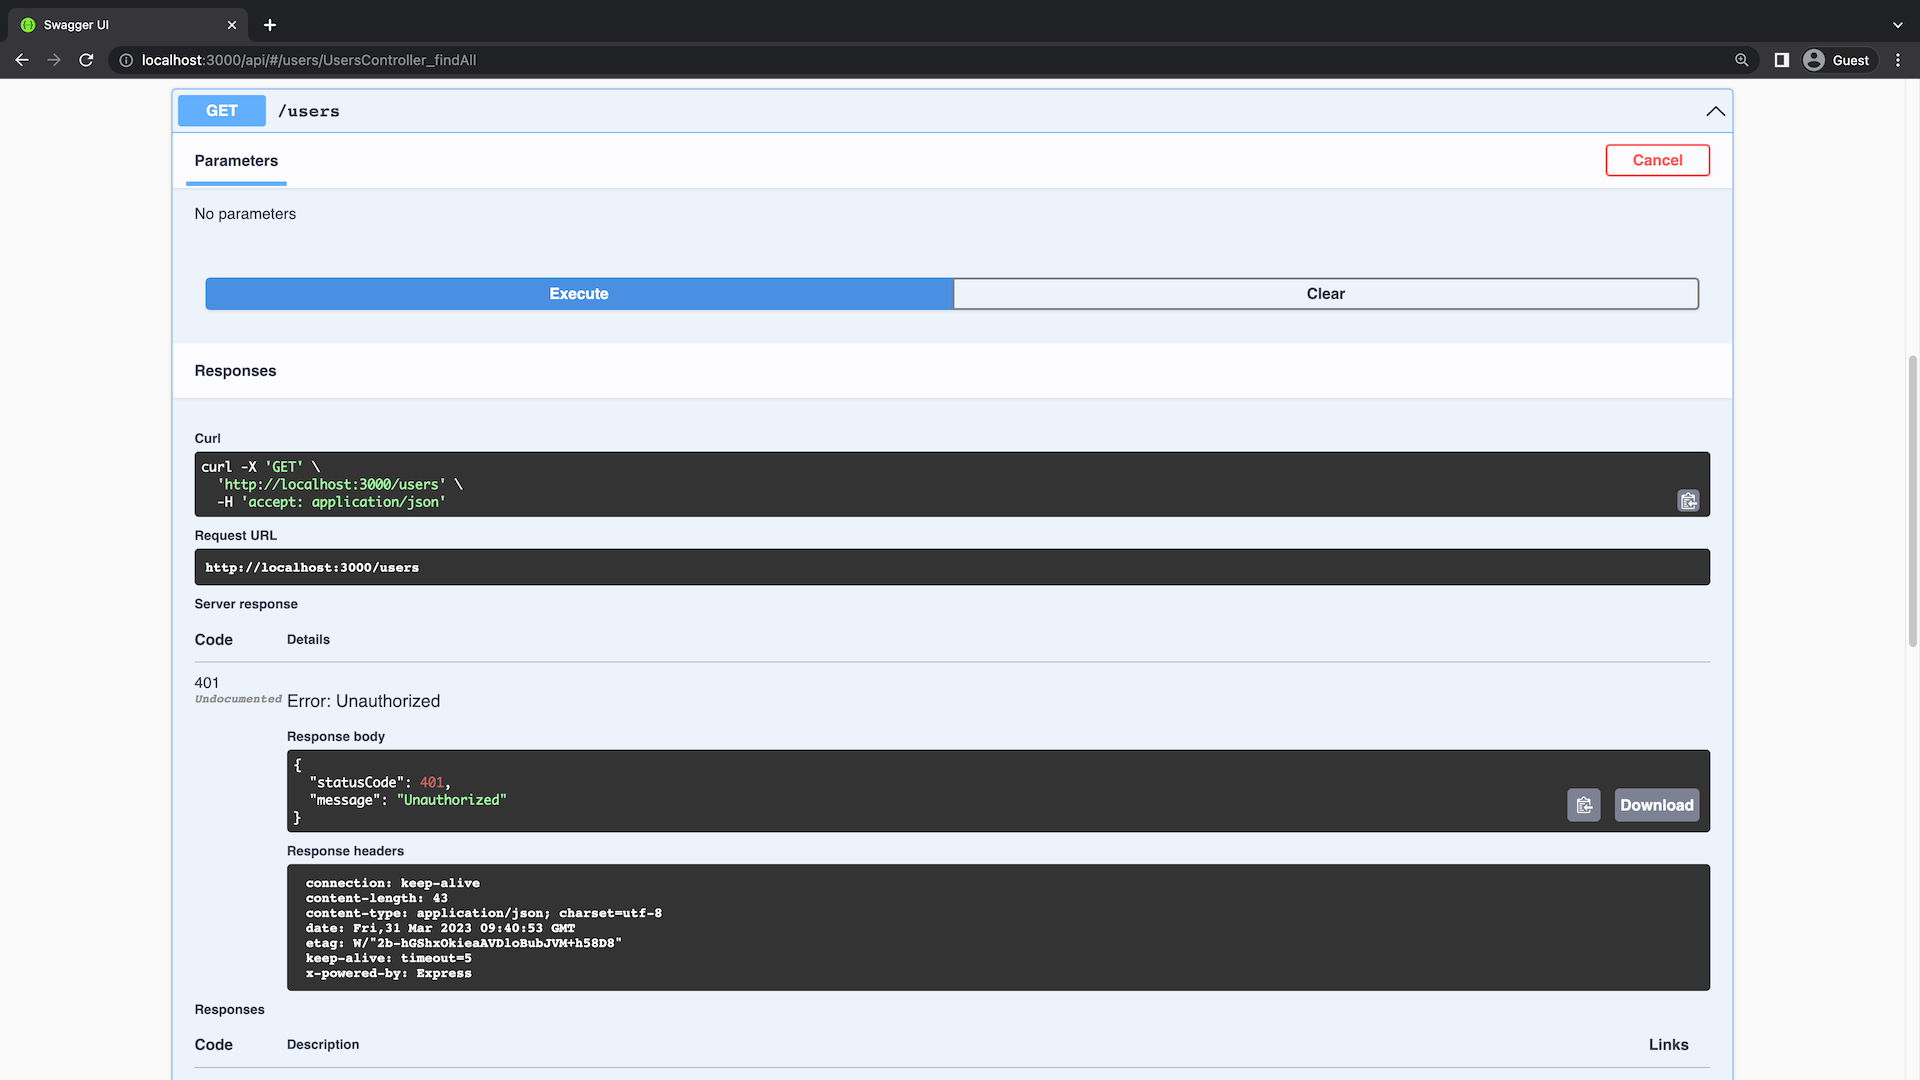
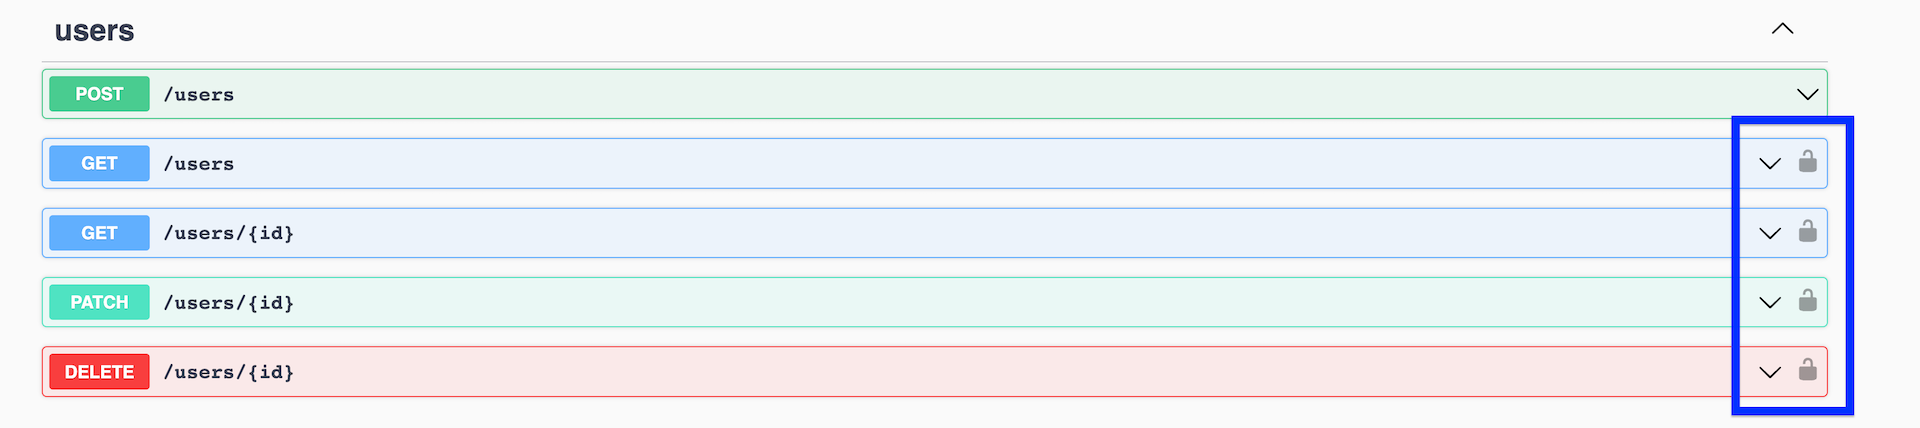
目前,在Swagger上還沒有任何跡象表明這些端點受到了身份驗證的保護(hù)。您可以向控制器添加@ApiBearerAuth()裝飾器,以指示這些端點需要進(jìn)行身份驗證:
// src/users/users.controller.ts
import {
Controller,
Get,
Post,
Body,
Patch,
Param,
Delete,
ParseIntPipe,
UseGuards,
} from '@nestjs/common';
import { UsersService } from './users.service';
import { CreateUserDto } from './dto/create-user.dto';
import { UpdateUserDto } from './dto/update-user.dto';
import { ApiBearerAuth, ApiCreatedResponse, ApiOkResponse, ApiTags } from '@nestjs/swagger';
import { UserEntity } from './entities/user.entity';
import { JwtAuthGuard } from 'src/auth/jwt-auth.guard';
@Controller('users')
@ApiTags('users')
export class UsersController {
constructor(private readonly usersService: UsersService) {}
@Post()
@ApiCreatedResponse({ type: UserEntity })
async create(@Body() createUserDto: CreateUserDto) {
return new UserEntity(await this.usersService.create(createUserDto));
}
@Get()
@UseGuards(JwtAuthGuard)
@ApiBearerAuth()
@ApiOkResponse({ type: UserEntity, isArray: true })
async findAll() {
const users = await this.usersService.findAll();
return users.map((user) => new UserEntity(user));
}
@Get(':id')
@UseGuards(JwtAuthGuard)
@ApiBearerAuth()
@ApiOkResponse({ type: UserEntity })
async findOne(@Param('id', ParseIntPipe) id: number) {
return new UserEntity(await this.usersService.findOne(id));
}
@Patch(':id')
@UseGuards(JwtAuthGuard)
@ApiBearerAuth()
@ApiCreatedResponse({ type: UserEntity })
async update(
@Param('id', ParseIntPipe) id: number,
@Body() updateUserDto: UpdateUserDto,
) {
return new UserEntity(await this.usersService.update(id, updateUserDto));
}
@Delete(':id')
@UseGuards(JwtAuthGuard)
@ApiBearerAuth()
@ApiOkResponse({ type: UserEntity })
async remove(@Param('id', ParseIntPipe) id: number) {
return new UserEntity(await this.usersService.remove(id));
}
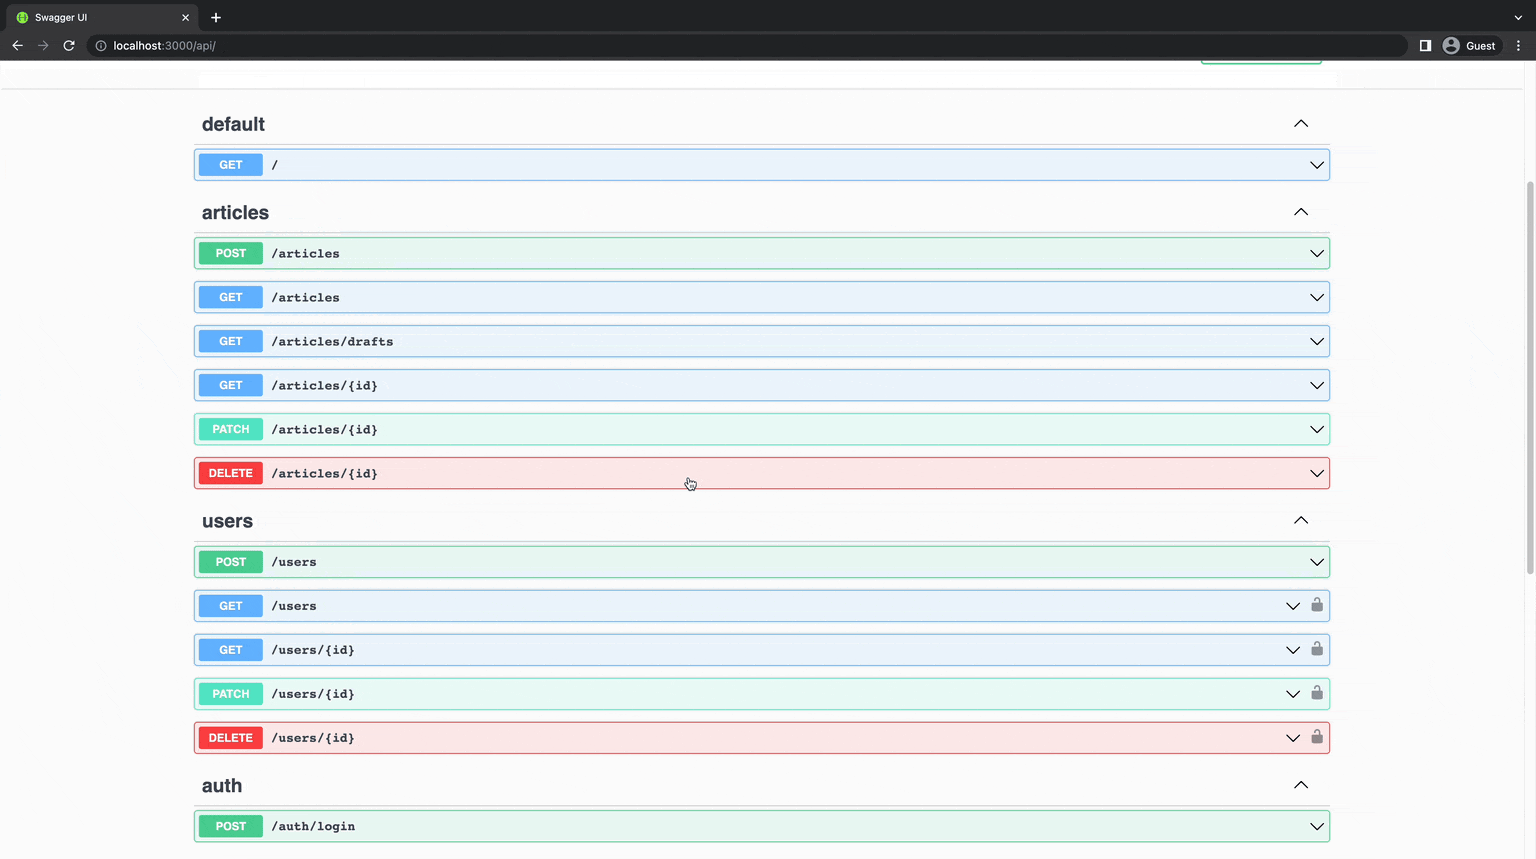
}現(xiàn)在,受身份驗證保護(hù)的端點在 Swagger 中應(yīng)該有一個鎖圖標(biāo) ??
目前無法直接在 Swagger 中“驗證”自己,因此您可以測試這些端點。為此,您可以在main.ts中的SwaggerModule設(shè)置里添加.addBearerAuth()方法調(diào)用:
// src/main.ts


import { NestFactory, Reflector } from '@nestjs/core';

import { AppModule } from './app.module';

import { SwaggerModule, DocumentBuilder } from '@nestjs/swagger';

import { ClassSerializerInterceptor, ValidationPipe } from '@nestjs/common';


async function bootstrap() {

  const app = await NestFactory.create(AppModule);


  app.useGlobalPipes(new ValidationPipe({ whitelist: true }));

  app.useGlobalInterceptors(new ClassSerializerInterceptor(app.get(Reflector)));


  const config = new DocumentBuilder()

    .setTitle('Median')

    .setDescription('The Median API description')

    .setVersion('0.1')

    .addBearerAuth()

    .build();

  const document = SwaggerModule.createDocument(app, config);

  SwaggerModule.setup('api', app, document);


  await app.listen(3000);

}

bootstrap();
現(xiàn)在,您可以通過單擊 Swagger 中的“授權(quán)”按鈕來添加令牌。 Swagger 會將令牌添加到您的請求中,以便您可以查詢受保護(hù)的端點。
注意:您可以通過向
/auth/login端點發(fā)送一個包含有效password的POST請求來生成令牌。
自己嘗試一下。
目前,該User.password字段以純文本形式存儲。這是一個重大的安全風(fēng)險,因為如果數(shù)據(jù)庫遭到泄露,那么所有密碼也將隨之暴露。為了解決這個問題,我們可以在將密碼存儲到數(shù)據(jù)庫之前先對其進(jìn)行哈希處理。
您可以使用bcrypt加密庫來散列密碼。使用npm安裝它:
npm install bcrypt

npm install --save-dev @types/bcrypt首先,您將更新中的create和update方法以在將密碼存儲到數(shù)據(jù)庫之前對密碼進(jìn)行哈希處理:
// src/users/users.service.ts

import { Injectable } from '@nestjs/common';

import { CreateUserDto } from './dto/create-user.dto';

import { UpdateUserDto } from './dto/update-user.dto';

import { PrismaService } from 'src/prisma/prisma.service';

import * as bcrypt from 'bcrypt';


export const roundsOfHashing = 10;


@Injectable()

export class UsersService {

  constructor(private prisma: PrismaService) {}


  async create(createUserDto: CreateUserDto) {

    const hashedPassword = await bcrypt.hash(

      createUserDto.password,

      roundsOfHashing,

    );


    createUserDto.password = hashedPassword;


    return this.prisma.user.create({

      data: createUserDto,

    });

  }


  findAll() {

    return this.prisma.user.findMany();

  }


  findOne(id: number) {

    return this.prisma.user.findUnique({ where: { id } });

  }


  async update(id: number, updateUserDto: UpdateUserDto) {

    if (updateUserDto.password) {

      updateUserDto.password = await bcrypt.hash(

        updateUserDto.password,

        roundsOfHashing,

      );

    }


    return this.prisma.user.update({

      where: { id },

      data: updateUserDto,

    });

  }


  remove(id: number) {

    return this.prisma.user.delete({ where: { id } });

  }

}該bcrypt.hash函數(shù)接受兩個參數(shù):哈希函數(shù)的輸入字符串和哈希輪數(shù)(也稱為成本因子)。增加哈希值的計算時間可以通過提高哈希輪數(shù)來實現(xiàn),但這也需要在安全性和性能之間做出權(quán)衡。具體來說,哈希輪數(shù)越多,計算所需的時間就越長,從而有助于增強對暴力攻擊的防御能力。然而,更多輪的散列也意味著用戶登錄時需要更多的時間來計算散列。這個堆棧溢出的答案對這個主題進(jìn)行了深入的討論。
bcrypt還會自動使用另一種稱為salting 的技術(shù)來增加暴力破解哈希的難度。salting是一種在散列之前將隨機字符串添加到輸入字符串的技術(shù)。這樣,由于每個密碼都使用了不同的鹽值,攻擊者就無法利用預(yù)先計算好的哈希表來破解密碼了。
您還需要更新數(shù)據(jù)庫種子腳本以在將密碼插入數(shù)據(jù)庫之前對密碼進(jìn)行哈希處理:
// prisma/seed.ts

import { PrismaClient } from '@prisma/client';

import * as bcrypt from 'bcrypt';


// initialize the Prisma Client

const prisma = new PrismaClient();


const roundsOfHashing = 10;


async function main() {

  // create two dummy users

  const passwordSabin = await bcrypt.hash('password-sabin', roundsOfHashing);

  const passwordAlex = await bcrypt.hash('password-alex', roundsOfHashing);


  const user1 = await prisma.user.upsert({

    where: { email: 'sabin@adams.com' },

    update: {

      password: passwordSabin,

    },

    create: {

      email: 'sabin@adams.com',

      name: 'Sabin Adams',

      password: passwordSabin,

    },

  });


  const user2 = await prisma.user.upsert({

    where: { email: 'alex@ruheni.com' },

    update: {

      password: passwordAlex,

    },

    create: {

      email: 'alex@ruheni.com',

      name: 'Alex Ruheni',

      password: passwordAlex,

    },

  });


  // create three dummy posts

  // ...

}


// execute the main function

// ...運行種子腳本npx prisma db seed后,您應(yīng)該會注意到數(shù)據(jù)庫中存儲的密碼都已經(jīng)經(jīng)過了哈希處理。
...

Running seed command ts-node prisma/seed.ts ...
{
  user1: {
    id: 1,
    name: 'Sabin Adams',
    email: 'sabin@adams.com',
    password: '$2b$10$XKQvtyb2Y.jciqhecnO4QONdVVcaghDgLosDPeI0e90POYSPd1Dlu',
    createdAt: 2023-03-20T22:05:56.758Z,
    updatedAt: 2023-04-02T22:58:05.792Z
  },
  user2: {
  id: 2,
  name: 'Alex Ruheni',
  email: 'alex@ruheni.com',
  password: '$2b$10$0tEfezrEd1a2g51lJBX6t.Tn.RLppKTv14mucUSCv40zs5qQyBaw6',
  createdAt: 2023-03-20T22:05:56.772Z,
  updatedAt: 2023-04-02T22:58:05.808Z
},
...password字段的值對您來說會有所不同,因為每次都會使用不同的鹽值進(jìn)行哈希處理。重要的是,現(xiàn)在這個值已經(jīng)是一個哈希字符串了。
現(xiàn)在,如果您嘗試使用正確的密碼,您將面臨HTTP 401錯誤。這是因為該login方法嘗試將用戶請求中的明文密碼與數(shù)據(jù)庫中的哈希密碼進(jìn)行比較。更新login方法以使用哈希密碼:
//src/auth/auth.service.ts

import { AuthEntity } from './entity/auth.entity';

import { PrismaService } from './../prisma/prisma.service';

import {

  Injectable,

  NotFoundException,

  UnauthorizedException,

} from '@nestjs/common';

import { JwtService } from '@nestjs/jwt';

import * as bcrypt from 'bcrypt';


@Injectable()

export class AuthService {

  constructor(private prisma: PrismaService, private jwtService: JwtService) {}


  async login(email: string, password: string): Promise<AuthEntity> {

    const user = await this.prisma.user.findUnique({ where: { email } });


    if (!user) {

      throw new NotFoundException(No user found for email: ${email});
    }

    const isPasswordValid = await bcrypt.compare(password, user.password);

    if (!isPasswordValid) {
      throw new UnauthorizedException('Invalid password');
    }

    return {
      accessToken: this.jwtService.sign({ userId: user.id }),
    };
  }
}
您現(xiàn)在可以使用正確的密碼登錄并在響應(yīng)中獲取 JWT。
在本章中,您學(xué)習(xí)了如何在 NestJS REST API 中實現(xiàn) JWT 身份驗證。您還了解了對密碼進(jìn)行加鹽處理以及將身份驗證與 Swagger 集成。
您可以在GitHub存儲庫的end-authentication分支上找到本教程的完成代碼。如果您發(fā)現(xiàn)問題,請隨時在存儲庫中提出問題或提交 PR。
原文鏈接:https://www.prisma.io/blog/nestjs-prisma-authentication-7D056s1s0k3l
深入解析 DeepSeek API 密鑰:獲取、使用與最佳實踐

2025年7月第2周GitHub熱門API推薦:rustfs/rustfs、pocketbase/pocketbase、smallcloudai/refact

API設(shè)計的首要原則

從Google Doodle AI看圖像互動API的創(chuàng)新應(yīng)用
微信截圖_17536819819248.png)
深度解析思維鏈Prompt(Chain-of-Thought Prompt):激發(fā)大模型推理能力的關(guān)鍵技術(shù)

教育革命:在App中集成ChatGPT API…

Nexus API 的入門教程與使用指南

HTTP API vs WebSocket API:選擇哪個來實現(xiàn)實時通信?

API 規(guī)范:設(shè)計與最佳實踐