
使用這些基本 REST API 最佳實踐構建出色的 API
注意:此文件夾還附帶一個名為
test的目錄,但本教程并不涵蓋測試內容。然而,如果您對使用Prisma進行應用程序測試的最佳實踐感興趣,建議您查閱本教程系列的另一篇指南:使用Prisma進行測試的終極指南。
此存儲庫中的關鍵文件和目錄概述如下:
src目錄:包含應用程序的源代碼。具體包括三個模塊:
app模塊(位于src根目錄下):作為應用程序的入口點,負責啟動Web服務器。prisma模塊:包含Prisma Client,這是您與數據庫交互的接口。articles和users模塊:分別定義了路由端點及其相關的業務邏輯。prisma文件夾:
schema.prisma文件:定義了數據庫的架構。migrations目錄:記錄了數據庫的遷移歷史。seed.ts文件:包含一個腳本,用于使用虛擬數據為開發數據庫設定初始值。docker-compose.yml文件:定義了PostgreSQL數據庫的Docker映像。.env文件:包含了PostgreSQL數據庫的連接字符串。請注意,如需了解這些組件的更多詳細信息,請參閱本教程系列的第一章。
在本節中,您將為 REST API 實現大部分身份驗證邏輯。在本節結束時,以下端點將受到身份驗證保護??:
GET /usersGET /users/:idPATCH /users/:idDELETE /users/:idWeb 上使用的身份驗證主要有兩種類型:基于會話的身份驗證和基于令牌的身份驗證。在本教程中,您將使用 JSON Web 令牌 (JWT) 實現基于令牌的身份驗證。
首先,在您的應用程序中創建一個新模塊。運行以下命令以生成新模塊。
npx nest generate resource您將收到一些 CLI 提示,請相應地回答問題:
現在,您應該在項目的目錄中找到一個名為auth的新模塊,它位于src/auth路徑下。
passport是Node.js應用程序中常用的一個身份驗證庫。它配置靈活,并支持多種身份驗證策略。passport旨在與構建NestJS應用的ExpressWeb框架協同工作。NestJS提供了與@nestjs/passport的第一方集成,這使得在NestJS應用程序中使用passport變得十分簡便。
首先安裝以下軟件包:
npm install --save @nestjs/passport passport @nestjs/jwt passport-jwt

npm install --save-dev @types/passport-jwt
現在您已經安裝了所需的軟件包,您可以在應用程序中進行配置。打開文件并添加以下代碼:
//src/auth/auth.module.ts

import { Module } from '@nestjs/common';

import { AuthService } from './auth.service';

import { AuthController } from './auth.controller';

import { PassportModule } from '@nestjs/passport';

import { JwtModule } from '@nestjs/jwt';

import { PrismaModule } from 'src/prisma/prisma.module';


export const jwtSecret = 'zjP9h6ZI5LoSKCRj';


@Module({

  imports: [

    PrismaModule,

    PassportModule,

    JwtModule.register({

      secret: jwtSecret,

      signOptions: { expiresIn: '5m' }, // e.g. 30s, 7d, 24h

    }),

  ],

  controllers: [AuthController],

  providers: [AuthService],

})

export class AuthModule {}
@nestjs/passport 提供了 PassportModule,您可以在官方文檔中深入了解其相關信息。您已經配置了 PassportModule 以及一個用于生成和驗證 JWT 的模塊,這就是 JwtModule,它依賴于 jsonwebtoken 庫。JwtModule 提供了一個用于對 JWT 進行簽名的密鑰(jwtSecret)以及定義了 JWT 過期時間的對象(expiresIn),當前設置為 5 分鐘。
注意:如果前一個令牌已過期,請記得生成新令牌。
您可以使用代碼片段中提供的代碼來生成?jwtSecret,也可以使用 OpenSSL 生成自己的密鑰。
注意:在實際應用程序中,切勿將密鑰(
secret)直接存儲在代碼庫中。NestJS 提供了@nestjs/config包,用于從環境變量中加載密鑰。您可以查閱官方文檔以獲取更多信息。
實現?POST /auth/login?終端節點。這個終端節點將用于用戶身份驗證。它將接收用戶名和密碼作為輸入,如果憑證有效,則返回 JWT。首先,您需要創建一個類來定義?POST /login?請求正文的形狀,這個類可以命名為?LoginDto。
在src/auth/dto目錄下,創建一個名為login.dto.ts的新文件:
mkdir src/auth/dto

touch src/auth/dto/login.dto.ts現在,定義一個名為LoginDto的類,該類包含email和password兩個字段。
//src/auth/dto/login.dto.ts

import { ApiProperty } from '@nestjs/swagger';

import { IsEmail, IsNotEmpty, IsString, MinLength } from 'class-validator';


export class LoginDto {

  @IsEmail()

  @IsNotEmpty()

  @ApiProperty()

  email: string;


  @IsString()

  @IsNotEmpty()

  @MinLength(6)

  @ApiProperty()

  password: string;

}您還需要定義一個類型來描述JWT有效負載的結構。請在src/auth/entity目錄下創建一個名為AuthEntity.ts的新文件。
mkdir src/auth/entity

touch src/auth/entity/auth.entity.ts現在在AuthEntity文件中定義 :
//src/auth/entity/auth.entity.ts

import { ApiProperty } from '@nestjs/swagger';


export class AuthEntity {

  @ApiProperty()

  accessToken: string;

}AuthEntity應包含一個名為accessToken的字符串字段,該字段用于存儲JWT。
現在,在AuthService中創建一個新的方法login。
//src/auth/auth.service.ts

import {

  Injectable,

  NotFoundException,

  UnauthorizedException,

} from '@nestjs/common';

import { PrismaService } from './../prisma/prisma.service';

import { JwtService } from '@nestjs/jwt';

import { AuthEntity } from './entity/auth.entity';


@Injectable()

export class AuthService {

  constructor(private prisma: PrismaService, private jwtService: JwtService) {}


  async login(email: string, password: string): Promise<AuthEntity> {

    // Step 1: Fetch a user with the given email

    const user = await this.prisma.user.findUnique({ where: { email: email } });


    // If no user is found, throw an error

    if (!user) {

      throw new NotFoundException(No user found for email: ${email});
    }

    // Step 2: Check if the password is correct
    const isPasswordValid = user.password === password;

    // If password does not match, throw an error
    if (!isPasswordValid) {
      throw new UnauthorizedException('Invalid password');
    }

    // Step 3: Generate a JWT containing the user's ID and return it
    return {
      accessToken: this.jwtService.sign({ userId: user.id }),
    };
  }
}該方法首先會嘗試獲取與給定電子郵件匹配的用戶。如果用戶不存在,則會拋出NotFoundException ,如果用戶存在,接下來會驗證提供的密碼是否正確。如果密碼驗證失敗,會拋出UnauthorizedException。只有當密碼驗證成功時,該方法才會生成一個包含用戶ID的JWT,并將其作為響應返回。
現在,在AuthController中創建一個處理POST請求的方法,路徑為/auth/login。
//src/auth/auth.controller.ts


import { Body, Controller, Post } from '@nestjs/common';

import { AuthService } from './auth.service';

import { ApiOkResponse, ApiTags } from '@nestjs/swagger';

import { AuthEntity } from './entity/auth.entity';

import { LoginDto } from './dto/login.dto';


@Controller('auth')

@ApiTags('auth')

export class AuthController {

  constructor(private readonly authService: AuthService) {}


  @Post('login')

  @ApiOkResponse({ type: AuthEntity })

  login(@Body() { email, password }: LoginDto) {

    return this.authService.login(email, password);

  }

}
現在,您的API中應該新增了一個終端節點,即POST /auth/login。
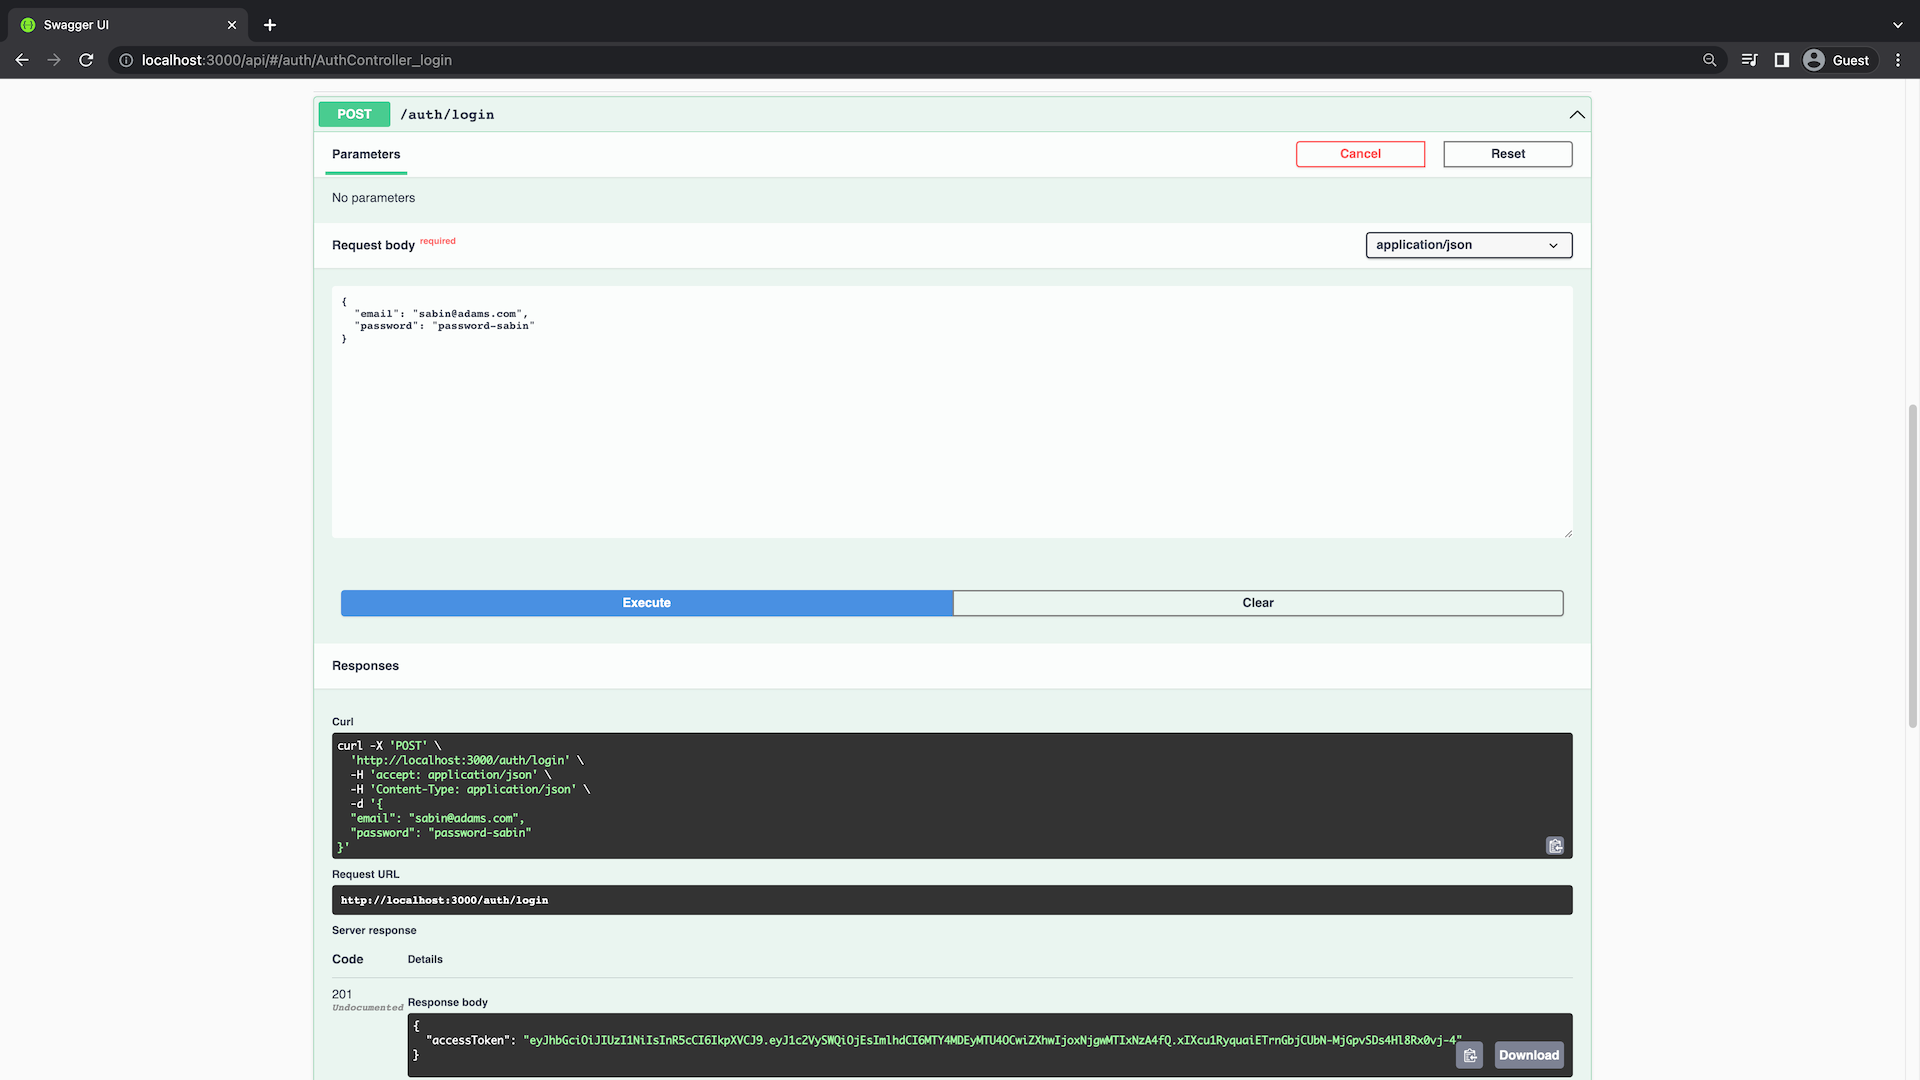
請訪問http://localhost:3000/api頁面,并嘗試訪問這個新的終端節點。在發起POST /auth/login請求時,請使用您在種子腳本中創建的用戶憑據進行身份驗證。
您可以使用以下請求正文:
{

  "email": "sabin@adams.com",

  "password": "password-sabin"

}
執行請求后,您應該會在響應中獲得 JWT。
在下一部分中,您將使用此令牌對用戶進行身份驗證。
在Passport中,策略負責驗證請求的身份,通過實現特定的身份驗證邏輯來完成這一任務。在本節中,我們將實現一個JWT身份驗證策略,用于用戶的身份驗證。
我們不會直接使用Passport包,而是與@nestjs/passport這個包裝器包進行交互,它會在后臺調用Passport。為了配置策略,我們需要創建一個擴展自PassportStrategy的類。在這個過程中,主要需要完成兩項工作:
super()方法。validate()回調方法,該方法會與數據庫進行交互,根據JWT有效負載來獲取用戶。如果成功找到用戶,該方法應返回一個user對象。首先,請在src/auth/strategy目錄下創建一個名為jwt.strategy.ts的新文件。
touch src/auth/jwt.strategy.ts現在實現類JwtStrategy:
//src/auth/jwt.strategy.ts

import { Injectable, UnauthorizedException } from '@nestjs/common';

import { PassportStrategy } from '@nestjs/passport';

import { ExtractJwt, Strategy } from 'passport-jwt';

import { jwtSecret } from './auth.module';

import { UsersService } from 'src/users/users.service';


@Injectable()

export class JwtStrategy extends PassportStrategy(Strategy, 'jwt') {

  constructor(private usersService: UsersService) {

    super({

      jwtFromRequest: ExtractJwt.fromAuthHeaderAsBearerToken(),

      secretOrKey: jwtSecret,

    });

  }


  async validate(payload: { userId: number }) {

    const user = await this.usersService.findOne(payload.userId);


    if (!user) {

      throw new UnauthorizedException();

    }


    return user;

  }

}
您已經創建了一個繼承自 PassportStrategy 的類,該類采用兩個參數:策略實現和策略名稱。您使用的是 passport-jwt 庫中的預定義策略 JwtStrategy。
在構造函數中,您向 super() 方法傳遞了一些選項。這些選項包括一個用于從請求中提取 JWT 的方法(在此情況下,您使用的是從 API 請求的 Authorization 標頭中提供 JWT 的標準方法),以及一個用于驗證 JWT 的密鑰(secretOrKey)。passport-jwt 存儲庫中還有更多可選的配置項。
對于?JwtStrategy,Passport 首先會驗證 JWT 的簽名并解碼其 JSON 有效負載。然后,Passport 會將解碼后的?JSON 對象傳遞給?validate()?方法。由于 JWT 簽名的工作機制,您可以確信接收到的令牌是在應用程序之前簽名并頒發的有效牌。validate()?方法應該返回一個?user?對象。如果未找到對應的用戶,該方法應該拋出一個錯誤。
注意:Passport 可能會讓人感到有些困惑。將 Passport 本身視為一個迷你框架是有幫助的,它將身份驗證過程抽象為幾個步驟,這些步驟可以通過策略和配置選項進行自定義。我建議您閱讀 NestJS 的 Passport 配方,以了解如何將 Passport 與 NestJS 結合使用的更多信息。
最后,在 AuthModule 中,您需要將新創建的 JwtStrategy 類作為提供程序(provider)添加進去:
//src/auth/auth.module.ts

import { Module } from '@nestjs/common';

import { AuthService } from './auth.service';

import { AuthController } from './auth.controller';

import { PassportModule } from '@nestjs/passport';

import { JwtModule } from '@nestjs/jwt';

import { PrismaModule } from 'src/prisma/prisma.module';

import { UsersModule } from 'src/users/users.module';

import { JwtStrategy } from './jwt.strategy';


export const jwtSecret = 'zjP9h6ZI5LoSKCRj';


@Module({

  imports: [

    PrismaModule,

    PassportModule,

    JwtModule.register({

      secret: jwtSecret,

      signOptions: { expiresIn: '5m' }, // e.g. 7d, 24h

    }),

    UsersModule,

  ],

  controllers: [AuthController],

  providers: [AuthService, JwtStrategy],

})

export class AuthModule {}現在,JwtStrategy可以被其他模塊使用了。您已經在UsersModule中添加了JwtStrategy,因為JwtStrategy類正在使用UsersService。
為了確保JwtStrategy類在其他模塊中的可訪問性,您還需要在UsersModule的exports數組中添加JwtStrategy。同時,由于UsersService在JwtStrategy類中被使用,確保UsersModule已經正確地通過imports引入了提供UsersService的模塊。
// src/users/users.module.ts

import { Module } from '@nestjs/common';

import { UsersService } from './users.service';

import { UsersController } from './users.controller';

import { PrismaModule } from 'src/prisma/prisma.module';


@Module({

  controllers: [UsersController],

  providers: [UsersService],

  imports: [PrismaModule],

  exports: [UsersService],

})

export class UsersModule {}guard是 NestJS 中的一個結構,用于決定是否允許請求繼續處理。在本節中,您將實現一個自定義guard,用于保護那些需要身份驗證的路由。這個自定義guard將被命名為?JwtAuthGuard。
請在 src/auth 目錄下創建一個新文件,命名為 jwt-auth.guard.ts。
touch src/auth/jwt-auth.guard.ts現在實現類JwtAuthGuard:
//src/auth/jwt-auth.guard.ts

import { Injectable } from '@nestjs/common';

import { AuthGuard } from '@nestjs/passport';


@Injectable()

export class JwtAuthGuard extends AuthGuard('jwt') {}該類(指JwtStrategy類)需要指定策略的名稱。在本例中,您使用的是在上一節中實現的JWT策略,該策略的名稱為jwt。
現在,您可以將JwtAuthGuard作為裝飾器來使用,以保護您的API端點。請在UsersController中,為您想要保護的路由添加JwtAuthGuard。
// src/users/users.controller.ts
import {
Controller,
Get,
Post,
Body,
Patch,
Param,
Delete,
ParseIntPipe,
UseGuards,
} from '@nestjs/common';
import { UsersService } from './users.service';
import { CreateUserDto } from './dto/create-user.dto';
import { UpdateUserDto } from './dto/update-user.dto';
import { ApiCreatedResponse, ApiOkResponse, ApiTags } from '@nestjs/swagger';
import { UserEntity } from './entities/user.entity';
import { JwtAuthGuard } from 'src/auth/jwt-auth.guard';
@Controller('users')
@ApiTags('users')
export class UsersController {
constructor(private readonly usersService: UsersService) {}
@Post()
@ApiCreatedResponse({ type: UserEntity })
async create(@Body() createUserDto: CreateUserDto) {
return new UserEntity(await this.usersService.create(createUserDto));
}
@Get()
@UseGuards(JwtAuthGuard)
@ApiOkResponse({ type: UserEntity, isArray: true })
async findAll() {
const users = await this.usersService.findAll();
return users.map((user) => new UserEntity(user));
}
@Get(':id')
@UseGuards(JwtAuthGuard)
@ApiOkResponse({ type: UserEntity })
async findOne(@Param('id', ParseIntPipe) id: number) {
return new UserEntity(await this.usersService.findOne(id));
}
@Patch(':id')
@UseGuards(JwtAuthGuard)
@ApiCreatedResponse({ type: UserEntity })
async update(
@Param('id', ParseIntPipe) id: number,
@Body() updateUserDto: UpdateUserDto,
) {
return new UserEntity(await this.usersService.update(id, updateUserDto));
}
@Delete(':id')
@UseGuards(JwtAuthGuard)
@ApiOkResponse({ type: UserEntity })
async remove(@Param('id', ParseIntPipe) id: number) {
return new UserEntity(await this.usersService.remove(id));
}
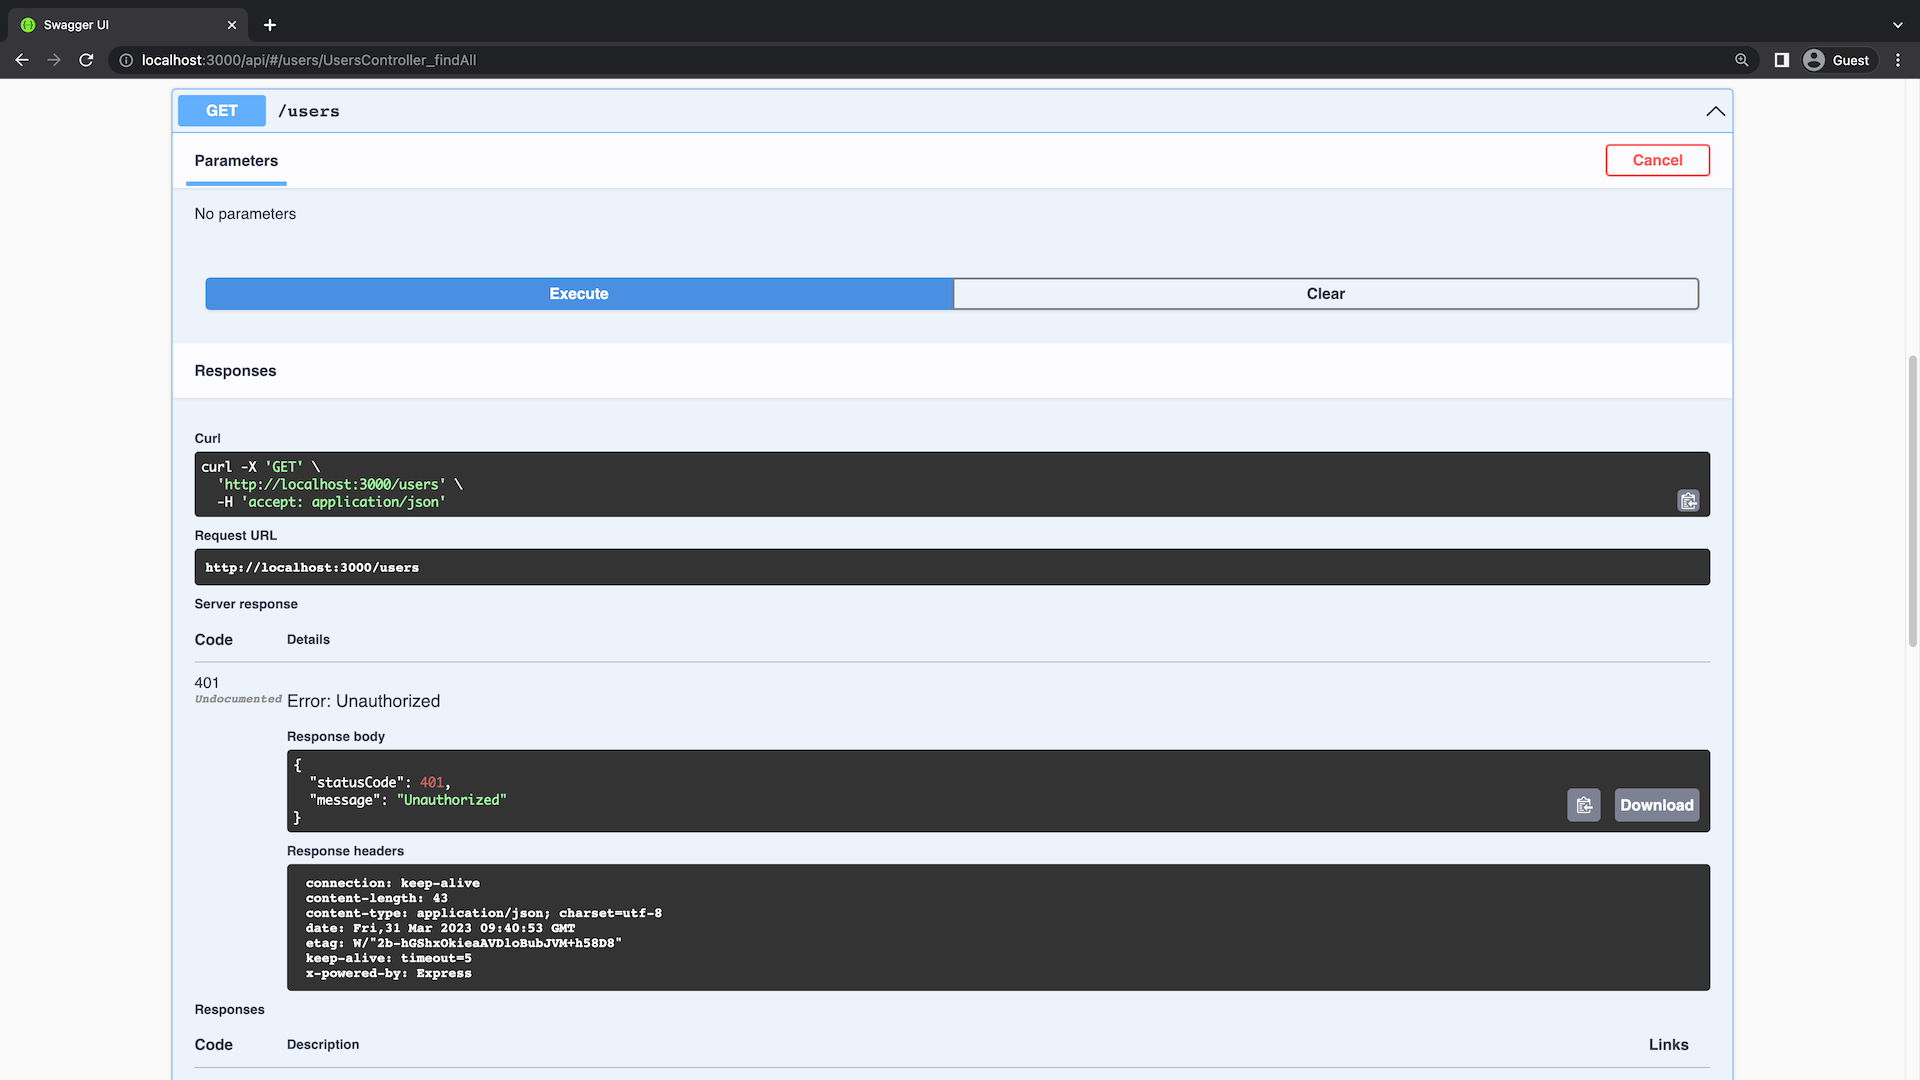
}如果您嘗試在未經身份驗證的情況下查詢這些終端節點中的任何一個,它將不再有效。
目前,Swagger 文檔尚未標明哪些終端節點受到身份驗證保護。您可以在控制器上添加一個裝飾器:?@ApiBearerAuth(),以指明這些終端節點需要身份驗證。
// src/users/users.controller.ts


import {

  Controller,

  Get,

  Post,

  Body,

  Patch,

  Param,

  Delete,

  ParseIntPipe,

  UseGuards,

} from '@nestjs/common';

import { UsersService } from './users.service';

import { CreateUserDto } from './dto/create-user.dto';

import { UpdateUserDto } from './dto/update-user.dto';

import { ApiBearerAuth, ApiCreatedResponse, ApiOkResponse, ApiTags } from '@nestjs/swagger';

import { UserEntity } from './entities/user.entity';

import { JwtAuthGuard } from 'src/auth/jwt-auth.guard';


@Controller('users')

@ApiTags('users')

export class UsersController {

  constructor(private readonly usersService: UsersService) {}


  @Post()

  @ApiCreatedResponse({ type: UserEntity })

  async create(@Body() createUserDto: CreateUserDto) {

    return new UserEntity(await this.usersService.create(createUserDto));

  }


  @Get()

  @UseGuards(JwtAuthGuard)

  @ApiBearerAuth()

  @ApiOkResponse({ type: UserEntity, isArray: true })

  async findAll() {

    const users = await this.usersService.findAll();

    return users.map((user) => new UserEntity(user));

  }


  @Get(':id')

  @UseGuards(JwtAuthGuard)

  @ApiBearerAuth()

  @ApiOkResponse({ type: UserEntity })

  async findOne(@Param('id', ParseIntPipe) id: number) {

    return new UserEntity(await this.usersService.findOne(id));

  }


  @Patch(':id')

  @UseGuards(JwtAuthGuard)

  @ApiBearerAuth()

  @ApiCreatedResponse({ type: UserEntity })

  async update(

    @Param('id', ParseIntPipe) id: number,

    @Body() updateUserDto: UpdateUserDto,

  ) {

    return new UserEntity(await this.usersService.update(id, updateUserDto));

  }


  @Delete(':id')

  @UseGuards(JwtAuthGuard)

  @ApiBearerAuth()

  @ApiOkResponse({ type: UserEntity })

  async remove(@Param('id', ParseIntPipe) id: number) {

    return new UserEntity(await this.usersService.remove(id));

  }

}
現在,受身份驗證保護的終端節點在 Swagger ?? 中應該有一個鎖圖標
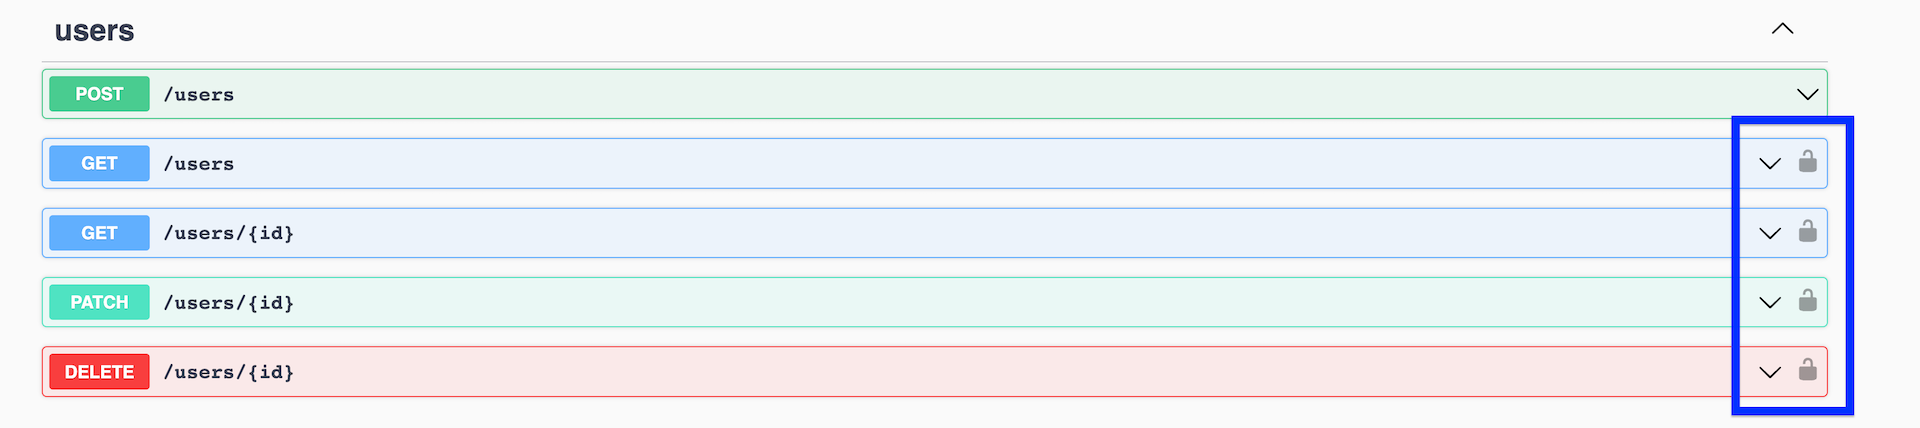
由于目前無法在Swagger中直接進行身份驗證,因此您可以通過測試來驗證這些終端節點的功能。為此,您可以在main.ts文件中,通過調用SwaggerModule的.addBearerAuth()方法,為Swagger添加Bearer令牌認證支持。
// src/main.ts


import { NestFactory, Reflector } from '@nestjs/core';

import { AppModule } from './app.module';

import { SwaggerModule, DocumentBuilder } from '@nestjs/swagger';

import { ClassSerializerInterceptor, ValidationPipe } from '@nestjs/common';


async function bootstrap() {

  const app = await NestFactory.create(AppModule);


  app.useGlobalPipes(new ValidationPipe({ whitelist: true }));

  app.useGlobalInterceptors(new ClassSerializerInterceptor(app.get(Reflector)));


  const config = new DocumentBuilder()

    .setTitle('Median')

    .setDescription('The Median API description')

    .setVersion('0.1')

    .addBearerAuth()

    .build();

  const document = SwaggerModule.createDocument(app, config);

  SwaggerModule.setup('api', app, document);


  await app.listen(3000);

}

bootstrap();
現在,您可以通過點擊 Swagger 界面中的“Authorize”按鈕來添加 JWT 令牌。Swagger 會自動將這個令牌添加到您的請求頭中,這樣您就可以訪問那些受保護的終端節點了。
注意:您可以通過向
/auth/login終端節點發送包含有效電子郵件和密碼的請求來生成 JWT 令牌。
自己動手試試吧。
目前,User.password字段是以純文本形式存儲的,這存在安全風險,因為一旦數據庫被泄露,所有密碼也將暴露無遺。為了解決這個問題,我們可以在將密碼存儲到數據庫之前,使用哈希處理來對密碼進行加密。
您可以使用bcrypt這個加密庫來對密碼進行哈希處理。要使用bcrypt,請先通過npm進行安裝:
npm install bcrypt

npm install --save-dev @types/bcrypt
首先,您將更新 UsersService 中的 create 和 update 方法,以確保在將密碼存儲到數據庫之前對其進行哈希處理。
// src/users/users.service.ts

import { Injectable } from '@nestjs/common';

import { CreateUserDto } from './dto/create-user.dto';

import { UpdateUserDto } from './dto/update-user.dto';

import { PrismaService } from 'src/prisma/prisma.service';

import * as bcrypt from 'bcrypt';


export const roundsOfHashing = 10;


@Injectable()

export class UsersService {

  constructor(private prisma: PrismaService) {}


  async create(createUserDto: CreateUserDto) {

    const hashedPassword = await bcrypt.hash(

      createUserDto.password,

      roundsOfHashing,

    );


    createUserDto.password = hashedPassword;


    return this.prisma.user.create({

      data: createUserDto,

    });

  }


  findAll() {

    return this.prisma.user.findMany();

  }


  findOne(id: number) {

    return this.prisma.user.findUnique({ where: { id } });

  }


  async update(id: number, updateUserDto: UpdateUserDto) {

    if (updateUserDto.password) {

      updateUserDto.password = await bcrypt.hash(

        updateUserDto.password,

        roundsOfHashing,

      );

    }


    return this.prisma.user.update({

      where: { id },

      data: updateUserDto,

    });

  }


  remove(id: number) {

    return this.prisma.user.delete({ where: { id } });

  }

}bcrypt.hash函數接受兩個參數:需要哈希的輸入字符串(通常是密碼),以及哈希的輪數(也被稱為成本因子)。增加哈希的輪數會提升計算哈希值所需的時間,從而在安全性和性能之間取得平衡。哈希輪數越多,計算哈希的過程就越耗時,這有助于抵御暴力破解攻擊。然而,更多的哈希輪數也意味著在用戶登錄時,系統需要花費更多時間來計算哈希值。關于這個話題,在Stack Overflow上進行了深入的討論。
此外,bcrypt還會自動應用一種稱為加鹽的技術,以增強密碼哈希的安全性。加鹽是指在哈希處理之前,向輸入字符串中添加一個隨機生成的字符串。這樣做的好處是,即使兩個用戶使用了相同的密碼,由于每個密碼都附加了不同的鹽值,它們最終生成的哈希值也會不同。這樣,攻擊者就無法利用預先計算好的哈希表來破解密碼了。
您還需要更新數據庫種子腳本,以便在將密碼插入數據庫之前對其進行哈希處理:
// prisma/seed.ts

import { PrismaClient } from '@prisma/client';

import * as bcrypt from 'bcrypt';


// initialize the Prisma Client

const prisma = new PrismaClient();


const roundsOfHashing = 10;


async function main() {

  // create two dummy users

  const passwordSabin = await bcrypt.hash('password-sabin', roundsOfHashing);

  const passwordAlex = await bcrypt.hash('password-alex', roundsOfHashing);


  const user1 = await prisma.user.upsert({

    where: { email: 'sabin@adams.com' },

    update: {

      password: passwordSabin,

    },

    create: {

      email: 'sabin@adams.com',

      name: 'Sabin Adams',

      password: passwordSabin,

    },

  });


  const user2 = await prisma.user.upsert({

    where: { email: 'alex@ruheni.com' },

    update: {

      password: passwordAlex,

    },

    create: {

      email: 'alex@ruheni.com',

      name: 'Alex Ruheni',

      password: passwordAlex,

    },

  });


  // create three dummy posts

  // ...

}


// execute the main function

// ...運行種子腳本后,您應該會發現存儲在數據庫中的密碼已經經過了哈希處理。您可以使用以下命令來執行種子腳本:npx prisma db seed。
...

Running seed command ts-node prisma/seed.ts ...
{
  user1: {
    id: 1,
    name: 'Sabin Adams',
    email: 'sabin@adams.com',
    password: '$2b$10$XKQvtyb2Y.jciqhecnO4QONdVVcaghDgLosDPeI0e90POYSPd1Dlu',
    createdAt: 2023-03-20T22:05:56.758Z,
    updatedAt: 2023-04-02T22:58:05.792Z
  },
  user2: {
  id: 2,
  name: 'Alex Ruheni',
  email: 'alex@ruheni.com',
  password: '$2b$10$0tEfezrEd1a2g51lJBX6t.Tn.RLppKTv14mucUSCv40zs5qQyBaw6',
  createdAt: 2023-03-20T22:05:56.772Z,
  updatedAt: 2023-04-02T22:58:05.808Z
},
...每次使用不同的鹽值進行哈希處理時,所得到的哈希值(對于password字段)都會有所不同。重要的是,現在該值是以哈希字符串的形式存儲的。
然而,如果您現在嘗試使用正確的密碼進行登錄,可能會遇到 HTTP 401 錯誤。這是因為當前的登錄方法(login)試圖將用戶請求中提供的純文本密碼直接與數據庫中的哈希密碼進行比較。
為了解決這個問題,您需要更新登錄方法,以便在比較之前對提供的密碼進行哈希處理。
//src/auth/auth.service.ts

import { AuthEntity } from './entity/auth.entity';

import { PrismaService } from './../prisma/prisma.service';

import {

  Injectable,

  NotFoundException,

  UnauthorizedException,

} from '@nestjs/common';

import { JwtService } from '@nestjs/jwt';

import * as bcrypt from 'bcrypt';


@Injectable()

export class AuthService {

  constructor(private prisma: PrismaService, private jwtService: JwtService) {}


  async login(email: string, password: string): Promise<AuthEntity> {

    const user = await this.prisma.user.findUnique({ where: { email } });


    if (!user) {

      throw new NotFoundException(No user found for email: ${email});
    }

    const isPasswordValid = await bcrypt.compare(password, user.password);

    if (!isPasswordValid) {
      throw new UnauthorizedException('Invalid password');
    }

    return {
      accessToken: this.jwtService.sign({ userId: user.id }),
    };
  }
}
您現在可以使用正確的密碼登錄,并在響應中獲取 JWT。
在本章中,您學習了如何在 NestJS REST API 中實現 JWT 身份驗證。同時,您也掌握了如何對密碼進行加鹽處理,以及如何將身份驗證功能與 Swagger 集成。
您可以在 end-authentication 分支中找到相關代碼。如果您在操作過程中遇到問題,請隨時在存儲庫中提出問題或提交 PR。此外,您也可以直接在 Twitter 上與我取得聯系。
原文鏈接:https://www.prisma.io/blog/nestjs-prisma-authentication-7D056s1s0k3l