
使用這些基本 REST API 最佳實踐構建出色的 API
您可以在.ruby-version文件中指定Ruby版本,這是我個人偏好的常見做法。正如Bundler文檔所闡釋的,如果您依賴Ruby虛擬機(VM)中的特定功能,這樣做能讓您的應用程序在遇到不兼容時更快地失敗。如此一來,部署服務器上的Ruby VM將與本地VM保持一致。為此,您需要在.ruby-version文件中填入您將使用的Ruby版本號。
3.1.2最后,通過運行以下命令來安裝 Gem:
bundle install就這樣,Sinatra ?? 被安裝了!您還安裝了 puma 作為 Web 服務器。
讓我們創建一個類來表示一首歌。在該目錄中新建一個名為“models”的文件夾,并在其中創建一個新文件“song.rb”。
使用以下代碼填充“song.rb”文件。
# models/song.rb


# frozen_string_literal: true


# Class to represent a Song

class Song

  attr_accessor :id, :name, :url


  def initialize(id, name, url)

    @id = id

    @name = name

    @url = url

  end


  def to_json(*a)

    {

      'id' => id,

      'name' => name,

      'url' => url

    }.to_json(*a)

  end

end您正在定義一個名為Song的類,該類具有三個屬性:id、name和url。此外,您還將為Song類實現一個更專業的to_json方法,以便在控制器中將歌曲渲染為JSON時,該方法可以作為序列化程序使用。
到目前為止,您主要使用了Ruby語言;現在,是時候親身體驗一下Sinatra框架了。
請在終端中創建一個新文件,命名為api.rb,并將以下內容添加到該文件中,作為API的基本框架。
# api.rb


# frozen_string_literal: true


require 'sinatra'

require 'json'


before do

  content_type 'application/json'

end


get '/songs' do

  return {todo: :implementation}.to_json

end


get '/songs/:id' do

  return {todo: :implementation}.to_json

end


post '/songs' do

  return {todo: :implementation}.to_json

end


put '/songs/:id' do

  return {todo: :implementation}.to_json

end


delete '/songs/:id' do

  return {todo: :implementation}.to_json

end
讓我們分解一下“api.rb”文件中的內容。
首先,您需要加載“sinatra”和“json”這兩個gem。
require 'sinatra'

require 'json'
與 Rails 不同,在 Sinatra 中,您必須自行加載所有內容。這可能很棒,因為它通過迫使你明確正在使用的東西,從而消除了 Rails 的所有魔力??。
接下來,您將定義一個過濾器:before。
before do

  content_type 'application/json'

end
正如Sinatra文檔所闡述的,before過濾器會在每次請求處理之前進行評估。
在此情境下,您需要將Content-Type頭部設置為application/json,以此告知客戶端,來自此服務器的所有響應均采用JSON格式。
接下來,我們將著手定義路由。
get '/songs' do

  # ...

end

get '/songs/:id' do

  # ...

end

post '/songs' do

  # ...

end

put '/songs/:id' do

  # ...

end

delete '/songs/:id' do

  # ...

end
這些路由代表了您將要實現的CRUD(創建、讀取、更新、刪除)操作。
嗯,雖然嚴格來說它更像是CRRUD(因為讀取操作有兩個),但您已經明白了主要意思。??
有了這個API框架,您就可以啟動服務器并測試各個端點了。
要從終端運行服務器:
ruby api.rb服務器運行后,您的終端將如下所示:
?  sinatra-auth0-songs-api git:(main) ? ruby api.rb

== Sinatra (v3.0.2) has taken the stage on 4567 for development with backup from Puma

Puma starting in single mode...

* Puma version: 6.0.0 (ruby 3.1.2-p20) ("Sunflower")

*  Min threads: 0

*  Max threads: 5

*  Environment: development

*          PID: 98050

* Listening on http://127.0.0.1:4567

* Listening on http://[::1]:4567

Use Ctrl-C to stop
現在,您可以訪問終端節點。我創建了一個 POSTMAN Collection,因此您可以自行測試這些終端節點。您也可以像這樣使用:http://localhost:4567(通過 curl 命令)。
? curl -v http://localhost:4567/songs


{"todo":"implementation"}%為了向API中填充一些數據,您可以使用songs.json文件。這個文件是通過LastFM API獲取的數據填充的,包含了Frank Sinatra的Top 10 Tracks,并且格式是LastFM的一個簡化版本。您可以下載這個文件來使用。
{

  "id": 1,

  "name": "My Way",

  "url": "https://www.last.fm/music/Frank+Sinatra/_/My+Way"

}
讓我們實現一個幫助程序,它將在 Sinatra API 啟動后負責從 songs.json 文件中讀取數據。
為此,請創建一個名為 helpers 的新文件夾,并在其中添加一個名為 songs_helper.rb 的文件。
# helpers/songs_helper.rb


# frozen_string_literal: true


require_relative '../models/song'

require 'json'


# Class to read songs from a JSON file

class SongsHelper

  def self.songs

    filepath = File.join(File.dirname(__FILE__), '../songs.json')

    file = File.read(filepath)

    data = JSON.parse(file)['songs']


    data.map do |song|

      Song.new(song['id'], song['name'], song['url'])

    end

  end

end該類實現了一個方法,用于讀取文件并將其內容映射到對象數組中。SongsHelper 類讀取 songs.json 文件中的歌曲。
接下來,在你的 api.rb 文件中,你可以調用 SongsHelper 類的 songs 方法來加載歌曲。
# api.rb


# frozen_string_literal: true


require 'sinatra'

require 'json'

# ?? new code

require_relative 'helpers/songs_helper'


songs ||= SongsHelper.songs

# ?? new code


# existing code ...您正在導入文件,并調用其中的方法將數據存儲在名為songs的變量中。這個變量是通過helpers/songs_helper模塊中的songssongs方法獲取的。
請注意,在實際的應用程序中,您會使用一個合適的數據庫來存儲數據,并且無需執行從文件導入數據的這一步驟。但為了簡化本教程,我們沒有使用數據庫,而是直接處理來自songs.json文件的數據。
現在,您可以使用這個songs變量來管理GET請求,例如獲取所有歌曲的請求可以命名為GET /songs。
# api.rb


# frozen_string_literal: true


require 'sinatra'

require 'json'

require_relative 'helpers/songs_helper'


songs ||= SongsHelper.songs


before do

  content_type 'application/json'

end


# ?? new code

get '/songs' do

  return songs.to_json

end

# ?? new code


# existing code ...
該請求現在將使用 curl 命令通過 GET 方法檢索一組歌曲,訪問的 URL 是 /songs。
? curl http://localhost:4567/songs

[

  {"id":1,"name":"My Way","url":"https://www.last.fm/music/Frank+Sinatra/_/My+Way"},

  {"id":2,"name":"Strangers in the Night","url":"https://www.last.fm/music/Frank+Sinatra/_/Strangers+in+the+Night"},

  {"id":3,"name":"Fly Me to the Moon","url":"https://www.last.fm/music/Frank+Sinatra/_/Fly+Me+to+the+Moon"},

  {"id":4,"name":"That's Life","url":"https://www.last.fm/music/Frank+Sinatra/_/That%27s+Life"},

  {"id":5,"name":"I've Got You Under My Skin","url":"https://www.last.fm/music/Frank+Sinatra/_/I%27ve+Got+You+Under+My+Skin"},

  {"id":6,"name":"Come Fly With Me","url":"https://www.last.fm/music/Frank+Sinatra/_/Come+Fly+With+Me"},

  {"id":7,"name":"The Way You Look Tonight","url":"https://www.last.fm/music/Frank+Sinatra/_/The+Way+You+Look+Tonight"},

  {"id":8,"name":"Fly Me to the Moon (In Other Words)","url":"https://www.last.fm/music/Frank+Sinatra/_/Fly+Me+to+the+Moon+(In+Other+Words)"},

  {"id":9,"name":"Theme from New York, New York","url":"https://www.last.fm/music/Frank+Sinatra/_/Theme+from+New+York,+New+York"},

  {"id":10,"name":"Jingle Bells","url":"https://www.last.fm/music/Frank+Sinatra/_/Jingle+Bells"}

]%
現在,讓我們來實現歌曲詳細信息的路由。為此,我們需要引入 helpers 的概念,并創建一個新的 helper。路由將是 /songs/:id。
接下來,在您的 api.rb 文件中,添加相應的內容。
# frozen_string_literal: true


require 'sinatra'

require 'json'

require_relative 'helpers/songs_helper'


songs ||= SongsHelper.songs


# ?? new code

helpers do

  def id_param

    halt 400, { message: 'Bad Request' }.to_json if params['id'].to_i < 1

    params['id'].to_i

  end

end

# ?? new code


# existing code ...
在 Sinatra 中,幫助程序(helpers)指的是那些在路由處理程序和模板中均可使用的頂級方法。
在本例中,您將定義一個幫助程序方法。這個方法首先會檢查一個哈希值是否存在,這個哈希值是Sinatra在路由塊中自動為您提供的,它包含了來自請求的相關數據。這個特定的哈希鍵我們稱之為id_param。
在id_param方法中,如果對應的值不是正數,則會返回一個錯誤提示。如果它是一個有效的正數值,則方法會返回這個值并將其轉換為整數類型。您將在所有需要用到id參數的路由中使用這個方法,例如:在GET、PUT和DELETE請求處理/songs/:id這個路由時。
現在,回到api.rb文件,您可以通過使用這個helper方法來實現獲取、更新和刪除歌曲詳細信息的路由,如下所示(注意,這里我們假設id_param方法已經在文件中被正確定義):
/songs/:id,使用id_param來獲取并驗證歌曲ID。/songs/:id(原文中寫的是“放”,這里應該是PUT的誤寫),同樣使用id_param。/songs/:id,也是使用id_param。在這些路由處理程序中,如果id_param方法檢測到無效的ID,可以相應地返回“Bad Request”錯誤。
# existing code ...


get '/songs' do

  return songs.to_json

end


get '/songs/:id' do

  # ?? new code

  song = songs.find { |s| s.id == id_param }

  halt 404, { message: 'Song Not Found' }.to_json unless song


  return song.to_json

  # ?? new code

end


# existing code ...
您正在使用 Ruby 的?Enumerable#find?方法在數組中查找具有通過?params?發送的 ID 的歌曲。如果未找到對應的歌曲,則返回 404 NOT FOUND 錯誤。否則,您將以 JSON 格式返回該歌曲的信息。
讓我們現在使用:curl
? curl http://localhost:4567/songs/1


{"id":1,"name":"My Way","url":"https://www.last.fm/music/Frank+Sinatra/_/My+Way"}%
此時,您已經實現了 Songs API 中的兩個讀取路由。接下來,是時候實現創建、更新和刪除路由了。
讓我們從創建(create)路由開始。您可以通過提供一個包含歌曲名稱的 JSON 對象來發起 POST 請求。該 POST 請求的 URL 可以通過 curl 命令來發起,如下所示:
curl -X POST 'http://localhost:4567/songs' \

     -H 'Content-Type: application/json' \

     -d '{

          "name": "A new song",

          "url": "http://example.com"

}'在更新歌曲信息時,您需要在請求正文中傳遞name和url參數,并確保它們具有正確的JSON格式。這是實現相關幫助程序的一個關鍵提示。
接下來,我們將實現一個新的幫助程序,命名為json_params,它的作用是檢查請求的正文是否符合JSON格式要求。
現在,請在api.rb文件中添加實現json_params幫助程序的代碼。
# api.rb


# frozen_string_literal: true


require 'sinatra'

require 'json'

require_relative 'helpers/songs_helper'


songs ||= SongsHelper.songs


helpers do

  # existing code ...


  # ?? new code

  def json_params

    request.body.rewind

    @json_params ||= JSON.parse(request.body.read).transform_keys(&:to_sym)

  rescue JSON::ParserError

    halt 400, { message: 'Invalid JSON body' }.to_json

  end

  # ?? new code


  # existing code ...

end


# existing code ...
該方法從 request.body 中讀取 JSON 數據。如果在使用 JSON.parse 解析時遇到 JSON::ParseError,則表示請求體不是有效的 JSON 格式,此時該方法將返回 400 Bad Request 錯誤。
此外,您還應該驗證請求體中的參數是否僅包含必需的參數:name 和 url。為了實現這一驗證邏輯,我們可以創建一個新的 helper 方法。
# api.rb


# existing code ...


helpers do

  # existing code ...


  def json_params

    request.body.rewind

    @json_params ||= JSON.parse(request.body.read).transform_keys(&:to_sym)

  rescue JSON::ParserError

    halt 400, { message: 'Invalid JSON body' }.to_json

  end


  # ?? new code

  def require_params!

    json_params


    attrs = %i[name url]


    halt(400, { message: 'Missing parameters' }.to_json) if (attrs & @json_params.keys).empty?

  end

  # ?? new code


  # existing code ...

end


# existing code ...
該方法將是您在路由中使用的主要方法。首先,它調用 require_params! 以初始化實例變量 @json_params,并在上下文中使其可用。然后,該方法驗證 @json_params 是否包含 name 鍵且不包含其他未預期的參數。如果驗證失敗,它將返回 400 Bad Request 狀態碼。
require_params! 方法會檢查 json_params(通過參數傳遞或從請求體中解析得到)是否滿足要求。
只有在創建和更新歌曲時,才需要 name 參數。為此,您可以創建一個 before 過濾器來完成此驗證操作。
接下來,在 api.rb 中,添加以下內容來定義這個 before 過濾器:
# frozen_string_literal: true


require 'sinatra'

require 'json'

require_relative 'helpers/songs_helper'


songs ||= SongsHelper.songs


# ?? new code

set :method do |*methods|

  methods = methods.map { |m| m.to_s.upcase }

  condition { methods.include?(request.request_method) }

end

# ?? new code


helpers do

  # ... existing code

end


before do

  content_type 'application/json'

end


# ?? new code

before method: %i[post put] do

  require_params!

end

# ?? new code讓我們進一步分析并明確您的需求。您提到了兩個新增的元素:一個是變量(雖然您寫的是“a”,但根據上下文,我假設您可能想指的是某個具體的變量或設置項,但此處我們將其忽略,因為重點在于后續內容),另一個是您已經了解的before過濾器。
set方法是Sinatra框架提供的一個功能,它允許您為應用程序設置屬性。這個方法接受兩個參數:設置名稱和對應的值。
在您的情況中,您打算使用set方法來標識HTTP方法。具體做法是,您會設定一個名稱(,并將一個包含HTTP方法名稱的數組作為參數傳遞給它。隨后,您會利用條件語句來確保before過濾器僅在特定條件下執行,也就是當HTTP方法是POST或PUT時。
在before過濾器內部,您會傳遞一個HTTP方法的符號列表,以指明這段代碼應在哪些HTTP請求中執行。緊接著,您可能會調用一個自定義的方法,用于確保請求中包含了必要的參數。
現在,我們來關注api.rb文件中創建和更新歌曲的代碼實現。
首先,為了創建新歌曲,您需要處理POST /songs請求。
# existing code ...


before method: %i[post put] do

  require_params!

end


# existing code ...


# ?? new code

post '/songs' do

  create_params = @json_params.slice(:name, :url)


  if create_params.keys.sort == %i[name url]

    new_song = { id: songs.size + 1, name: @json_params[:name], url: @json_params[:url] }

  else

    halt(400, { message: 'Missing parameters' }.to_json)

  end


  songs.push(new_song)


  return new_song.to_json

end

# ??new code


# existing code ...

end

# existing code ...這條路由旨在簡化歌曲創建過程。首先,它會驗證?params?哈希中是否存在?name?和?url?這兩個鍵;請注意,之前的過濾器已經確保了這兩個參數是傳遞的唯一參數。如果這兩個參數都存在,那么可以創建一首新歌曲。這里需要說明的是,您只是簡單地將一個標識符遞增1,并將新歌曲對象推送到一個數組中;在實際應用中,您通常會在數據庫中創建新記錄。如果缺少?name?或?url?參數中的任何一個,則路由會返回 400 Bad Request 錯誤。
接下來,我們繼續為 update 路由添加代碼。
# api.rb

# existing code ...


# ?? new code

put '/songs/:id' do

  song = songs.find { |s| s.id == id_param }


  halt 404, { message: 'Song Not Found' }.to_json unless song


  song.name = @json_params[:name] if @json_params.keys.include? :name

  song.url = @json_params[:url] if @json_params.keys.include? :url


  return song.to_json

end

# ??new code


# existing code ...

end
當請求更新歌曲時,您的代碼會嘗試使用 id_param(從請求中提取的歌曲ID)在歌曲數組中查找該歌曲。如果未找到對應的歌曲,則返回 404 Not Found 錯誤。如果找到了歌曲,則僅更新請求正文中發送的字段,并以 JSON 格式返回更新后的歌曲信息。
最后,還有刪除歌曲的路由需要實現。讓我們將其添加到 api.rb 文件中:實現一個 DELETE 請求處理,路徑為 /songs/:id。
# api.rb

# existing code ...


# ?? new code

delete '/songs/:id' do

  song = songs.find { |s| s.id == id_param }

  halt 404, { message: 'Song Not Found' }.to_json unless song


  song = songs.delete(song)


  return song.to_json

end

# ??new code


# existing code ...

end
delete song 方法與 update song 方法非常相似,但它調用 Array#delete 函數并以 JSON 格式呈現歌曲。
您的 Songs API 已完成!但未得到保障??。此時,您的代碼必須與存儲庫的 main 分支上的代碼非常相似。
到目前為止,您已經成功構建了一個CRUD Songs API,但目前該API的終端節點對所有人都是開放的。為了確保只有經過授權的用戶才能執行創建、更新和刪除歌曲的操作,您計劃使用Auth0作為身份訪問管理(IAM)提供商。
接下來,您將實現已在add-authorization分支中完成的代碼,該代碼將作為您操作的指南。
要將您的Sinatra API與Auth0進行連接,您需要先在Auth0控制面板的API部分創建一個新的Auth0 API。具體操作步驟如下:
https://sinatra-auth0-songs-api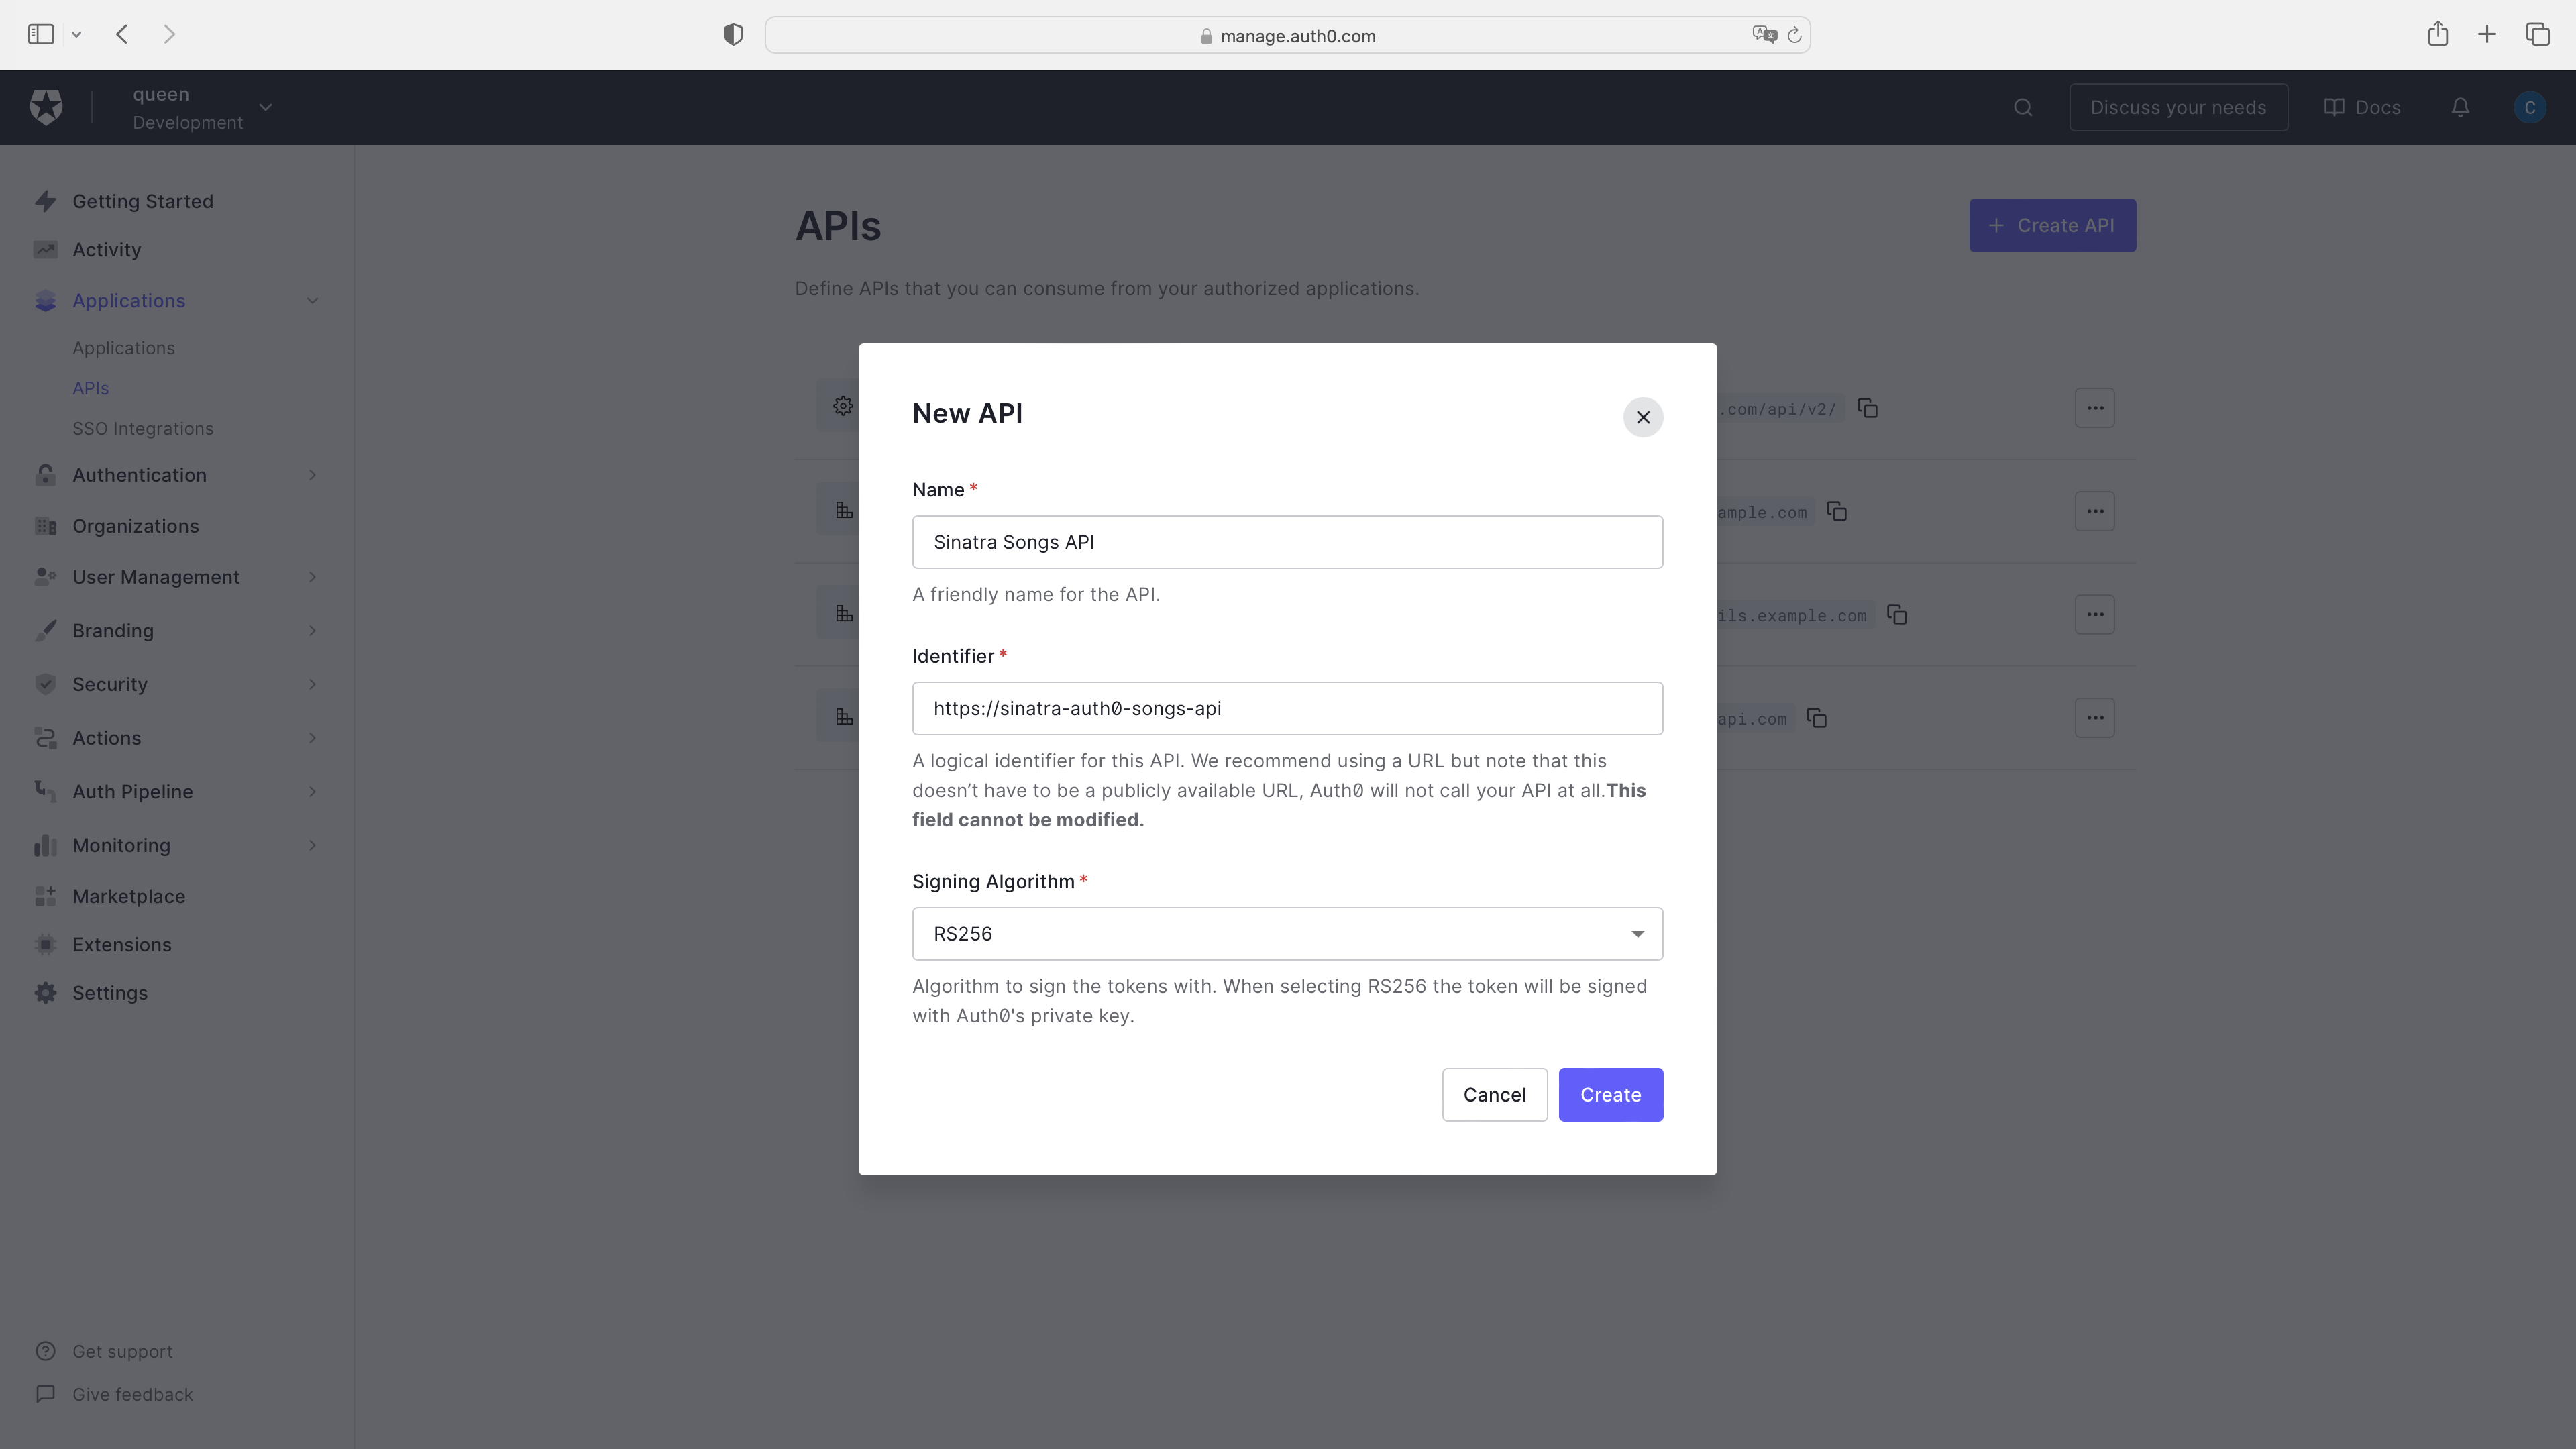
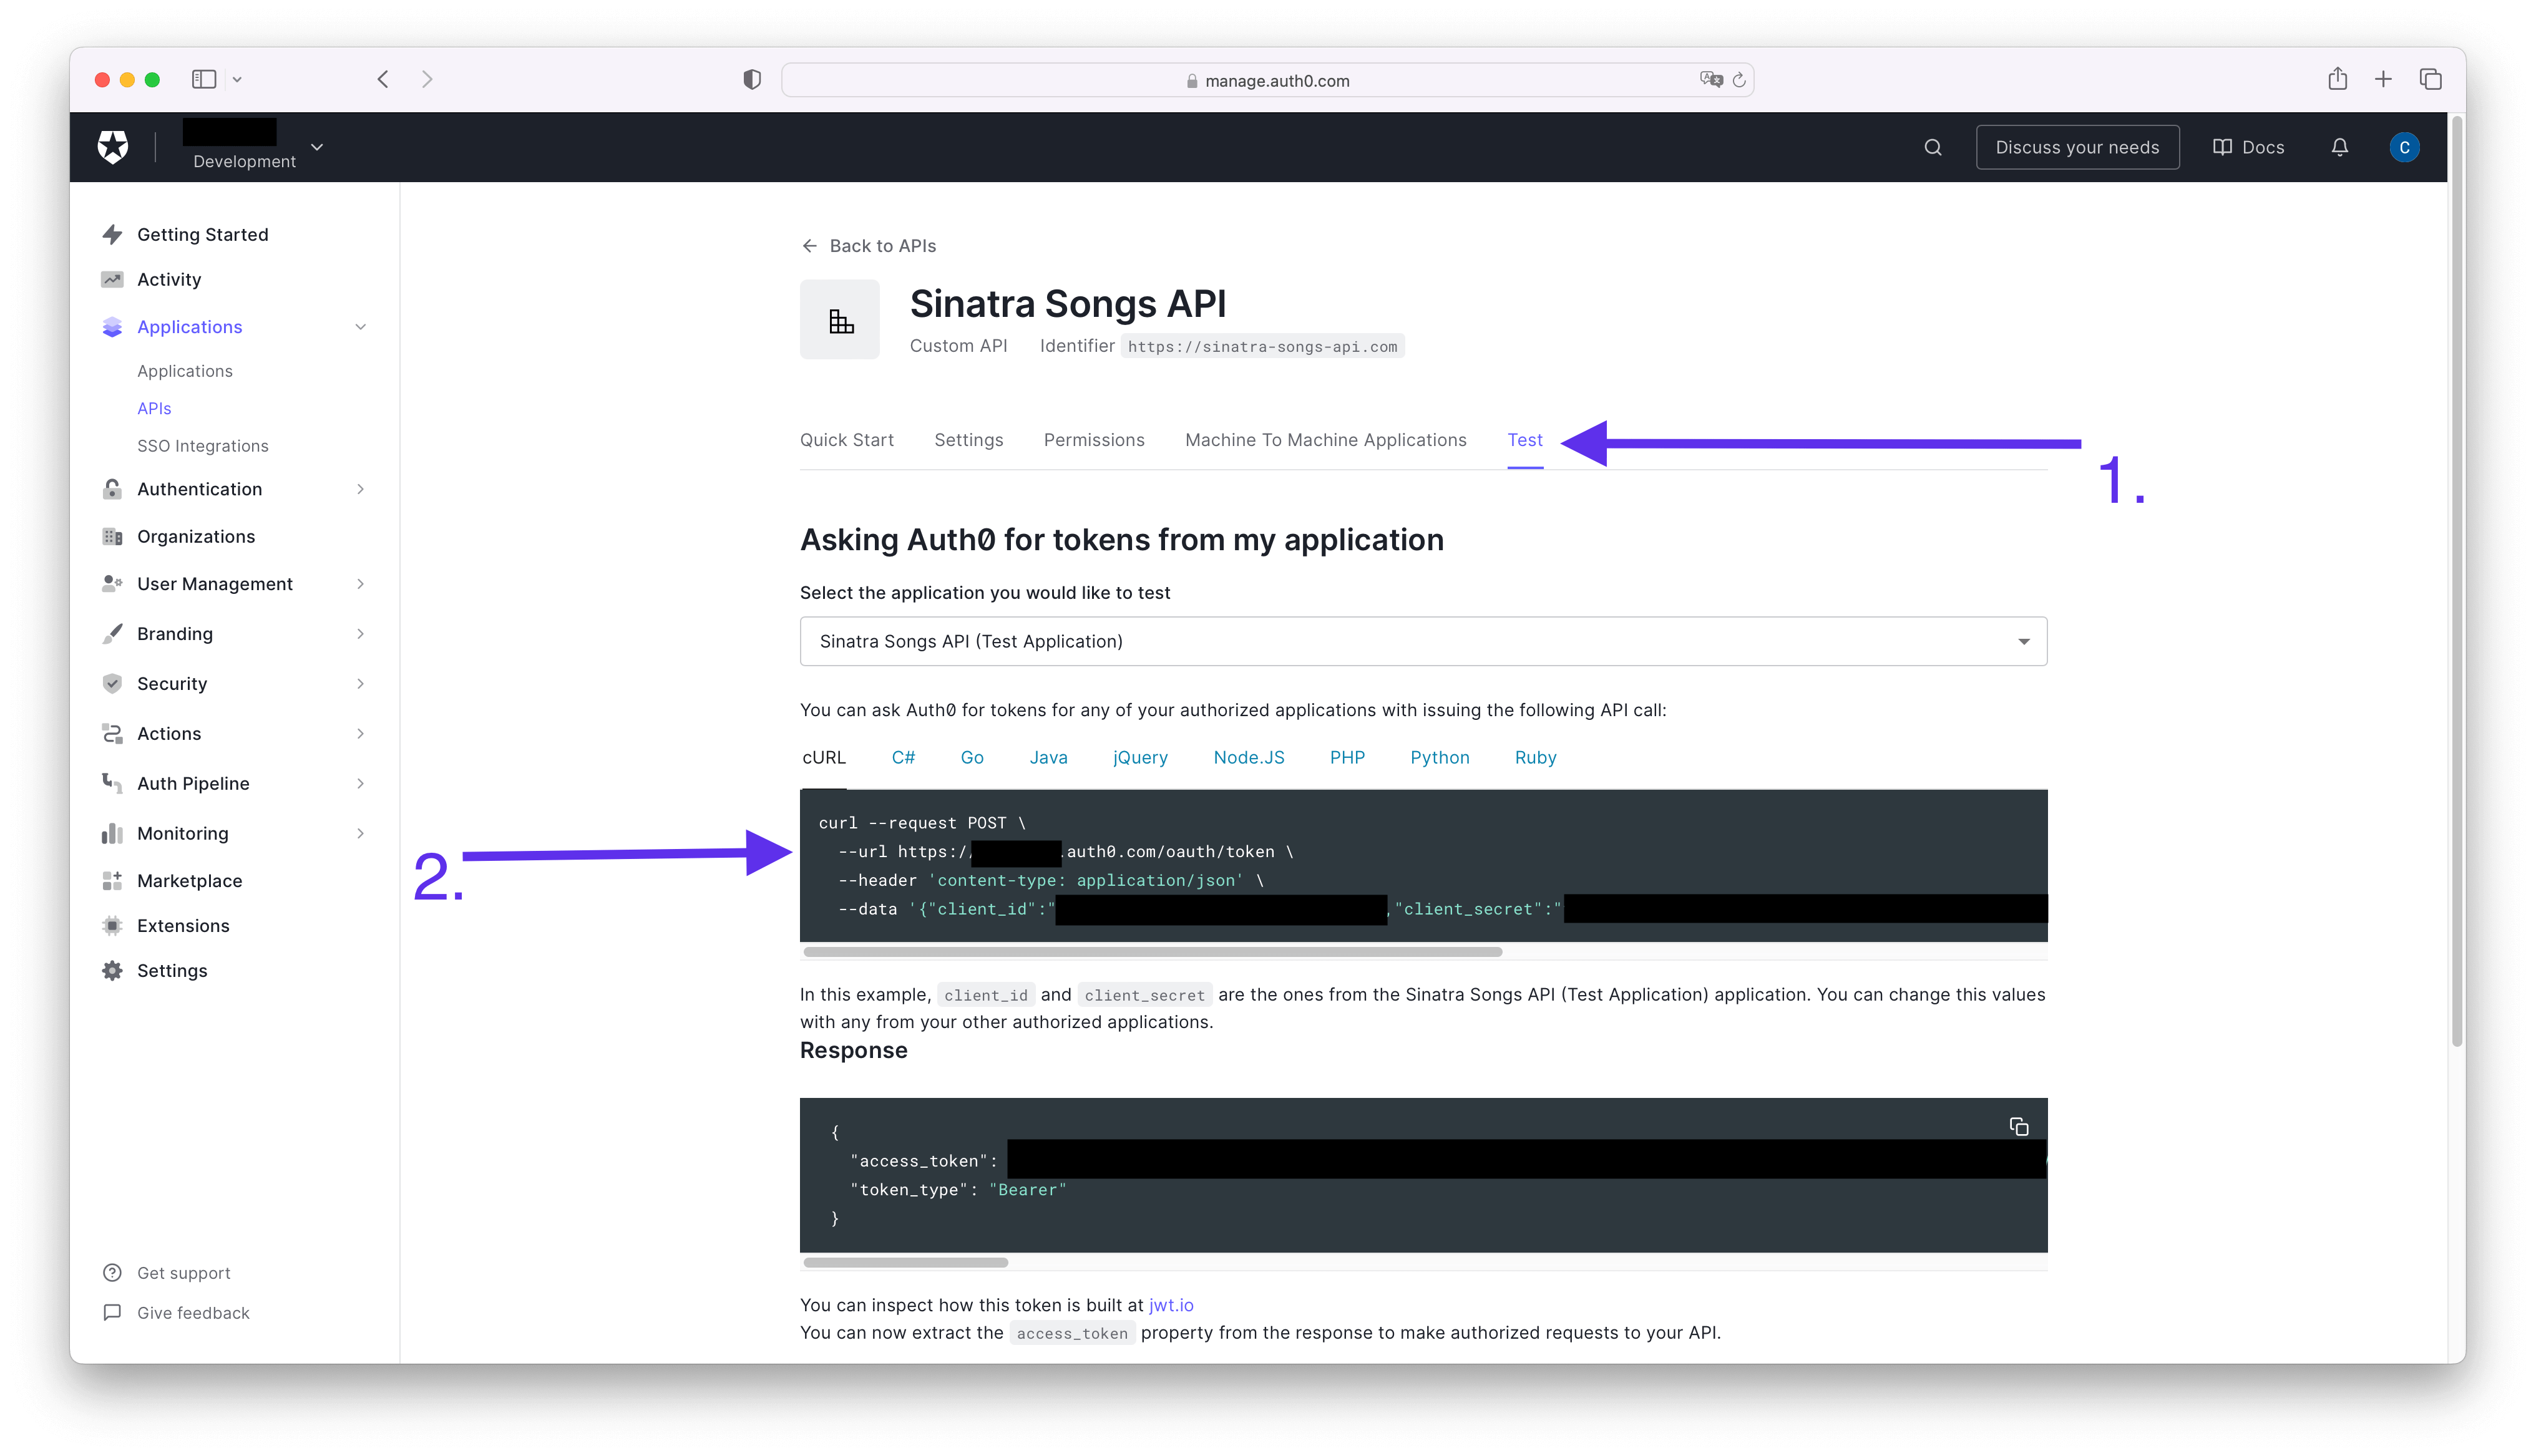
在設置 Sinatra API 時,您需要復制一個值(此處未具體說明是哪個值,可能是指某個配置參數或令牌)。此外,您還需要獲取您的 Auth0 域。除非您已配置自定義域,否則此值通常為您的租戶名稱和區域組成的 URL,形如 https://[TENANT_NAME].[REGION].auth0.com。如果您不確定此值的具體內容,可以打開 API 設置中的“Test”選項卡,并查看“Asking Auth0 for tokens from my application”部分下的代碼示例,其中會包含這個參數的示例值:identifier
創建 API 后,您可以前往命令行并開始安裝依賴項。
您將需要一些 gem,因此讓我們繼續將它們添加到Gemfile :
gem 'dotenv'

gem 'jwt'
接下來,在終端中運行:
bundle install您正在安裝 dotenv gem,以便從本地文件中讀取環境變量。您可以使用 .env.example 文件作為模板,并將其內容復制到項目根目錄中的一個名為 .env 的文件中。
請記住上一步,您必須保存您的 Auth0 域和標識符。嗯,這就是您可以在?.env?文件中使用它們的地方。
將 AUTH0_DOMAIN 和 AUTH0_IDENTIFIER 粘貼到您的 .env 文件中。
您還安裝了 JWT gem,它是 JWT 標準的 Ruby 實現,稍后將幫助您驗證 JWT 令牌,稍后您將了解有關這些令牌的更多信息。
為了保護 API 的終端節點,您將使用所謂的基于令牌的授權。基本上,您的 Sinatra Songs API 將接收一個訪問令牌;傳遞的訪問令牌會告知 API,令牌的持有者已被授權訪問 API 并執行范圍指定的特定操作。
最后,您的 API 將通過確保訪問令牌具有正確的結構,并且它是由正確的授權服務器(在本例中為 Auth0)頒發的,來驗證訪問令牌。
為了驗證訪問令牌,您需要首先創建一個新的類來專門處理這一過程。
接下來,請在您的文件夾中新建一個文件,命名為helpers/auth0_client_helper.rb,并向其中添加相應的代碼。
# helpers/auth0_client_helper.rb


# frozen_string_literal: true


require 'jwt'

require 'net/http'


# AuthoClient helper class to validate JWT access token

class Auth0ClientHelper

  # Auth0 Client Objects

  Error = Struct.new(:message, :status)

  Response = Struct.new(:decoded_token, :error)


  # Helper Functions

  def self.domain_url

    "https://#{ENV['AUTH0_DOMAIN']}/"

  end


  def self.decode_token(token, jwks_hash)

    JWT.decode(token, nil, true, {

                 algorithm: 'RS256',

                 iss: domain_url,

                 verify_iss: true,

                 aud: (ENV['AUTH0_AUDIENCE']).to_s,

                 verify_aud: true,

                 jwks: { keys: jwks_hash[:keys] }

               })

  end


  def self.get_jwks

    jwks_uri = URI("#{domain_url}.well-known/jwks.json")

    Net::HTTP.get_response jwks_uri

  end


  # Token Validation

  def self.validate_token(token)

    jwks_response = get_jwks


    unless jwks_response.is_a? Net::HTTPSuccess

      error = Error.new(message: 'Unable to verify credentials', status: :internal_server_error)

      return Response.new(nil, error)

    end


    jwks_hash = JSON.parse(jwks_response.body).transform_keys(&:to_sym)


    decoded_token = decode_token(token, jwks_hash)

    Response.new(decoded_token, nil)

  rescue JWT::VerificationError, JWT::DecodeError

    error = Error.new('Bad credentials', 401)

    Response.new(nil, error)

  end

end
這個類中包含了一些內容,這些內容在《Rails API 授權示例指南》中得到了詳盡的解釋,特別是在“Auth0Client 類在后臺的運作機制”這一章節下的“驗證 JSON Web Token(JWT)”部分。當然,我已經做了一些調整,將原本適用于 Rails 的代碼修改為適用于 Sinatra,但核心思想依然保持不變。
為了深入了解這些安全相關的概念,你可以參考《Rails 認證示例指南》和《Rails 授權示例指南》(后者還介紹了基于角色的訪問控制(RBAC)的概念)。
不過,現在讓我們聚焦于這個類中的一個核心方法:validate_token 方法。
def self.validate_token(token)

    jwks_response = get_jwks


    unless jwks_response.is_a? Net::HTTPSuccess

      error = Error.new(message: 'Unable to verify credentials', status: :internal_server_error)

      return Response.new(nil, error)

    end


    jwks_hash = JSON.parse(jwks_response.body).transform_keys(&:to_sym)


    decoded_token = decode_token(token, jwks_hash)

    Response.new(decoded_token, nil)

  rescue JWT::VerificationError, JWT::DecodeError

    error = Error.new('Bad credentials', 401)

    Response.new(nil, error)

end讓我們分解一下validate_token方法的作用:
validate_token 方法,該方法使用 JWT Gem 對訪問令牌進行解碼,如下所示:JWT.decode(token, nil, true, {
algorithm: 'RS256',
iss: domain_url,
verify_iss: true,
aud: (ENV['AUTH0_AUDIENCE']).to_s,
verify_aud: true,
jwks: { keys: jwks_hash[:keys] }
})這會從環境變量中獲取?u,并在值中設置?u。最后,在參數中傳遞您之前創建的?domain_url、AUTH0_DOMAIN、AUTH0_AUDIENCE?和?jwks_hash、jwks。
要了解有關參數的更多信息,可以參考 Rails API Authorization By Example Developer Guide 中的“Auth0Client 類在后臺做什么?”以及 JWT.decode。
創建幫助程序 authorize!,該類已經在執行大部分工作來驗證訪問令牌。現在,您需要在要保護的終端節點中實際調用它。使用 Auth0ClientHelper,類似于您之前使用它的方式。
轉到您的 api.rb 文件并添加相關代碼。
# api.rb


# existing code ...


helpers do

  # existing code ...


  # ?? new code

  def authorize!

    token = token_from_request


    validation_response = Auth0ClientHelper.validate_token(token)


    return unless (error = validation_response.error)


    halt error.status, { message: error.message }.to_json

  end


  def token_from_request

    authorization_header_elements = request.env['HTTP_AUTHORIZATION']&.split


    halt 401, { message: 'Requires authentication' }.to_json unless authorization_header_elements


    unless authorization_header_elements.length == 2

      halt 401, { message: 'Authorization header value must follow this format: Bearer access-token' }.to_json

    end


    scheme, token = authorization_header_elements


    halt 402, { message: 'Bad credentials' }.to_json unless scheme.downcase == 'bearer'


    token

  end

  # ?? new code

end


# existing code ...好吧,您實際上定義了兩個幫助程序,但這兩個幫助程序是互為輔助的。token_from_request 幫助程序通過調用另一個方法從請求中提取令牌。該方法會檢查 HTTP 標頭,并對其進行解析以驗證其格式是否正確。而 authorize! 幫助程序則依賴于 token_from_request 來獲取令牌。
使用 Bearer 模式時,格式正確的 Authorization 標頭如下所示:
Authorization: Bearer eyJhbGciOiJSUzI1NiIsInR5cCI6IkpXVCJ9.eyJzdWIiOiIxMjM0NTY3ODkwIiwibmFtZSI6IkpvaG4gRG9lIiwiYWRtaW4iOnRydWUsImlhdCI6MTUxNjIzOTAyMn0.NHVaYe26MbtOYhSKkoKYdFVomg4i8ZJd8_-RU8VNbftc4TSMb4bXP3l3YlNWACwyXPGffz5aXHc6lty1Y2t4SWRqGteragsVdZufDn5BlnJl9pdR_kdVFUsra2rWKEofkZeIC4yWytE58sMIihvo9H1ScmmVwBcQP6XETqYd0aSHp1gOa9RdUPDvoXQ5oqygTqVtxaDr6wUFKrKItgBMzWIdNZ6y7O9E0DhEPTbE9rfBo6KTFsHAZnMg4k68CDp2woYIaXbmYTWcvbzIuHO7_37GT79XdIwkm95QJ7hYC9RiwrV7mesbY4PAahERJawntho0my942XheVLmGwLMBkQ然后,該方法會驗證請求標頭中是否存在 Authorization,令牌是否存在,以及它是否具有正確的格式(例如,以 “Bearer ” 開頭)。如果任何一項檢查失敗,它將返回 401 Unauthorized 狀態碼。
從請求標頭中檢索到令牌后,幫助程序(我們假設它是一個輔助方法或類)將調用 Auth0ClientHelper 類中的 authorize! 方法來驗證令牌。如果令牌經過驗證且沒有錯誤,則 authorize! 方法將正常完成其執行流程。如果在驗證過程中出現任何錯誤,authorize! 方法會返回一個包含正確狀態碼和錯誤消息的 Error 對象。
要使用這個幫助程序保護您的 API 端點,您需要在任何客戶端嘗試調用這些端點之前調用 authorize! 方法。
保護終端節點的最后一步是實現一個過濾器,該過濾器會在請求到達端點之前被觸發。在 Sinatra 中,這通常是通過 before 過濾器來實現的。
在您的 api.rb 文件中,您可能已經有一個可以重復使用的過濾器,因此讓我們修改它,以便在調用任何需要保護的端點之前都執行 authorize! 方法。
# api.rb

# existing code ...


# old code

# before method: %i[post put] do

#   require_params!

# end

# old code


# ?? new code

before method: %i[post put delete] do

  require_params!

  authorize!

end

# ?? new code

# existing code ...首先,您將該方法添加到過濾器中,因為您希望只有授權用戶能夠創建、更新和刪除歌曲。deletebefore
接著,在過濾器中調用將執行授權驗證的幫助程序?authorize!。
就是這樣!現在,您已經設置好了授權驗證,可以使用 curl 命令來測試相關的終端節點。
curl -X POST 'http://localhost:4567/songs' \

-H 'Authorization: Bearer YOUR_TOKEN' \

-d '{

    "name": "A new song"

    "url": "http://example.com"

}'
將占位符替換為有效的訪問令牌后,此請求的結果將如下所示:
{"id":11,"name":"A new song","url":"http://example.com"}要獲取 API 的有效訪問令牌,請按照將 Sinatra API 與 Auth0 連接部分中顯示的步驟進行操作。
在這篇博文中,您了解了 Ruby 框架 Sinatra,并學習了如何創建一個基本的 CRUD API 來管理 Frank Sinatra 的歌曲。
您首先通過控制面板創建了一個新的 Auth0 賬戶和一個新的 API。接著,您使用了 JWT gem 來驗證由 Auth0 頒發的訪問令牌。最后,您通過實施基于令牌的授權(采用 Bearer 方案)保護了用于創建、更新和刪除歌曲的 API 終端節點。
我希望您喜歡這篇文章。您是否使用過其他的 Ruby 框架呢?請在評論中告訴我!
感謝閱讀!
原文鏈接:https://auth0.com/blog/add-authorization-to-sinatra-api-using-auth0/