2025 Prometheus API 完整指南:基礎查詢、PromQL 高級用法與自定義監控實踐
在本節中,我們將使用window.ai來構建一個 AI 聊天機器人,為提出的問題提供建議。
在終端中運行以下命令,在本地機器上搭建 Vue 單頁應用程序的基架:
npm create vue@latest按如下方式響應提示:
? Project name: … <your-project-name>

? Add TypeScript? … No

? Add JSX Support? … No

? Add Vue Router for Single Page Application development? … No

? Add Pinia for state management? … No

? Add Vitest for Unit testing? … No

? Add an End-to-End Testing Solution? … No

? Add ESLint for code quality? … Yes

? Add Prettier for code formatting? … No

? Add Vue DevTools 7 extension for debugging? (experimental) … No
我們將安裝 Vercel AI SDK 和 ChromeAI 提供程序,以調用 Chrome 的內置 AI 模型 (Gemini Nano) 和 Tailwind CSS 進行樣式設置:
npm install ai chrome-ai tailwindcss在項目根目錄中創建一個tailwind.config.js文件并添加以下內容:
/** @type {import('tailwindcss').Config} */

export default {

  purge: ['./index.html', './src/**/*.{vue,js,ts,jsx,tsx}'],

  content: [],

  theme: {

    extend: {},

  },

  plugins: [],

}接下來,請按照以下方式更新assets/main.css文件。
@tailwind base;

@tailwind components;

@tailwind utilities;

body {

  font-family: 'General Sans', sans-serif;

  background-color: #F9FAFB;

}由于該 API 僅在 Chrome Dev 和 Canary 瀏覽器中受支持,因此我們需要編寫幫助程序函數來處理不受支持的瀏覽器的驗證。
在目錄中創建utils.jssrc文件并添加以下內容:
export async function checkEnv() {

  function getChromeVersion() {

    var raw = navigator.userAgent.match(/Chrom(e|ium)\/([0-9]+)\./);

    return raw ? parseInt(raw[2], 10) : 0;

  }

  if (navigator.userAgentData?.brands) {

    const isChrome = navigator.userAgentData?.brands.some(

      (brandInfo) => brandInfo.brand === "Google Chrome",

    );

    if (!isChrome) {

      throw new Error(

        "Your browser is not supported. Please use Google Chrome Dev or Canary.",

      );

    }

  } else {

    // If brands is not available, we can't determine the browser, so we should handle this case

    throw new Error(

      "Your browser is not supported. Please use Google Chrome Dev or Canary.",

    );

  }

  const version = getChromeVersion();

  if (version < 127) {

    throw new Error(

      "Your browser is not supported. Please update to 127 version or greater.",

    );

  }

  if (!("ai" in globalThis)) {

    throw new Error(

      "Prompt API is not available, check your configuration in chrome://flags/#prompt-api-for-gemini-nano",

    );

  }

  const state = await ai?.assistant.capabilities();

  if (state.available !== "readily") {

    try {

      await window.ai.assistant.create();

    } catch (e) {

      console.error(e);

    }

    throw new Error(

      "Built-in AI is not ready, check your configuration in chrome://flags/#optimization-guide-on-device-model",

    );

  }

}
在開發過程中,我們可能會遇到一些實驗性功能,這些功能需要通過 Chrome 瀏覽器的特定標志來啟用。為了確保用戶能夠正確了解并使用這些功能,我們需要創建一個 modal(模態框)組件。
modal 組件將派上用場,用于顯示不受支持的瀏覽器的錯誤消息和在支持的瀏覽器中禁用的實驗性功能。
在項目的目錄中創建一個新文件夾,命名為 components,然后在該目錄中創建一個新的文件,命名為 Modal.vue , 并添加模態框組件的 Vue 代碼。
<script>

export default {

    props: {

        open: {

            type: Boolean,

            required: true

        }

    },

}

</script>

<template>

    <transition name="fade">

        <div class="vue-modal" v-if="open">

            <transition name="drop-in" v-show="open">

                <div class="vue-modal-inner">

                    <div class="vue-modal-content">

                        <slot/>

                    </div>

                </div>

            </transition>

        </div>

    </transition>

</template>

<style scoped>

*,

::before,

::after {

    margin: 0;

    padding: 0;

    box-sizing: border-box;

}

.vue-modal {

    position: fixed;

    top: 0;

    left: 0;

    width: 100%;

    height: 100%;

    overflow-x: hidden;

    overflow-y: auto;

    background-color: rgba(0, 0, 0, 0.44);

    z-index: 1;

}

.vue-modal-inner {

    max-width: 600px;

    margin: 3rem auto;

    border-radius: 0.4rem;

}

.vue-modal-content {

    position: relative;

    background-color: #fff;

    background-clip: padding-box;

    border-radius: 0.4rem;

    padding: 1rem;

}

.fade-enter-active,

.fade-leave-active {

    transition: opacity 0.5s;

}

.fade-enter-from,

.fade-leave-to {

    opacity: 0;

}

.drop-in-enter-active,

.drop-in-leave-active {

    transition: all 0.3s ease-out;

}

.drop-in-enter-from,

.drop-in-leave-to {

    opacity: 0;

    transform: translateY(-50px);

}

</style>在此步驟中,我們將創建一個導航欄組件,該組件將用于顯示品牌徽標和登錄的用戶配置文件。
在目錄Navbar.vuecomponents中創建并添加以下內容:
<template>

    <div class="h-[96px] px-[28px] sm:px-[48px] bg-[#FFFFFF] flex justify-between items-center">

        <h1 class="text-[#111827] font-bold text-lg sm:text-2xl">AI ChatBot</h1>

        <div class="flex sm:space-x-2 space-x-1">

            <img class="w-10 sm:w-12" src="/Avatar.svg">

            <div>

                <p class="font-bold mb-1 text-sm sm:text-base  text-[#111827] leading-6">Tynisha Obey</p>

                <p class="text-xs text[#718096] leading-5">Makostore</p>

            </div>

        </div>

    </div>

</template>
這是一個具有獨特樣式的簡單組件,用于區分機器人響應和用戶的提示。
在目錄Message.vuecomponents中創建并添加以下內容:
<template>

    <div v-if="role==='user'" className="flex items-start gap-3 mt-1 justify-end">

      <div className="bg-blue-100 rounded-lg p-3 max-w-[100%] md:max-w-[50%] text-primary-foreground">

        <div className="text-sm">{{message.content}}</div>

      </div>

      <div className="w-8 h-8 border rounded-full shrink-0">

        <img class="w-10 sm:w-12" src="/Avatar.svg">

      </div>

    </div>

    <div v-if="role==='assistant'" className="flex items-start mt-1 gap-3">

      <div className="w-8 h-8 border rounded-full shrink-0">

        <img class="w-10 sm:w-12" src="/bot.svg">

      </div>

      <div className="bg-gray-100 rounded-lg p-3 max-w-[100%] md:max-w-[50%]">

        <div className="text-sm">

            {{message.content}}

        </div>

      </div>

    </div>

</template>

<script>

export default {

    name: "message-component",

    props: {message: Object, role: String},

}

</script>聊天組件由消息顯示、提交消息的按鈕和用于輸入將發送到 Gemini 模型的提示的輸入字段組成。
在目錄ChatComponent.vue中創建components并添加以下內容:
<script>

import Message from './Message.vue';

import { streamText } from "ai";

import { chromeai } from "chrome-ai";

export default {

    name: "chat-component",

    components: { Message },

    props: {

        error: Object

    },

    data() {

        return {

            messages: [],

            userInput: '',

        };

    },

    methods: {

       async  sendMessage(e) {

            e.preventDefault();

        }

    },

}

</script>

<template>

    <div className="flex flex-col h-screen">

        <div className="flex-1 p-4 overflow-auto" ref={containerRef}>

            <div className="flex min-h-full flex-col gap-4 py-4 overflow-visible">

                <div v-if="messages.length > 0">

                    <div v-for="(m, i) in  messages " :key="i">

                        <Message :message=" m " :role="m.role"/>

                    </div>

                </div>

                <div v-else

                    className="mx-auto my-auto text-center w-full max-w-md flex items-center justify-center h-full">

                </div>

            </div>

        </div>

        <form @submit="sendMessage" className="bg-background border-t border-muted px-4 py-3 sticky bottom-0 w-full">

            <div>

                <div className="flex space-x-2">

                    <div className="w-full">

                        <input :v-model="userInput" :disabled="error" placeholder="Type your message..." className="w-full rounded-sm pr-16" />

                    </div>

                    <button type="submit" :disabled="error" className="">

                        <svg xmlns="http://www.w3.org/2000/svg" width="24" height="24" viewBox="0 0 24 24" fill="none"

                            stroke="currentColor" strokeWidth="2" strokeLinecap="round" strokeLinejoin="round">

                            <path d="m22 2-7 20-4-9-9-4Z" />

                            <path d="M22 2 11 13" />

                        </svg>

                        <p>Send</p>

                    </button>

                </div>

            </div>

        </form>

    </div>

</template>

<style scoped>

input {

    flex: 1;

    padding: 10px 15px;

    border: 1px solid #ddd;

    border-radius: 8px;

    margin-right: 10px;

    font-size: 14px;

    color: #333;

    outline: none;

    transition: border-color 0.3s ease;

}

input:focus {

    border-color: #007bff;

}

button {

    display: flex;

    align-items: center;

    justify-content: center;

    padding: 10px 15px;

    background-color: #007bff;

    color: #fff;

    border: none;

    border-radius: 8px;

    cursor: pointer;

    outline: none;

    transition: background-color 0.3s ease;

}

button:hover {

    background-color: #0056b3;

}

button svg {

    width: 20px;

    height: 20px;

}

</style>現在,我們需要異步處理用戶輸入提交,并實時流式傳輸 AI 的響應,并在收到響應時更新聊天界面。
使用以下命令更新 :
async  sendMessage(e) {

    e.preventDefault();

    const newMessages = [

        ...this.messages,

        { content: this.userInput, role: "user" },

    ];

    this.input = '';

    this.messages = newMessages

    try {

        const { textStream } = await streamText({

            model: chromeai(),

            system: "You are an assistant. Respond to every question completely.",

            prompt: ("User: '" + newMessages.slice(-1)[0].content)

        });

        let t = "";

        for await (const textPart of textStream) {

            t = t.concat(textPart);

            this.messages = ([...newMessages, { role: "assistant", content: t }]);

        }

    } catch (e) {

        console.error(e);

    }

}
當用戶提交消息時,會觸發一個異步方法。這個方法首先將用戶的消息附加到一個數組中,并清除輸入字段。然后,它使用 sendMessage 方法將用戶的消息發送到 AI 模型并接收流式響應。
這個流式響應會被分成幾個部分,并逐一附加到數組中。隨著 AI 助手生成其回復,這個數組會實時更新,從而允許 UI 實時顯示最新的回復內容。這里的 messages 數組就是用來存儲用戶和 AI 之間交互消息的。
接下來,我們將創建一個應用程序組件,來整合上述功能并管理用戶界面。這個組件將導入必要的子組件,并使用 modal 組件來處理環境驗證和錯誤報告。
使用以下命令更新App.js文件:
<script>

import NavBar from "./components/NavBar.vue";

import ChatComponent from "./components/ChatComponent.vue";

import { checkEnv } from "./utils";

import Modal from "./components/Modal.vue";

export default {

  name: "app-component",

  components: { NavBar, ChatComponent, Modal },

  data() {

    return {

      error: null,

      showModal: false,

    };

  },

  computed: {

  },

  mounted() {

    const checkBrowser = async () => {

      try {

        await checkEnv();

      } catch (e) {

        if (e instanceof Error) {

          console.log(e?.message);

          this.error = e?.message;

          this.showModal = true;

        }

      }

    };

    checkBrowser();

  },

  methods: {

    openModal () {

      this.showModal = true;

    },

    closeModal () {

      this.showModal = false;

    }

  },

};

</script>

<template>

  <NavBar />

  <div v-if="error">

    <Modal :open="showModal" @close="showModal = !showModal">

            <p class="text">{{error}} </p>

            <div class="flex justify-end">

                <button @click="showModal = !showModal" class="bg-[#007bff] rounded-md px-6 py-1.5 text-white ">

                    <span>Close</span>

                </button>

            </div>

    </Modal>

  </div>

  <ChatComponent :error="error"/>

</template>在組件掛載之后,它會首先檢查當前的瀏覽器環境是否滿足要求。如果檢測到環境不合適,組件會設置一條錯誤消息,并彈出一個模態對話框來通知用戶。盡管用戶可以關閉這個模態對話框,但錯誤消息會一直保留在界面上,直到相關的問題得到解決。這里所描述的組件是App組件。
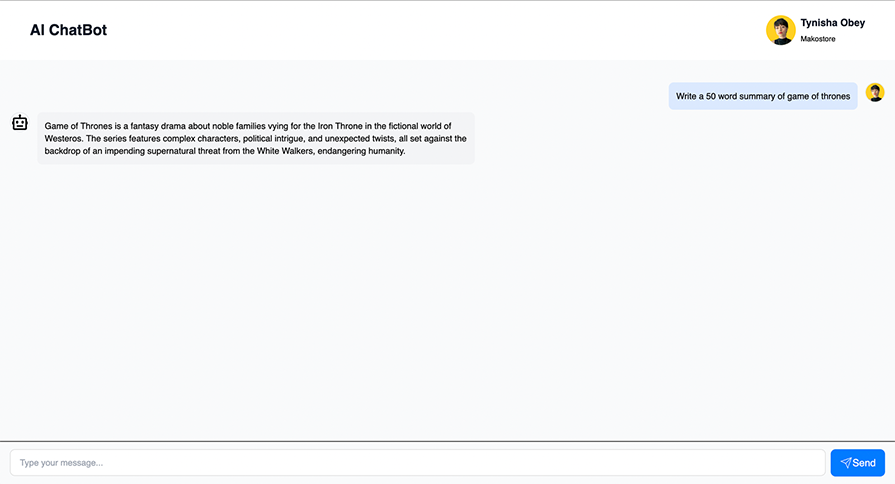
如果您沒看錯,以下是聊天機器人的最終構建樣子的圖像:
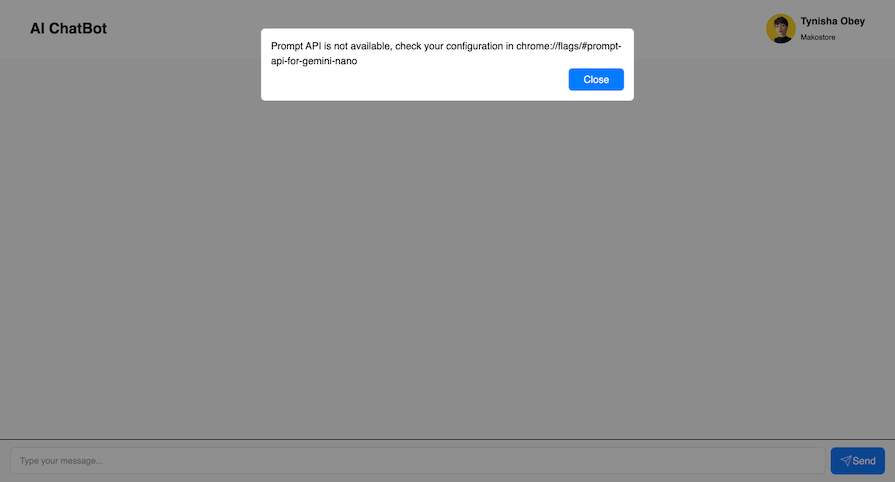
如果您在支持的瀏覽器上運行項目,但沒有在“設置”(Setting up the)窗口中設置相應的標志,那么您將會看到人工智能API部分顯示以下內容:
聊天機器人也可以離線工作。您可以關閉互聯網以體驗離線支持功能。
在網站上運行大量模型確實可能對用戶產生負面影響,尤其是在性能受限的設備上。讓每個網站都下載并運行其自己的大型語言模型(LLM)也是不切實際的,開發者需要花費大量時間來優化提示,這是一個既耗時又需要專業技能的過程。
盡管存在這些缺點,window.ai API 在業務方面仍然有其獨特的價值。它提供了隱私敏感的功能,能夠在用戶的設備上處理數據,從而避免了與服務器的往返通信,為用戶提供了近乎即時的結果。這種即時反饋對于提升用戶體驗和參與度至關重要。
此外,如果用戶的設備具備足夠的處理能力,那么通過讓設備承擔一部分處理負載,window.ai API 可以幫助管理服務器成本。這對于那些希望提供強大 AI 功能但又不想承擔高昂服務器費用的企業來說是一個有吸引力的選擇。
在本教程中,我們深入探索了Chrome的新API,并通過Vue.js構建了一個AI驅動的聊天機器人來展示其應用潛力。這個演示不僅是一個實踐案例,更是一個生動的示例,
考慮到并非所有設備都具備強大的AI處理能力,為那些無法支持高級功能的設備設計具有回退機制的功能顯得尤為重要。此外,進行基準測試以確保目標設備上的流暢運行也是不可或缺的一步。由于托管AI模型可能會占用大量資源,因此,制定有效的服務和緩存策略對于優化性能和資源利用率至關重要。
展望未來,生成式AI領域正以前所未有的速度發展,我們有理由相信,更小、更優化的Web模型將不斷涌現。隨著WebGPU、WebAssembly等技術的不斷進步以及庫的持續更新,設備上的AI推理將變得更加迅速和高效。例如,Transformers.js v3已經引入了WebGPU嵌入基準測試支持,這對于實時設備端AI來說無疑是一個重大突破。
最后需要強調的是,盡管這個API充滿了潛力,但它目前仍處于高度實驗性階段,未來可能會發生變化,甚至可能不會被納入Chrome的主版本。因此,在使用時請務必謹慎,并時刻關注其最新動態。
原文鏈接:https://blog.logrocket.com/chrome-new-window-ai-api-vue-app/