如何快速實現REST API集成以優化業務流程
注意:通過查看分支,您將能夠從相同的起點跟蹤文章
part-3。
要啟動PostgreSQL,請在“real-world-grading-app”文件夾中運行以下命令。
docker-compose up -d注意:Docker 將使用docker-compose.yml文件啟動 PostgreSQL 容器。
在深入探討具體實現之前,我們先來了解一下身份驗證和授權的相關概念。
盡管這兩個術語常被混用,但它們在應用中扮演著不同的角色,共同保護著應用程序的安全。簡而言之,身份驗證旨在確認用戶的身份,而授權則確保用戶有權訪問特定的資源。
以現實生活中的護照為例,它就是一個有效的身份驗證工具。當你出示護照,且你的外貌與證件照片相符(難以偽造)時,就證明了你就是你所聲稱的那個人。比如,在機場,你需要通過出示護照來通過安檢。
在這個例子中,授權則體現在登機過程中:你出示登機牌(通常通過掃描并與航班乘客數據庫進行比對來驗證),地勤人員確認無誤后,便會授權你登機。
Web 應用程序通常使用用戶名和密碼對用戶進行身份驗證。如果傳遞了有效的用戶名和密碼,應用程序可以驗證您是否是您聲稱的用戶,因為密碼應該只有您和應用程序知道。
注意:使用用戶名/密碼身份驗證的 Web 應用程序很少將密碼以明文形式存儲在數據庫中。 相反,它們使用一種稱為哈希的技術來存儲密碼的哈希值。 這允許后端在不知情的情況下驗證密碼。
哈希函數是一種數學函數,它接受任意輸入,并且總是在給定相同輸入的情況下生成相同的固定長度字符串/數字。 哈希函數的強大之處在于您可以從密碼轉換為哈希值,但不能從哈希值轉換為密碼。
這允許在不存儲實際密碼的情況下驗證用戶提交的密碼。 存儲密碼哈希可以在數據庫訪問被破壞的情況下保護用戶,因為無法使用哈希密碼登錄。
近年來,鑒于被入侵的重要網站數量眾多,網絡安全已成為一個日益受到關注的問題。這一趨勢通過引入更安全的身份驗證方法(如多重身份驗證)影響了安全性的處理方式。
多重身份驗證是一種身份驗證方法,其中用戶在成功提供兩個或多個證據(也稱為因素)后進行身份驗證。例如,從 ATM 取款時,需要兩個身份驗證因素:擁有銀行卡和 PIN 碼。
由于Web應用程序難以驗證用戶是否真正擁有某張卡,因此通常會在用戶名/密碼的基礎上,通過身份驗證器應用程序(安裝在智能手機上的程序或專門用于生成密碼的設備)生成的一次性令牌來增強安全性。
在本文中,您將實現一種基于電子郵件的無密碼身份驗證方法——這是一種旨在提升用戶體驗和安全性的兩步驗證流程。其運作機制是在用戶嘗試登錄時,向其電子郵件賬戶發送一個密鑰令牌。用戶打開電子郵件,將令牌輸入到應用程序中,應用程序隨后對用戶進行身份驗證,確認其為電子郵件賬戶的所有者。
此方法依賴于用戶的電子郵件服務提供商,我們假定該服務已經對用戶進行了身份驗證。用戶體驗因此得到提升,因為用戶無需設置和記憶密碼。同時,隨著應用程序不再承擔密碼管理的責任,安全性也得到了增強,這原本可能是一個易受攻擊的環節。
將身份驗證任務交給用戶的電子郵件賬戶意味著應用程序將繼承用戶電子郵件賬戶安全性的優點和不足。但值得慶幸的是,如今大多數電子郵件服務都提供了第二因素身份驗證和其他安全措施的選項。
盡管如此,這種方法仍能有效避免用戶選擇弱密碼或在多個網站上重復使用同一密碼的問題。完全摒棄密碼意味著這些用戶將更加安全,因為不再存在可能被猜測、暴力破解或盜取的密碼。
基于電子郵件的無密碼身份驗證是一個兩步過程,涉及兩種令牌類型。
身份驗證流程將如下所示:
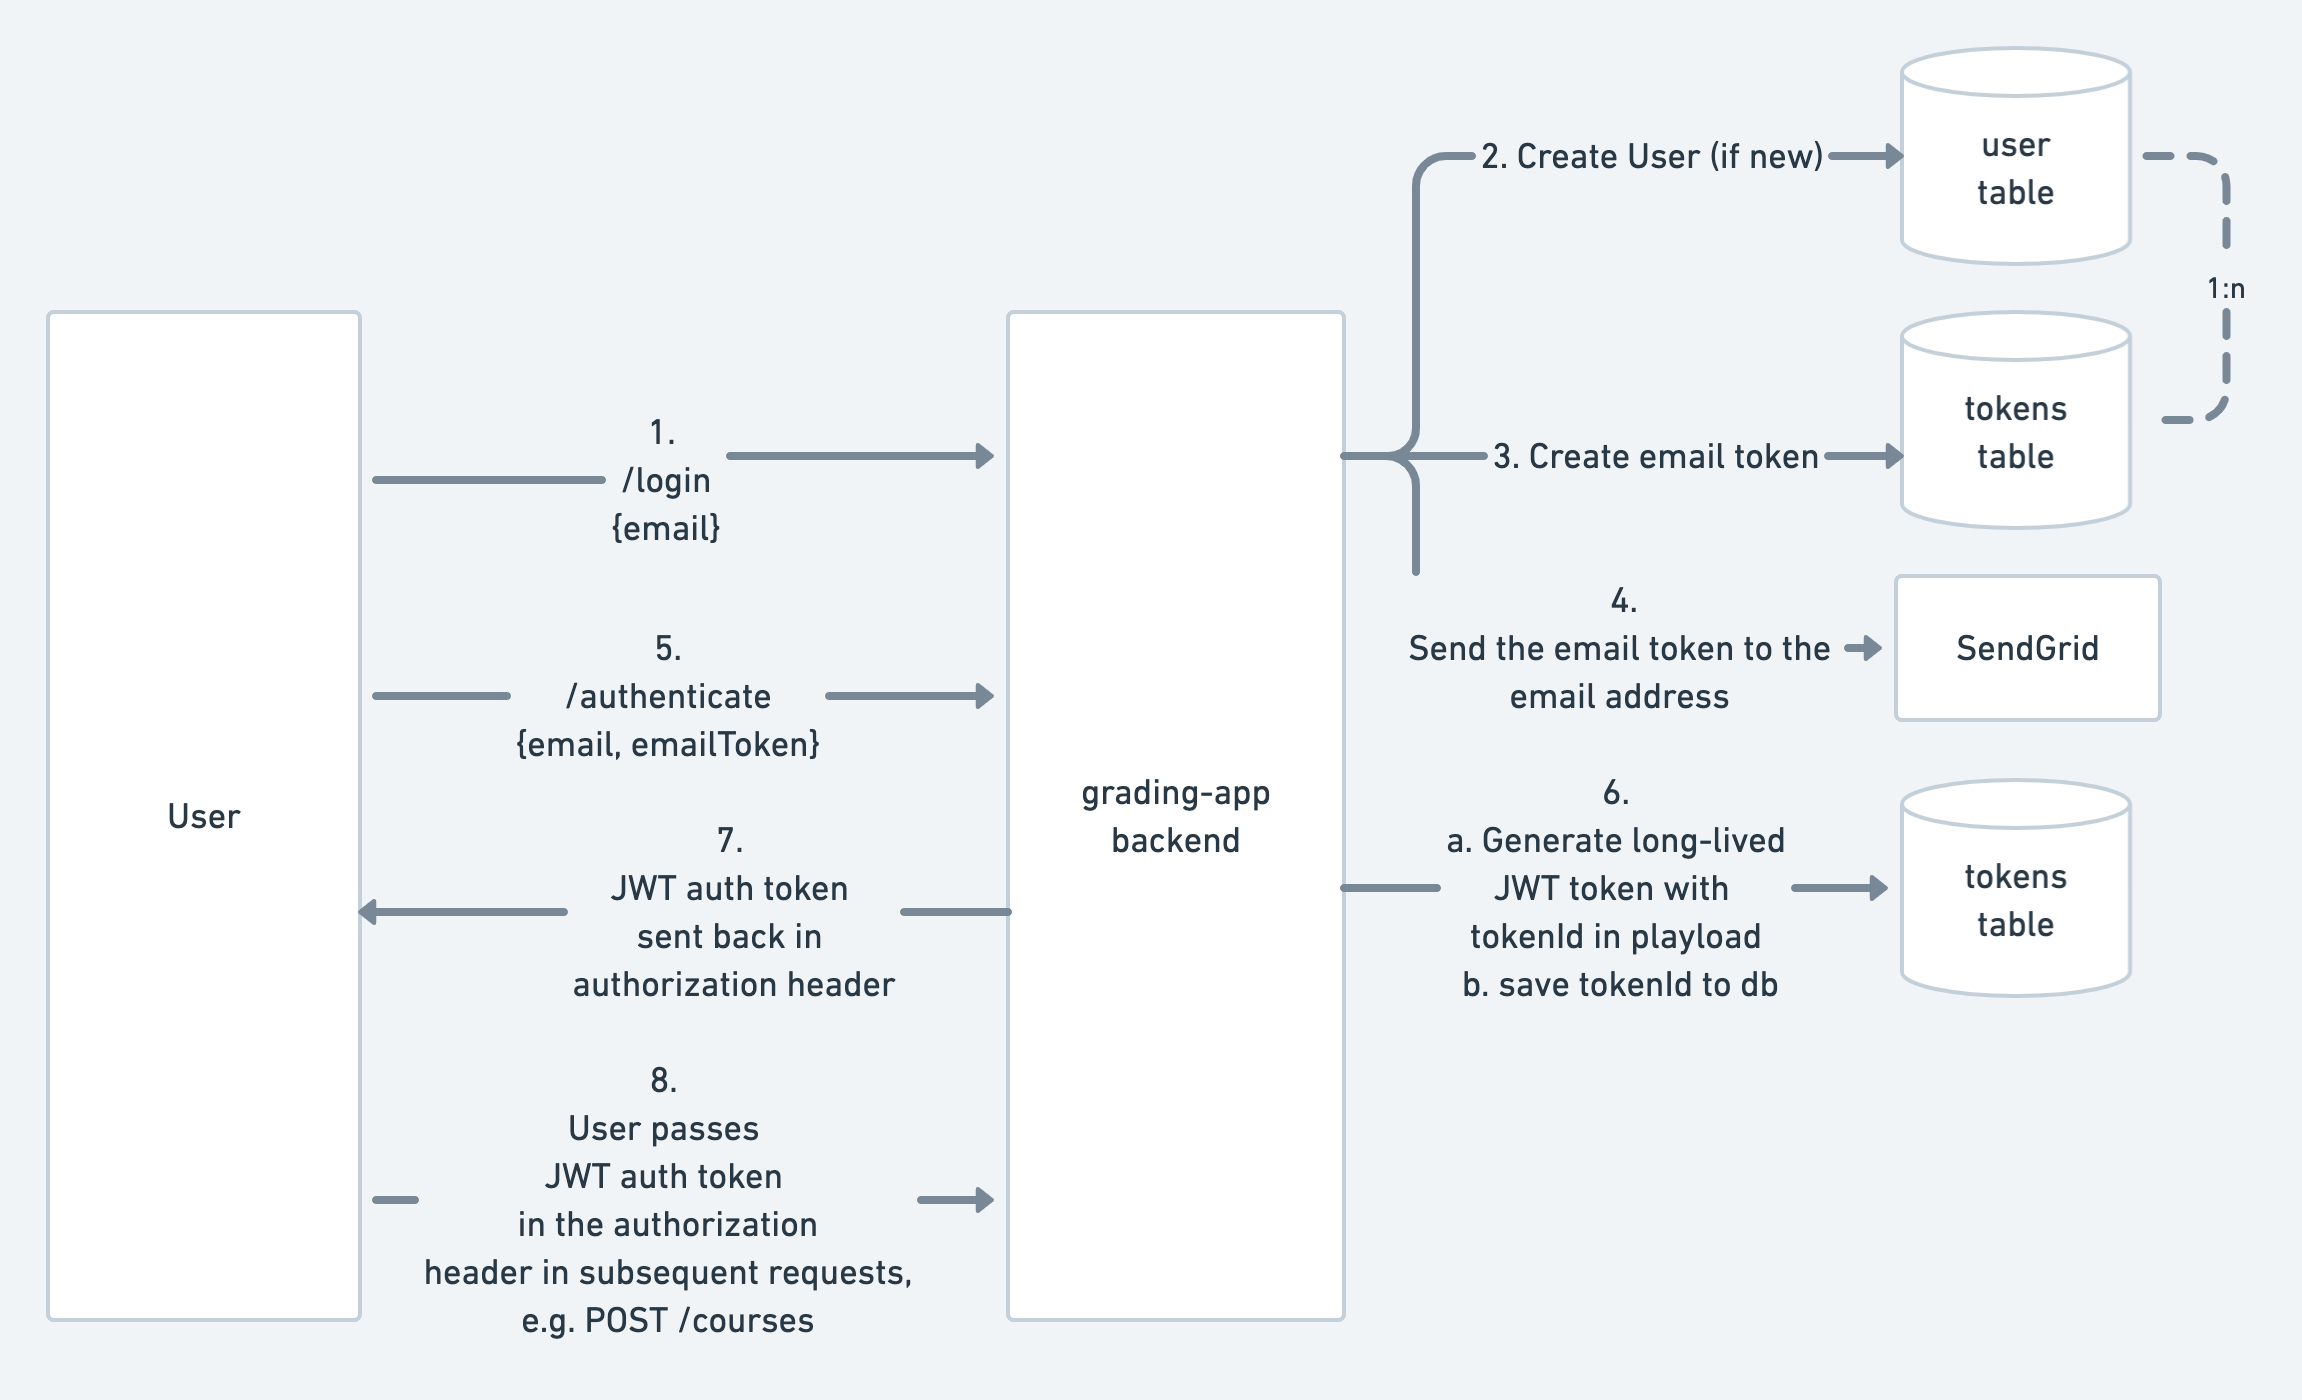
有兩種令牌類型:
采用此身份驗證策略,登錄和注冊流程可以通過單個終端節點來處理。這是因為登錄和注冊之間的唯一區別在于是否需要在User表中創建新記錄(即用戶是否已存在)。
JSON Web 令牌(JWT)是一種開放且標準的方法,用于在雙方之間安全地傳遞聲明。該標準定義了一種緊湊且自包含的方式,允許將信息作為JSON對象在各方之間安全地傳輸。這些信息是經過數字簽名的,因此可以驗證其真實性并建立信任。
JWT令牌由使用Base64編碼的三個部分組成:header(頭部)、payload(負載)和signature(簽名),它們之間用點(.)分隔。
eyJhbGciOiJIUzI1NiIsInR5cCI6IkpXVCJ9.

eyJ0b2tlbklkIjo5fQ.

FkKMzLobPl_MaQHB7hRG3nZQZ-ME4lRaanGJVnLMa84
注意:Base64 是表示數據的另一種方式。它不涉及任何加密
如果您使用 Base64 從上面解碼標頭和有效負載,您將獲得以下內容:
{"alg":"HS256","typ":"JWT"}{"tokenId":9}令牌的簽名部分是通過應用簽名算法(本例為HS256)并結合標頭、有效負載及一個后端專有的密鑰來生成的。這個密鑰對于驗證令牌的真實性至關重要,且僅后端知曉。
在本文中,JWT被用作長期身份驗證令牌。令牌的有效負載中包含一個tokenId,該tokenId會存儲在數據庫中,并與為其生成令牌的用戶相關聯。這樣,后端就能通過tokenId找到對應的用戶。
注意:這種方法稱為有狀態 JWT,其中令牌引用存儲在數據庫中的會話。雖然這意味著對請求進行身份驗證需要往返數據庫,這會增加處理請求所需的時間,但這種方法更安全,因為后端可以撤銷令牌。
為了將令牌存儲在數據庫中以便進行驗證,您需要將令牌模型添加到Prisma架構中。在此步驟中,您還需更新Prisma架構中的其他模型,以使某些字段成為可選字段。接下來,請打開位于prisma/schema.prisma的Prisma架構文件,并進行如下更新:
generator client {

  provider        = "prisma-client-js"

}


model User {

 id        Int     @id @default(autoincrement())

 email     String  @unique

 firstName String

 lastName  String

 firstName String?

 lastName  String?

 social    Json?


 // Relation fields

 courses     CourseEnrollment[]

 testResults TestResult[]       @relation(name: "results")

 testsGraded TestResult[]       @relation(name: "graded")

 tokens      Token[]

}


model Token {

 id         Int       @id @default(autoincrement())

 createdAt  DateTime  @default(now())

 updatedAt  DateTime  @updatedAt

 type       TokenType

 emailToken String?   @unique // Only used for short lived email tokens

 valid      Boolean   @default(true)

 expiration DateTime


 // Relation fields

 user   User @relation(fields: [userId], references: [id])

 userId Int

}


enum TokenType {

 EMAIL // used as a short-lived token sent to the user's email

 API

}
讓我們回顧一下引入的變化:
aggregateApi預覽功能。User模型中,firstName和lastName字段現在被設置為可選,這允許用戶僅使用電子郵件進行登錄或注冊。Token模型。每個用戶可以與多個Token相關聯,形成1對多的關系。Token模型包含了與過期相關的字段、一個表示令牌類型的枚舉(TokenType),以及用于存儲電子郵件令牌的字段。要遷移數據庫架構,請按如下方式創建并運行遷移:
npx prisma migrate dev --preview-feature --name "add-token"檢查站:您應該在輸出中看到如下內容:
Prisma Migrate created and applied the following migration(s) from new schema changes:


migrations/

  └─ 20201202094612_add_token/

    └─ migration.sql


? Generated Prisma Client to ./node_modules/@prisma/client in 96ms


Everything is now in sync.注意:默認情況下,運行該命令還將生成 Prisma Client。
prisma migrate dev
由于后端將在用戶登錄時發送電子郵件,因此您將創建一個插件,該插件將向應用程序的其余部分公開電子郵件發送功能。happy 插件將遵循與 Prisma 插件類似的約定。
在本文中,我們將利用SendGrid服務和其npm包來輕松實現與SendGrid API的集成。
npm install --save @sendgrid/mail在文件夾中創建一個名為 的新文件:email.tssrc/plugins/
touch src/plugins/email.ts并將以下內容添加到文件中:
import Hapi from '@hapi/hapi'

import Joi from '@hapi/joi'

import Boom from '@hapi/boom'

import sendgrid from '@sendgrid/mail'


// Module augmentation to add shared application state

// https://github.com/DefinitelyTyped/DefinitelyTyped/issues/33809#issuecomment-472103564

declare module '@hapi/hapi' {

  interface ServerApplicationState {

    sendEmailToken(email: string, token: string): Promise<void>

  }

}


const emailPlugin = {

  name: 'app/email',

  register: async function(server: Hapi.Server) {

    if (!process.env.SENDGRID_API_KEY) {

      console.log(

        The SENDGRID_API_KEY env var must be set, otherwise the API won't be able to send emails.,
        Using debug mode which logs the email tokens instead.,
      )
      server.app.sendEmailToken = debugSendEmailToken
    } else {
      sendgrid.setApiKey(process.env.SENDGRID_API_KEY)
      server.app.sendEmailToken = sendEmailToken
    }
  },
}

export default emailPlugin

async function sendEmailToken(email: string, token: string) {
  const msg = {
    to: email,
    from: 'EMAIL_ADDRESS_CONFIGURED_IN_SEND_GRID@email.com',
    subject: 'Login token for the modern backend API',
    text: The login token for the API is: ${token},
  }

  await sendgrid.send(msg)
}

async function debugSendEmailToken(email: string, token: string) {
  console.log(email token for ${email}: ${token} )
}該插件將在對象上公開一個函數,該函數在整個路由處理程序中均可訪問。它會使用環境變量(您在生產環境中需通過SendGrid控制臺中的密鑰來設置該變量)來工作。在開發階段,您可以不設置該變量,此時令牌將被記錄,而不是通過電子郵件發送。這個環境變量是SENDGRID_API_KEY,并且與sendEmailToken功能相關聯,該功能是在server.app上公開的。
最后一步是在server.ts文件中注冊這個插件。
import emailPlugin from './plugins/email'


await server.register([

  // ... existing plugins

  emailPlugin,

])為了實施身份驗證,您首先需要定義/login/register路由,該路由將負責在數據庫中創建用戶和令牌、發送電子郵件令牌、驗證電子郵件以及生成JWT身份驗證令牌。值得注意的是,盡管這兩個端點會處理身份驗證流程,但它們最初并不會保護API。
隨后,為了保護API,您將定義一個身份驗證策略,該策略將利用hapi-auth-jwt2庫。
請注意,happy框架中的身份驗證機制基于方案和策略的概念。方案是處理身份驗證的一種手段,而策略則是方案的預配置實例。在本文中,您只需根據JWT身份驗證方案來定義策略。
最后,您會將這些身份驗證邏輯封裝在一個名為auth的插件中。
首先,將以下依賴項添加到您的項目中:
npm install --save hapi-auth-jwt2@10.1.0 jsonwebtoken@8.5.1

npm install --save-dev @types/jsonwebtoken@8.5.0接下來,您需要創建一個名為auth的插件,以封裝身份驗證相關的邏輯。
請在src/plugins/文件夾中新建一個文件,并命名為auth.ts。
touch src/plugins/auth.ts并將以下內容添加到文件中:
import Hapi from '@hapi/hapi'

import { TokenType, UserRole } from '@prisma/client'


const authPlugin: Hapi.Plugin<null> = {

  name: 'app/auth',

  dependencies: ['prisma', 'hapi-auth-jwt2', 'app/email'],

  register: async function(server: Hapi.Server) {

    // TODO: Add the authentication strategy

  },

}


export default plugin
注意:
auth插件依賴于prisma、hapi-auth-jwt2以及prisma插件是在本系列第2部分中定義的,用于訪問Prisma客戶端;hapi-auth-jwt2插件定義了身份驗證方案,您將基于它來實現自定義的身份驗證策略;而sendEmailToken功能也將在身份驗證過程中被調用。
接下來,在registerauthPlugin函數中,您需要定義一個新的登錄路由。
server.route([

  // Endpoint to login or register and to send the short-lived token

  {

    method: 'POST',

    path: '/login',

    handler: loginHandler,

    options: {

      auth: false,

      validate: {

        payload: Joi.object({

          email: Joi.string()

            .email()

            .required(),

        }),

      },

    },

  },

])注意:請將
options.auth設置為false,這樣在您設定了默認的身份驗證策略之后,終端節點會保持開放狀態。默認情況下,該策略會要求對所有未明確禁用身份驗證的路由進行驗證。
在插件的 register 函數之外,添加以下內容:
const EMAIL_TOKEN_EXPIRATION_MINUTES = 10


interface LoginInput {

  email: string

}


async function loginHandler(request: Hapi.Request, h: Hapi.ResponseToolkit) {

  // ?? get prisma and the sendEmailToken from shared application state

  const { prisma, sendEmailToken } = request.server.app

  // ?? get the email from the request payload

  const { email } = request.payload as LoginInput

  // ?? generate an alphanumeric token

  const emailToken = generateEmailToken()

  // ?? create a date object for the email token expiration

  const tokenExpiration = add(new Date(), {

    minutes: EMAIL_TOKEN_EXPIRATION_MINUTES,

  })


  try {

    // ?? create a short lived token and update user or create if they don't exist

    const createdToken = await prisma.token.create({

      data: {

        emailToken,

        type: TokenType.EMAIL,

        expiration: tokenExpiration,

        user: {

          connectOrCreate: {

            create: {

              email,

            },

            where: {

              email,

            },

          },

        },

      },

    })


    // ?? send the email token

    await sendEmailToken(email, emailToken)

    return h.response().code(200)

  } catch (error) {

    return Boom.badImplementation(error.message)

  }

}


// Generate a random 8 digit number as the email token

function generateEmailToken(): string {

  return Math.floor(10000000 + Math.random() * 90000000).toString()

}loginHandler執行以下操作:
connectOrCreate功能,如果數據庫中不存在具有該電子郵件地址的用戶,則創建一個新用戶;若已存在,則與該現有用戶建立關聯。SENDGRID_API_KEY環境變量,將生成的令牌發送到有效負載中指定的電子郵件地址;若未設置,則將該令牌記錄到控制臺。最后一步是在server.ts文件中注冊此插件。
import hapiAuthJWT from 'hapi-auth-jwt2'

import authPlugin from './plugins/auth'


await server.register([

  // ... existing plugins

  hapiAuthJWT,

  authPlugin,

])
檢查站:
npm run dev。curl對/loginemail終端節點進行POST調用。您應該能在后端日志中看到記錄的令牌,例如:curl --header "Content-Type: application/json" --request POST --data '{"email":"test@test.io"}' localhost:3000/loginemail,輸出可能是token for test@test.io: 27948216。 到目前為止,后端已經能夠創建用戶、生成電子郵件令牌并通過電子郵件發送給用戶。但是,這些生成的令牌還不能用于身份驗證。接下來,您將通過創建/authenticateauthorization終端節點來實施身份驗證的第二步。這個端點將根據數據庫中的記錄驗證電子郵件令牌,并在驗證成功后,在響應頭中向用戶返回一個長期的JWT身份驗證令牌。
首先,您需要在authPlugin中添加以下路由聲明。
server.route({

  method: 'POST',

  path: '/authenticate',

  handler: authenticateHandler,

  options: {

    auth: false,

    validate: {

      payload: Joi.object({

        email: Joi.string()

          .email()

          .required(),

        emailToken: Joi.string().required(),

      }),

    },

  },

})路由需要email和emailToken這兩個參數。由于僅合法嘗試登錄的用戶才知道這兩個值,因此這增加了猜測email和emailToken的難度,從而降低了遭受暴力攻擊(如猜測八位數令牌)的風險。
接下來,請將以下內容添加到auth.ts文件中。
//Load the JWT secret from environment variables or default

const JWT_SECRET = process.env.JWT_SECRET || 'SUPER_SECRET_JWT_SECRET'


const JWT_ALGORITHM = 'HS256'


const AUTHENTICATION_TOKEN_EXPIRATION_HOURS = 12


interface AuthenticateInput {

  email: string

  emailToken: string

}


async function authenticateHandler(

  request: Hapi.Request,

  h: Hapi.ResponseToolkit,

) {

  // ?? get prisma from shared application state

  const { prisma } = request.server.app

  // ?? get the email and emailToken from the request payload

  const { email, emailToken } = request.payload as AuthenticateInput


  try {

    // Get short lived email token

    const fetchedEmailToken = await prisma.token.findUnique({

      where: {

        emailToken: emailToken,

      },

      include: {

        user: true,

      },

    })


    if (!fetchedEmailToken?.valid) {

      // If the token doesn't exist or is not valid, return 401 unauthorized

      return Boom.unauthorized()

    }


    if (fetchedEmailToken.expiration < new Date()) {

      // If the token has expired, return 401 unauthorized

      return Boom.unauthorized('Token expired')

    }


    // If token matches the user email passed in the payload, generate long lived API token

    if (fetchedEmailToken?.user?.email === email) {

      const tokenExpiration = add(new Date(), {

        hours: AUTHENTICATION_TOKEN_EXPIRATION_HOURS,

      })

      // Persist token in DB so it's stateful

      const createdToken = await prisma.token.create({

        data: {

          type: TokenType.API,

          expiration: tokenExpiration,

          user: {

            connect: {

              email,

            },

          },

        },

      })


      // Invalidate the email token after it's been used

      await prisma.token.update({

        where: {

          id: fetchedEmailToken.id,

        },

        data: {

          valid: false,

        },

      })


      const authToken = generateAuthToken(createdToken.id)

      return h.response().code(200).header('Authorization', authToken)

    } else {

      return Boom.unauthorized()

    }

  } catch (error) {

    return Boom.badImplementation(error.message)

  }

}


// Generate a signed JWT token with the tokenId in the payload

function generateAuthToken(tokenId: number): string {

  const jwtPayload = { tokenId }


  return jwt.sign(jwtPayload, JWT_SECRET, {

    algorithm: JWT_ALGORITHM,

    noTimestamp: true,

  })

}注意:可以通過運行以下命令來生成環境變量:.這應該始終在生產環境中設置。
JWT_SECRETnode -e "console.log(require('crypto').randomBytes(256).toString('base64'));"
處理程序從數據庫中獲取電子郵件令牌,確保其有效,在數據庫中創建新的 API 令牌,生成 JWT 令牌(引用數據庫中的令牌),使電子郵件令牌失效,并在Authorization標頭中返回令牌。
檢查站:
npm run dev命令啟動服務器。/logincurl --header "Content-Type: application/json" --request POST --data '{"email":"test@test.io"}' localhost:3000/loginemail token for test@test.io: 13080740/authenticatecurl -v --header "Content-Type: application/json" --request POST --data '{"email":"hello@prisma.io", "emailToken": "13080740"}' localhost:3000/authenticate200AuthorizationeyJhbGciOiJIUzI1NiIsInR5cCI6IkpXVCJ9.eyJ0b2tlbklkIjoyOH0.gJYk3f1RJVKvPh75FdElCHwMoe_ZCMZftTE1Em5PpMg身份驗證策略將定義 happy 如何驗證對需要身份驗證的端點的請求。在此步驟中,您將通過使用 JWT 令牌中的從數據庫中獲取有關用戶的信息,定義tokenId使用 JWT 令牌驗證請求的邏輯。
要定義身份驗證策略,請將以下內容添加到auth.ts文件中:
// This strategy will be used across the application to secure routes

export const API_AUTH_STATEGY = 'API'在函數authPlugin.register中添加以下內容:
// Define the authentication strategy which uses the jwt authentication scheme
server.auth.strategy(API_AUTH_STATEGY, 'jwt', {
  key: JWT_SECRET,
  verifyOptions: { algorithms: [JWT_ALGORITHM] },
  validate: validateAPIToken,
})

// Set the default authentication strategy for API routes, unless explicitly disabled
server.auth.default(API_AUTH_STATEGY)最后,添加validateAPIToken函數:
const apiTokenSchema = Joi.object({

  tokenId: Joi.number().integer().required(),

})


// Function will be called on every request using the auth strategy

const validateAPIToken = async (

  decoded: APITokenPayload,

  request: Hapi.Request,

  h: Hapi.ResponseToolkit,

) => {

  const { prisma } = request.server.app

  const { tokenId } = decoded

  // Validate the token payload adheres to the schema

  const { error } = apiTokenSchema.validate(decoded)


  if (error) {

    request.log(['error', 'auth'], API token error: ${error.message})
    return { isValid: false }
  }

  try {
    // Fetch the token from DB to verify it's valid
    const fetchedToken = await prisma.token.findUnique({
      where: {
        id: tokenId,
      },
      include: {
        user: true,
      },
    })

    // Check if token could be found in database and is valid
    if (!fetchedToken || !fetchedToken?.valid) {
      return { isValid: false, errorMessage: 'Invalid Token' }
    }

    // Check token expiration
    if (fetchedToken.expiration < new Date()) {
      return { isValid: false, errorMessage: 'Token expired' }
    }

    // Get all the courses that the user is the teacher of
    const teacherOf = await prisma.courseEnrollment.findMany({
      where: {
        userId: fetchedToken.userId,
        role: UserRole.TEACHER,
      },
      select: {
        courseId: true,
      },
    })

    // The token is valid. Make the userId, isAdmin, and teacherOf to credentials which is available in route handlers via request.auth.credentials
    return {
      isValid: true,
      credentials: {
        tokenId: decoded.tokenId,
        userId: fetchedToken.userId,
        isAdmin: fetchedToken.user.isAdmin,
        // convert teacherOf from an array of objects to an array of numbers
        teacherOf: teacherOf.map(({ courseId }) => courseId),
      },
    }
  } catch (error) {
    request.log(['error', 'auth', 'db'], error)
    return { isValid: false }
  }
}validateAPIToken函數用于根據API_AUTH_STRATEGY來確定是否允許請求繼續執行。它通過返回一個對象來完成這一決定,該對象包含isValid和credentials兩個屬性。
isValid:用于指示令牌是否已成功驗證。credentials:可用于將用戶相關信息傳遞給Request對象。這些傳遞給credentials的信息可以通過request.auth.credentials在路由處理程序中訪問。在此場景中,我們確定如果令牌存在于數據庫中且未過期,則視為有效。若令牌有效,我們會獲取該令牌對應的用戶所教授的課程(這些信息將用于后續的授權判斷),并將其與用戶ID(userId)、令牌ID(tokenId)以及用戶是否為管理員(isAdmin)的信息一起傳遞給credentials對象。
由于默認的身份驗證策略,大多數終端節點都需要進行身份驗證。這意味著,要訪問這些終端節點,您現在需要在請求的標頭中提供有效的JWT令牌。例如,要訪問GET /courses端點,您就需要在Authorization標頭中包含有效的JWT令牌。
檢查站:
npm run dev命令啟動服務器。/coursescurl -v localhost:3000/courses{"statusCode":401,"error":"Unauthorized","message":"Missing authentication"}Authorizationcurl -H "Authorization:eyJhbGciOiJIUzI1NiIsInR5cCI6IkpXVCJ9.eyJ0b2tlbklkIjoyOH0.gJYk3f1RJVKvPh75FdElCHwMoe_ZCMZftTE1Em5PpMg" localhost:3000/courses恭喜,您已成功實施基于電子郵件的無密碼身份驗證并保護了終端節點。接下來,您將定義授權規則。
后端的授權模型旨在明確用戶可執行的操作及其針對的實體。主要基于以下屬性授予用戶權限:
如果用戶不是課程的管理員或教師,他們仍應能夠創建新課程、以學生身份注冊現有課程、獲取測試結果以及獲取和更新其用戶個人資料。
注意:這種方法混合了兩種授權方法,即基于角色的授權和基于資源的授權。其中,從課程注冊中獲取權限屬于基于資源的授權,即根據特定資源來授予操作權限,例如以教師身份注冊課程后,用戶有權創建相關測試并提交測試結果。而賦予admin用戶操作權限(將其設置為true)則屬于基于角色的授權,即用戶因具備“admin”角色而獲得相應權限。
要實施建議的授權規則,我們將首先重新訪問具有建議的授權規則的終端節點列表:
| HTTP 方法 | 路線 | 描述 | 授權規則 |
|---|---|---|---|
POST | /login | 開始登錄/注冊并發送電子郵件令牌 | 打開 |
POST | /authenticate | 對用戶進行身份驗證并創建 JWT 令牌 | Open (需要 email token) |
GET | /profile | 獲取經過身份驗證的用戶配置文件 | 任何經過身份驗證的用戶 |
POST | /users | 創建用戶 | 僅管理員 |
GET | /users/{userId} | 獲取用戶 | 僅管理員或經過身份驗證的用戶 |
PUT | /users/{userId} | 更新用戶 | 僅管理員或經過身份驗證的用戶 |
DELETE | /users/{userId} | 刪除用戶 | 僅管理員或經過身份驗證的用戶 |
GET | /users | 獲取用戶 | 僅管理員 |
GET | /users/{userId}/courses | 獲取用戶的課程中注冊 | 僅管理員或經過身份驗證的用戶 |
POST | /users/{userId}/courses | 將用戶注冊到課程(作為學生或教師) | 僅管理員或經過身份驗證的用戶 |
DELETE | /users/{userId}/courses/{courseId} | 刪除用戶對課程的注冊 | 僅管理員或經過身份驗證的用戶 |
POST | /courses | 創建課程 | 任何經過身份驗證的用戶 |
GET | /courses | 獲取課程 | 任何經過身份驗證的用戶 |
GET | /courses/{courseId} | 獲取課程 | 任何經過身份驗證的用戶 |
PUT | /courses/{courseId} | 更新課程 | 當然只有管理員或老師 |
DELETE | /courses/{courseId} | 刪除課程 | 當然只有管理員或老師 |
POST | /courses/{courseId}/tests | 為課程創建測試 | 當然只有管理員或老師 |
GET | /courses/tests/{testId} | 進行測試 | 任何經過身份驗證的用戶 |
PUT | /courses/tests/{testId} | Update a test | Only admin or teacher of course |
DELETE | /courses/tests/{testId} | Delete a test | Only admin or teacher of course |
GET | /users/{userId}/test-results | 獲取用戶的測試結果 | 僅管理員或經過身份驗證的用戶 |
POST | /courses/tests/{testId}/test-results | 為與用戶關聯的測試創建測試結果 | 當然只有管理員或老師 |
GET | /courses/tests/{testId}/test-results | 獲取測試的多個測試結果 | 當然只有管理員或老師 |
PUT | /courses/tests/test-results/{testResultId} | 更新測試結果(與用戶和測試關聯) | 只有測試的管理員或評分者 |
DELETE | /courses/tests/test-results/{testResultId} | 刪除測試結果 | 只有測試的管理員或評分者 |
注意:包含路徑中的參數時,例如
{userId},這表示URL中的變量插值。例如,在www.myapi.com/users/13中,13就是{userId}的插值。
Happy routes具有函數的概念,這使得Handler logic可以被分解為更小且可重用的函數。這些函數在處理程序之前被調用,并允許接管響應,以便在需要時返回未經授權的錯誤。這在授權上下文中非常有用,因為對于多個路由/終端節點,上表中建議的許多授權規則都是相同的。例如,對于POST /users和GET /users路由,檢查用戶是否是管理員的規則是相同的。因此,您可以定義一個預函數(pre-function),并將其分配給這兩個端點,以實現重用。
在這一部分,您將定義函數來實現不同的授權規則。您將從三個端點(GET /users/{userId}、POST /users和DELETE /users/{userId})開始。如果發出請求的用戶是管理員,或者用戶正在請求自己的資源(即,用戶的ID與請求中指定的ID相匹配),則這些端點應被授權。
注意:Happy還提供了一種使用Scopes以聲明方式實現基于角色的身份驗證的方法。然而,對于擬議的基于資源的授權方法(其中用戶的權限取決于請求的特定資源),需要更精細的控制,而Scopes無法滿足這一需求。因此,在這種情況下,我們選擇了使用函數來實現授權規則。
要添加 pre-function 來驗證路由中的授權規則,請在src/plugins/user.ts文件中為GET /users/{userId}路由添加相應的預函數。
// Pre-function to check if the authenticated user matches the requested user

export async function isRequestedUserOrAdmin(request: Hapi.Request, h: Hapi.ResponseToolkit) {

  // ?? userId and isAdmin are populated by the validateAPIToken function
  const { userId, isAdmin } = request.auth.credentials

  if (isAdmin) {
    // If the user is an admin allow
    return h.continue
  }

  const requestedUserId = parseInt(request.params.userId, 10)

  // ?? Check that the requested userId matches the authenticated userId
  if (requestedUserId === userId) {
    return h.continue
  }

  // The authenticated user is not authorized
  throw Boom.forbidden()
}然后,請按照以下方式在src/plugins/user.ts文件中為路由定義添加pre選項。
{

  method: 'GET',

  path: '/users/{userId}',

  handler: getUserHandler,

  options: {

    pre: [isRequestedUserOrAdmin],

    auth: {

      mode: 'required',

      strategy: API_AUTH_STATEGY,

    },

    validate: {

      params: Joi.object({

        userId: Joi.number().integer(),

      }),

    },

  },

}現在,我們將在getUserHandler之前調用該預函數(pre-function),并且僅向管理員或請求自己userId的用戶授予訪問權限。
注意:在上一部分中,您已經定義了默認的身份驗證策略,因此嚴格來說,顯式定義每個路由的身份驗證要求并不是必需的。但出于清晰性和安全性的考慮,最好還是顯式地定義每個路由的身份驗證要求。
檢查站:為了驗證授權邏輯是否已正確實現,您將創建一個測試用戶和一個測試管理員,并嘗試訪問/users/{userId}端點。
npm run devseed-usersnpm run seed-users請注意,這里的“結果”部分僅作為示例,實際運行腳本時得到的輸出可能會有所不同。
Created test user  id: 1 | email: test@prisma.io

Created test admin id: 2 | email: test-admin@prisma.io/login終端節點發送請求來登錄,示例郵箱為test@prisma.io,請求方法為POST。curl --header "Content-Type: application/json" --request POST --data '{"email":"test@prisma.io"}' localhost:3000/logincurl命令并攜帶該令牌來調用/authenticate終端節點。curl -v --header "Content-Type: application/json" --request POST --data '{"email":"test@prisma.io", "emailToken": "TOKEN_FROM_CONSOLE"}' localhost:3000/authenticate200AuthorizationeyJhbGciOiJIUzI1NiIsInR5cCI6IkpXVCJ9.eyJ0b2tlbklkIjoyOH0.gJYk3f1RJVKvPh75FdElCHwMoe_ZCMZftTE1Em5PpMg/users/1Authorizationcurl -H "Authorization:eyJhbGciOiJIUzI1NiIsInR5cCI6IkpXVCJ9.eyJ0b2tlbklkIjoyOH0.gJYk3f1RJVKvPh75FdElCHwMoe_ZCMZftTE1Em5PpMg" localhost:3000/users/1/users/2curl -H "Authorization:eyJhbGciOiJIUzI1NiIsInR5cCI6IkpXVCJ9.eyJ0b2tlbklkIjoyOH0.gJYk3f1RJVKvPh75FdElCHwMoe_ZCMZftTE1Em5PpMg" localhost:3000/users/2若所有步驟均順利完成,預函數將正確地為用戶授權,使其能夠訪問自己的用戶配置文件。為了測試管理員功能,請從第三步開始重新操作,但此次需使用測試管理員的電子郵件地址(例如test-admin@prisma.io)進行登錄。成功登錄后,管理員應該能夠訪問這兩個用戶的配置文件,這得益于isRequestedUserOrAdmin函數的驗證。
到目前為止,您已經在路由中定義了authorization前置函數isRequestedUserOrAdmin,并將其應用到了特定的路由上。為了在不同路由中復用該授權邏輯,建議您將這個函數從src/plugins/users.ts文件中移動到一個獨立的模塊,命名為src/auth-helpers.ts。這樣做的好處是,您可以將授權相關的邏輯集中管理,并且方便在多個插件中定義的路由(例如user-enrollment.ts)中重用。
完成函數遷移后,您需要在具有相同授權需求的路由中,將isRequestedUserOrAdmin作為前置函數進行添加,這些路由可能包括GET /users/{userId}以及GET /users/{userId}/courses等。
| 模塊 | 路線 |
|---|---|
src/plugins/users.ts | DELETE /users/{userId} |
src/plugins/users.ts | PUT /users/{userId} |
src/plugins/users-enrollment.ts | GET /users/{userId}/courses |
src/plugins/users-enrollment.ts | POST /users/{userId}/courses |
src/plugins/users-enrollment.ts | DELETE /users/{userId}/courses |
src/plugins/test-results.ts | GET /users/{userId}/test-results |
教師應該能夠更新課程并為他們擔任教師和管理員的課程創建測試。在此步驟中,您將創建另一個 pre-function 來驗證這一點。
在 auth-helpers.ts中定義以下前置函數 :
export async function isTeacherOfCourseOrAdmin(

  request: Hapi.Request,

  h: Hapi.ResponseToolkit,

) {

  // ?? isAdmin and teacherOf are populated by the validateAPIToken function
  const { isAdmin, teacherOf } = request.auth.credentials

  if (isAdmin) {
    // If the user is an admin allow
    return h.continue
  }

  const courseId = parseInt(request.params.courseId, 10)

  // Verify that the authenticated user is a teacher of the requested course
  if (teacherOf?.includes(courseId)) {
    return h.continue
  }
  // If the user is not a teacher of the course, deny access
  throw Boom.forbidden()
}前置函數利用提取的數組信息來驗證用戶是否為其所請求課程的授課教師,該功能命名為teacherOf。
請將isTeacherOfCourseOrAdmin作為前置條件添加到相關路由配置中。
| 模塊 | 路線 |
|---|---|
src/plugins/courses.ts | PUT /courses/{courseId} |
src/plugins/courses.ts | DELETE /courses/{courseId} |
src/plugins/tests.ts | POST /courses/{courseId}/tests |
為更新路由表,您需要在路由的options.pre字段中添加這個前置條件。
options: {

pre: [isTeacherOfCourseOrAdmin],

 // ... other route options

}
您現在已經實施了兩個不同的授權規則,并將其作為前提函數添加到后端的十個不同的路由中。
在 REST API 中實現身份驗證和授權后,測試將失敗,因為路由現在要求對用戶進行身份驗證。在此步驟中,您將調整測試以考慮身份驗證。
例如,在測試GET /users/{userId}終端節點時,就需要執行上述添加操作。
test('get user returns user', async () => {

  const response = await server.inject({

    method: 'GET',

    url: /users/${userId},
  })
  expect(response.statusCode).toEqual(200)
  const user = JSON.parse(response.payload)

  expect(user.id).toBe(userId)
})如果現在運行此測試,測試將會失敗。這是因為當請求到達終端節點時,測試請求不滿足其身份驗證要求。為了使用Happy服務器的測試功能(npm run test -- -t="get user returns user"),并模擬對服務器的HTTP請求,您可以利用server.inject方法。該方法允許您添加一個包含已驗證用戶信息的對象,該對象會設置憑據,就像它們在src/plugins/auth.ts文件中的validateAPITokens函數中所做的那樣。
test('get user returns user', async () => {

  const response = await server.inject({

    method: 'GET',

    url: /users/${testUser.id},
    auth: {
      strategy: API_AUTH_STATEGY,
      credentials: {
        userId: testUser.id,
        tokenId: // TODO: create the token and pass it here
        isAdmin: // TODO: set this based on the test user
        teacherOf: // TODO: set this based on the test user,
      },
    },
  })
  expect(response.statusCode).toEqual(200)
  const user = JSON.parse(response.payload)

  expect(user.id).toBe(testUserCredentials.userId)
})傳遞的對象需與src/plugins/auth.ts中定義的AuthCredentials接口相匹配,這里的接口指的是credentials。
interface AuthCredentials {

  userId: number

  tokenId: number

  isAdmin: boolean

  teacherOf: number[]

}注意:TypeScript 中的接口與類型非常相似,但有一些細微的差異。要了解更多信息,請查看 TypeScript 手冊。
為了使測試順利通過,您將在測試過程中直接利用Prisma創建一個用戶,并構建一個符合AuthCredentials接口規范的對象。
test('get user returns user', async () => {

  const testUser = await server.app.prisma.user.create({

    data: {

      email: test-${Date.now()}@test.com,
      isAdmin: false,
      tokens: {
        create: {
          expiration: add(new Date(), { days: 7 }),
          type: TokenType.API,
        },
      },
    },
    include: {
      tokens: true,
    },
  })

  const testUserCredentials = {
    userId: testUser.id,
    tokenId: testUser.tokens[0].id,
    isAdmin: testUser.isAdmin,
    teacherOf: [], // empty array because no courses were created for the user
  }

  const response = await server.inject({
    method: 'GET',
    url: /users/${testUserCredentials.userId},
    auth: {
      strategy: API_AUTH_STATEGY,
      credentials: testUserCredentials,
    },
  })
  expect(response.statusCode).toEqual(200)
  const user = JSON.parse(response.payload)

  expect(user.id).toBe(testUserCredentials.userId)
})檢查站:運行命令驗證測試是否通過。npm run test -- -t="get user returns user"
此時,您已經成功修復了一個測試。但是,考慮到其他測試也可能需要創建credentials對象,為了提高代碼的可重用性和可維護性,您可以將創建credentials對象的邏輯抽象到一個單獨的模塊中,命名為test-helpers.ts。
// Helper function to create a test user and return the credentials object the same way that the auth plugin does

export const createUserCredentials = async (

  prisma: PrismaClient,

  isAdmin: boolean,

): Promise<AuthCredentials> => {

  const testUser = await prisma.user.create({

    data: {

      email: test-${Date.now()}@test.com,
      isAdmin,
      tokens: {
        create: {
          expiration: add(new Date(), { days: 7 }),
          type: TokenType.API,
        },
      },
    },
    include: {
      tokens: true,
      courses: {
        where: {
          role: UserRole.TEACHER,
        },
        select: {
          courseId: true,
        },
      },
    },
  })

  return {
    userId: testUser.id,
    tokenId: testUser.tokens[0].id,
    isAdmin: testUser.isAdmin,
    teacherOf: testUser.courses?.map(({ courseId }) => courseId),
  }
}下一步,您需要編寫一個測試,以驗證管理員使用GET /users/{userId}終端節點獲取不同用戶帳戶時是否遵循既定的授權規則。
恭喜您取得當前進展。本文深入探討了多個關鍵概念,從身份驗證與授權的基本原理出發,進而闡述了如何利用Prisma、happy框架以及JWT技術來實現基于電子郵件的無密碼身份驗證機制。最終,您借助happy框架的前置函數功能,成功實施了授權規則。此外,您還開發了一個電子郵件插件,該插件通過集成SendGrid API,為后端服務提供了郵件發送功能。
auth插件整合了兩個關鍵路由,以形成完整的身份驗證流程,并借助身份驗證方案來明確身份驗證策略。在身份驗證策略的validate函數中,您會查詢數據庫以驗證令牌的有效性,并填充credentials對象,該對象包含了與授權規則緊密相關的信息,這些信息是基于JWT生成的。
您已經執行了數據庫遷移操作,并利用Prisma Migrate功能引入了一張新表,該表與另一張表存在n-1的關系,即Token表與用戶(User)表之間的關系。
在整個開發過程中,TypeScript發揮了至關重要的作用,它不僅提供了自動補全功能,還確保了類型的正確使用,從而有效保障了代碼與數據庫架構之間的一致性。
您廣泛使用 Prisma Client 來獲取和保存數據庫中的數據。
本文介紹了所有終端節點子集的授權。作為后續步驟,您可以執行以下操作:
JWT_SECRET環境變量。SENDGRID_API_KEY環境變量,并測試電子郵件功能。您可以在GitHub上找到完整的源代碼。該代碼包含了所有已實施端點的授權規則,并對測試進行了相應調整。
雖然Prisma旨在簡化關系數據庫的使用,但了解底層數據庫和身份驗證的基本原則也同樣重要。
如果您有任何疑問,請隨時在Twitter上與我們聯系。
原文鏈接:https://www.prisma.io/blog/backend-prisma-typescript-orm-with-postgresql-auth-mngp1ps7kip4