安裝依賴項后,我們將繼續導入所有必要的庫并配置 matplotlib 繪圖的各項設置:
import transformers

import textwrap

from transformers import LlamaTokenizer, LlamaForCausalLM

import os

import sys

from typing import List


from peft import (

    LoraConfig,

    get_peft_model,

    get_peft_model_state_dict,

    prepare_model_for_int8_training,

)


import fire

import torch

from datasets import load_dataset

import pandas as pd


import matplotlib.pyplot as plt

import matplotlib as mpl

import seaborn as sns

from pylab import rcParams


%matplotlib inline

sns.set(rc={'figure.figsize':(10, 7)})

sns.set(rc={'figure.dpi':100})

sns.set(style='white', palette='muted', font_scale=1.2)


DEVICE = "cuda" if torch.cuda.is_available() else "cpu"

DEVICE我們將使用Kaggle上提供的BTC Tweets Sentiment數據集,該數據集包含約50,000條與比特幣相關的推文。為了清理數據,我刪除了所有以“RT”開頭或包含鏈接的推文。現在讓我們開始下載數據集:
!gdown 1xQ89cpZCnafsW5T3G3ZQWvR7q682t2BN我們可以使用 Pandas 來加載 CSV:
df = pd.read_csv("bitcoin-sentiment-tweets.csv")

df.head()| 日期 | 推文內容 | 情感傾向 | |
|---|---|---|---|
| 0 | 2018 年 3 月 23 日星期五 00:40:40 +0000 | @p0nd3ea 比特幣不是為了在交易所生存而創建的。 | 正面(1) |
| 1 | 2018 年 3 月 23 日星期五 00:40:40 +0000 | @historyinflicks 伙計,如果我患有 Bannon 那種19世紀的一連串疾病,我也想成為比特幣。 | 正面(1) |
| 2 | 2018 年 3 月 23 日星期五 00:40:42 +0000 | @eatBCH @Bitcoin @signalapp @myWickr @Samsung @tipprbot耐心確實是一種美德 | 負面(1) |
| 3 | 2018 年 3 月 23 日星期五 00:41:04 +0000 | @aantonop 即使比特幣明天早上就崩盤,它的技術仍然是革命性的。一種簡化的方式。#我必須成為其中的一部分 | 負面(0) |
| 4 | 2018 年 3 月 23 日星期五 00:41:07 +0000 | 我正在試驗我是否可以只用捐贈的比特幣生活。 | 正面(1) |
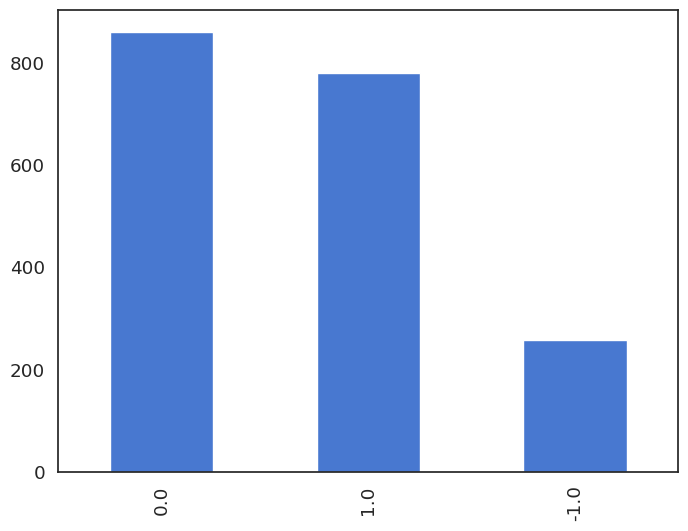
我們的數據集包含了約1900條推文,這些推文的情緒標簽用數字表示:負數情緒為-1,中性情緒為0,積極情緒為1。
讓我們來看看它們的分布情況:
df.sentiment.value_counts() 0.0 860
1.0 779
-1.0 258
Name: sentiment, dtype: int64df.sentiment.value_counts().plot(kind='bar');負面情緒的分布相對較低,這一點在評估微調模型的性能時應予以考慮。
原始Alpaca倉庫中的數據集格式為一個JSON文件,該文件包含一個對象列表,這些對象具有instruction、input和output字符串屬性。
現在,讓我們將Pandas數據幀轉換為符合原始Alpaca倉庫格式的JSON文件:
def sentiment_score_to_name(score: float):

    if score > 0:

        return "Positive"

    elif score < 0:

        return "Negative"

    return "Neutral"


dataset_data = [

    {

        "instruction": "Detect the sentiment of the tweet.",

        "input": row_dict["tweet"],

        "output": sentiment_score_to_name(row_dict["sentiment"])

    }

    for row_dict in df.to_dict(orient="records")

]


dataset_data[0]
{
"instruction": "Detect the sentiment of the tweet.",
"input": "@p0nd3ea Bitcoin wasn't built to live on exchanges.",
"output": "Positive"
}最后,我們將保存生成的 JSON 文件用于訓練模型 :
import json

with open("alpaca-bitcoin-sentiment-dataset.json", "w") as f:

json.dump(dataset_data, f)盡管原始的Llama模型權重無法獲取,但它們已被泄露并隨后被適配用于HuggingFace Transformers庫。我們將使用decapoda-research提供的權重:
BASE_MODEL = "decapoda-research/llama-7b-hf"


model = LlamaForCausalLM.from_pretrained(

    BASE_MODEL,

    load_in_8bit=True,

    torch_dtype=torch.float16,

    device_map="auto",

)


tokenizer = LlamaTokenizer.from_pretrained(BASE_MODEL)


tokenizer.pad_token_id = (

    0  # unk. we want this to be different from the eos token

)

tokenizer.padding_side = "left"
這段代碼使用Hugging Face Transformers庫中的類來加載預訓練的Llama模型。參數load_in_8bit=True表示以8位量化的方式加載模型,以減少內存使用并提高推理速度。
代碼還使用相同的類加載了該Llama模型的分詞器,并為填充令牌設置了一些附加屬性。具體來說,它將pad_token_id設置為0來表示未知令牌,并將padding_side設置為”left”以在左側填充序列。
現在我們已經加載了模型和分詞器,接下來可以使用HuggingFace datasets庫中的load_dataset()函數來加載我們之前保存的JSON文件。
data = load_dataset("json", data_files="alpaca-bitcoin-sentiment-dataset.json")data["train"]Dataset({
features: ['instruction', 'input', 'output'],
num_rows: 1897
})接下來,我們需要從加載的數據集中創建提示并對其進行標記:
def generate_prompt(data_point):

    return f"""Below is an instruction that describes a task, paired with an input that provides further context. Write a response that appropriately completes the request.  # noqa: E501

### Instruction:

{data_point["instruction"]}

### Input:

{data_point["input"]}

### Response:

{data_point["output"]}"""


def tokenize(prompt, add_eos_token=True):

    result = tokenizer(

        prompt,

        truncation=True,

        max_length=CUTOFF_LEN,

        padding=False,

        return_tensors=None,

    )

    if (

        result["input_ids"][-1] != tokenizer.eos_token_id

        and len(result["input_ids"]) < CUTOFF_LEN

        and add_eos_token

    ):

        result["input_ids"].append(tokenizer.eos_token_id)

        result["attention_mask"].append(1)


    result["labels"] = result["input_ids"].copy()


    return result


def generate_and_tokenize_prompt(data_point):

    full_prompt = generate_prompt(data_point)

    tokenized_full_prompt = tokenize(full_prompt)

    return tokenized_full_prompt
第一個函數從數據集中取出一個數據點,通過結合 INSTRUCTION、INPUT 和 OUTPUT 來生成一個提示。第二個函數接收生成的提示并使用之前定義的分詞器對其進行分詞。它還會在輸入序列中添加一個序列結束令牌,并將標簽設置為與輸入序列相同。第三個函數將前兩個函數結合,以一步完成提示的生成和分詞。generate_prompt、tokenize和generate_and_tokenize_prompt分別表示這三個函數。
數據準備的最后一步是將數據集拆分為獨立的訓練集和驗證集:
train_val = data["train"].train_test_split(

    test_size=200, shuffle=True, seed=42

)

train_data = (

    train_val["train"].map(generate_and_tokenize_prompt)

)

val_data = (

    train_val["test"].map(generate_and_tokenize_prompt)

)
我們需要 200 個驗證集樣本,并對數據進行隨機排序。對于訓練和驗證集中的每個樣本,我們都會應用一個函數來生成并標記提示(tokenize prompts),該函數名為generate_and_tokenize_prompt()。
訓練過程需要多個參數,這些參數大多來源于原始存儲庫中的微調腳本:
LORA_R = 8

LORA_ALPHA = 16

LORA_DROPOUT= 0.05

LORA_TARGET_MODULES = [

    "q_proj",

    "v_proj",

]


BATCH_SIZE = 128

MICRO_BATCH_SIZE = 4

GRADIENT_ACCUMULATION_STEPS = BATCH_SIZE // MICRO_BATCH_SIZE

LEARNING_RATE = 3e-4

TRAIN_STEPS = 300

OUTPUT_DIR = "experiments"
我們現在可以準備用于訓練的模型:
model = prepare_model_for_int8_training(model)

config = LoraConfig(

    r=LORA_R,

    lora_alpha=LORA_ALPHA,

    target_modules=LORA_TARGET_MODULES,

    lora_dropout=LORA_DROPOUT,

    bias="none",

    task_type="CAUSAL_LM",

)

model = get_peft_model(model, config)

model.print_trainable_parameters()
trainable params: 4194304 || all params: 6742609920 || trainable%: 0.06220594176090199我們使用LORA算法初始化以準備模型訓練,LORA算法是一種量化形式,可以在不顯著損失精度的情況下減小模型大小和內存使用量。
LoraConfig是一個類,用于指定LORA算法的超參數,如正則化強度(lora_alpha)、丟棄概率(lora_dropout)以及要壓縮的目標模塊(target_modules)。
在訓練過程中,我們將使用Hugging Face Transformers庫中的Trainer類。
training_arguments = transformers.TrainingArguments(

    per_device_train_batch_size=MICRO_BATCH_SIZE,

    gradient_accumulation_steps=GRADIENT_ACCUMULATION_STEPS,

    warmup_steps=100,

    max_steps=TRAIN_STEPS,

    learning_rate=LEARNING_RATE,

    fp16=True,

    logging_steps=10,

    optim="adamw_torch",

    evaluation_strategy="steps",

    save_strategy="steps",

    eval_steps=50,

    save_steps=50,

    output_dir=OUTPUT_DIR,

    save_total_limit=3,

    load_best_model_at_end=True,

    report_to="tensorboard"

)這段代碼創建了一個TrainingArguments對象,該對象指定了訓練模型時的各種設置和超參數。這些設置包括:
gradient_accumulation_steps:在進行反向傳播/更新之前,累積梯度的更新步驟數。warmup_steps:優化器的預熱步驟數。max_steps:要執行的總訓練步驟數。learning_rate:優化器的學習率。fp16:是否使用16位精度進行訓練。data_collator = transformers.DataCollatorForSeq2Seq(
tokenizer, pad_to_multiple_of=8, return_tensors="pt", padding=True
)DataCollatorForSeq2Seq是 Transformers 庫中的一個類,用于為序列到序列(seq2seq)模型創建輸入/輸出序列的批次。在這段代碼中,我們實例化了一個對象,并使用了以下參數:
pad_to_multiple_of:一個整數,表示最大序列長度,會向上取整到該值的最近倍數。padding:一個布爾值,指示是否將序列填充到指定的最大長度。
現在我們已經有了所有必要的組件,可以繼續進行模型的訓練了。
trainer = transformers.Trainer(

    model=model,

    train_dataset=train_data,

    eval_dataset=val_data,

    args=training_arguments,

    data_collator=data_collator

)

model.config.use_cache = False

old_state_dict = model.state_dict

model.state_dict = (

    lambda self, *_, **__: get_peft_model_state_dict(

        self, old_state_dict()

    )

).__get__(model, type(model))


model = torch.compile(model)


trainer.train()

model.save_pretrained(OUTPUT_DIR)在實例化Trainer之后,代碼將模型配置中的use_cache設置為False,并使用get_peft_model_state_dict()函數為模型創建一個狀態字典,該函數通過使用低精度算術來準備模型進行訓練。
然后,在模型上調用torch.compile()函數,該函數會編譯 model 的計算圖,并使用 PyTorch 2 準備進行訓練。
在A100上,訓練過程大約持續了2個小時。讓我們在Tensorboard上查看結果:
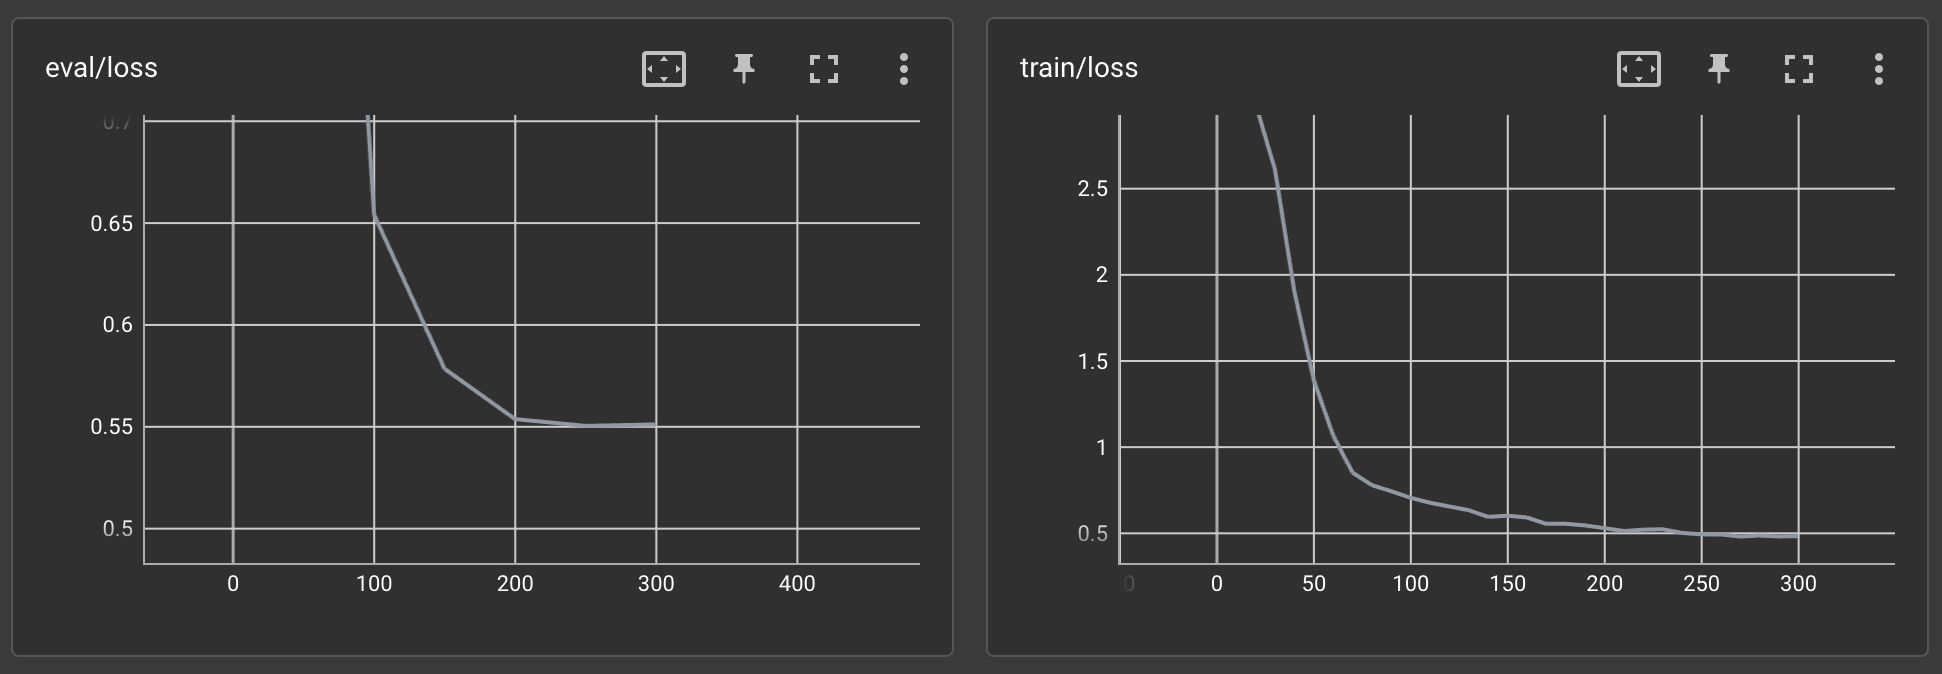
訓練損失和評估損失似乎都在穩步下降。而且這還只是第一次嘗試!
我們將把訓練好的模型上傳到Hugging Face Model Hub,以便輕松復用:
from huggingface_hub import notebook_login


notebook_login()


model.push_to_hub("curiousily/alpaca-bitcoin-tweets-sentiment", use_auth_token=True)我們將首先復制該存儲庫,然后使用腳本對模型進行測試:generate.py
!git clone https://github.com/tloen/alpaca-lora.git

%cd alpaca-lora

!git checkout a48d947
該腳本啟動的Gradio應用程序將使我們能夠利用我們模型的權重:
!python generate.py \

    --load_8bit \

    --base_model 'decapoda-research/llama-7b-hf' \

    --lora_weights 'curiousily/alpaca-bitcoin-tweets-sentiment' \

    --share_gradio
以下是我們的應用程序:
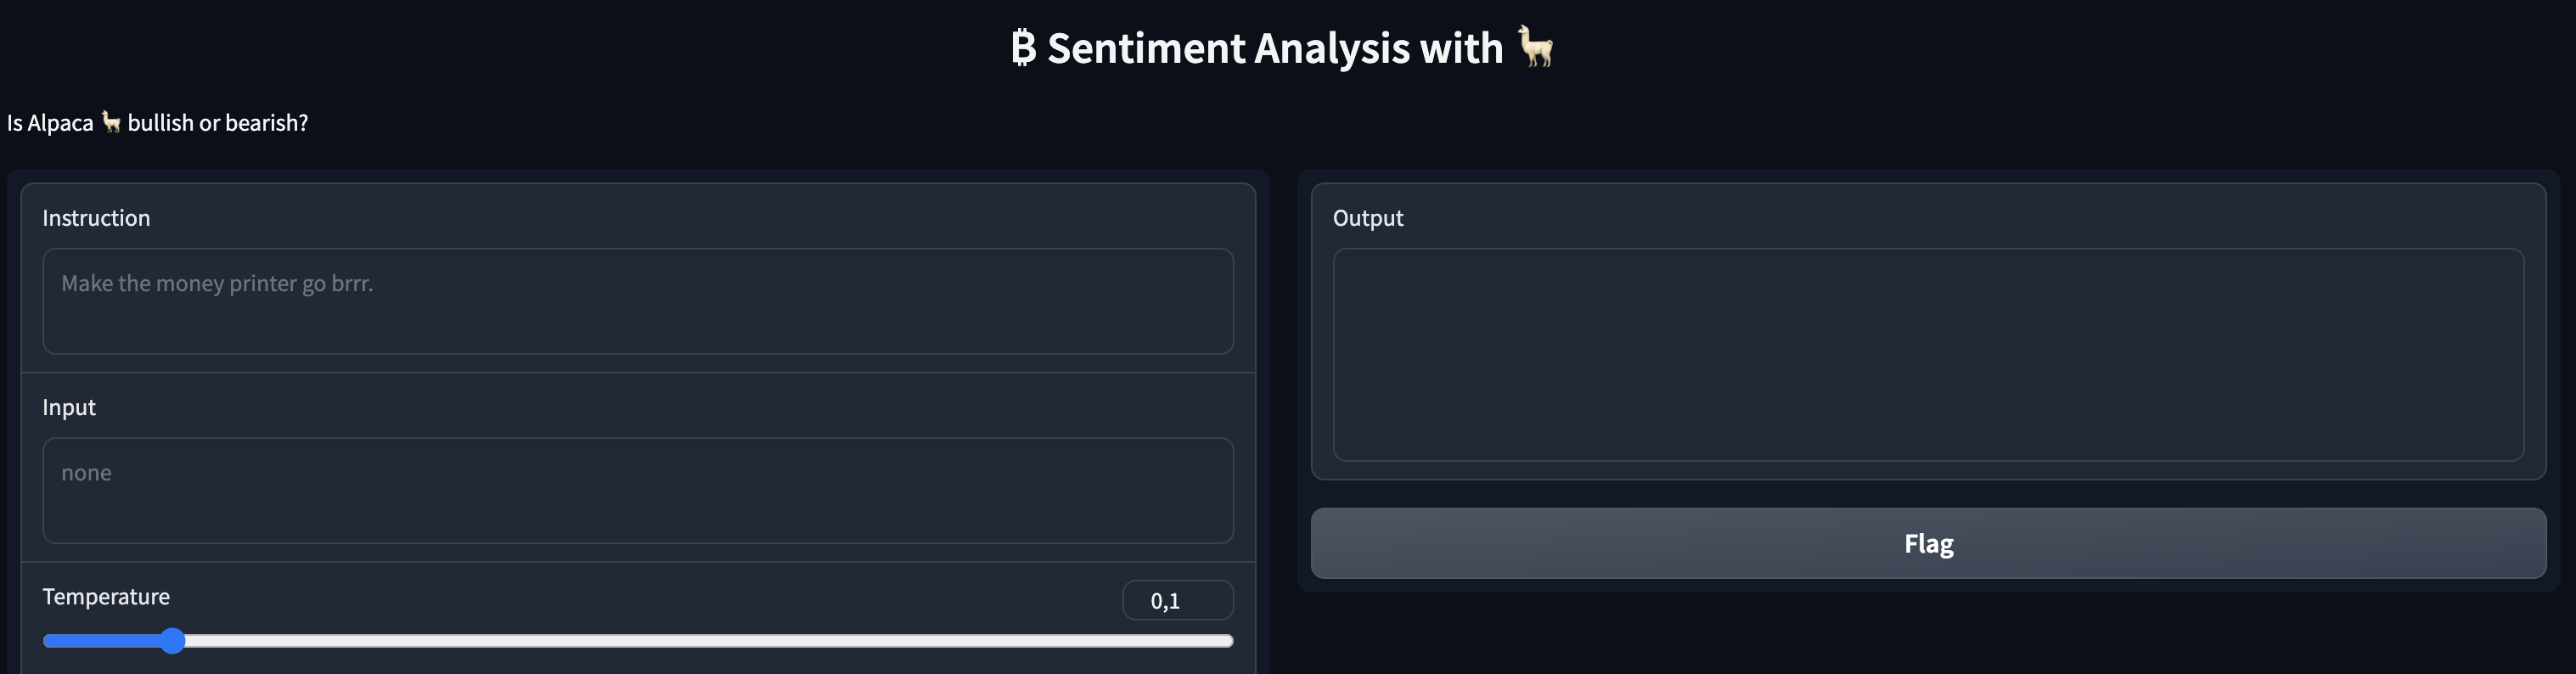
讓我們一起來測試模型吧!
總之,我們已經成功使用Alpaca LoRa方法對Llama模型進行了微調,使其能夠檢測比特幣推文中的情緒。在這個過程中,我們借助了Hugging Face的Transformers庫和datasets庫來加載并預處理數據,同時利用Transformers訓練器完成了模型的訓練。最后,我們將模型部署到了Hugging Face模型庫,并展示了如何在Gradio應用程序中使用它。
原文鏈接:https://www.mlexpert.io/blog/alpaca-fine-tuning